He who was seated on the throne said, “ Behold, I am *making all things new!”
Revelation 21:5
**Remember, O Lord, thy tender mercies and thy loving kindness; for they have been ever of old.
Psalm 25:6
I’m delighted to be offering this Guest Post on Adelina’s blog, as she is in the midst of moving this
week! I have moved MANY times and I know how stressful it can be – My offering for today will be a
potpourri of ‘do-over’ ideas for you – ;-}
I have learned through the years to ‘make Beauty from Ashes,’ so to speak, and I thought I’d share
just some of my many Repurposed Items and ‘creative storage’ ideas. Perhaps some of these may be
helpful to those of you who are on tight budgets or in tight spaces – as I know all too well… I have
been ‘repurposing’ items all my life – long before it became ‘fashionable’ to do so and I enjoy reusing
‘usable’ items, often making them more beautiful.
So – there are times when I just have to acknowledge my Dutch Heritage… Being very frugal,
resourceful and drinking coffee all day are a few things I do that come from my ‘Dutch genes.’
*smile* Therefore, I have many empty coffee cans for which I continue to find ‘good use’ –
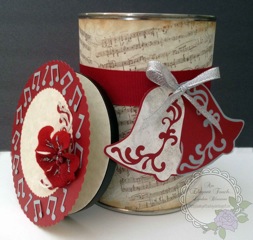
My first project today is a ‘repurposed’ coffee can – decorated with scraps – and turned into a Gift
Container for some yummy Christmas Cookies or candies.
To cover the can, I stamped ‘sheet music’ in brown on parchment paper, inking the edges and then
stamping snowy flourishes in silver in various places. (These don’t show up in the photos – sorry.) I
used the (www.PaperCraftingWorld.com) Bell .svg file – a scrap of red, one of ‘marbleized’ silver, two
of plain silver and a snippet of silver ribbon to make the ‘Silver Bells,’ which I adhered to the red
grosgrain ribbon wrapped around the can.
I made a Recipe Card/Gift Tag for the top with a Circle Card file (I don’t know from whence I got it…)
– topped it with a Scalloped Circle ‘wreath’ I made from the same file. I punched ‘notes’ from silver
scraps, placing them on the wreath. I used the flourishes that were cut from the Bells under a red
flower plucked from a red hydrangea stem, enhanced with a red, flower-gem center and silver
‘Scribbles’ paint.
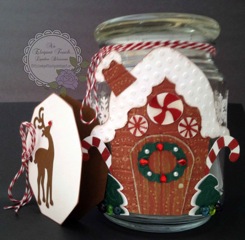
Another enjoyable passion of mine is ‘burning candles’ – for their relaxing scent, as I ‘burn mine at
both ends!’ Therefore, I have several of these empty glass jars at any given time…
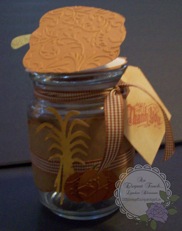
These harvest-themed .svg files are from
The pumpkins were cut with my Cricut/SCAL2
and then embossed on my Cuttlebug. The
pumpkin atop is for the recipe and a note –
These Christmas .svg files are from
After cutting the pieces with my
Cricut/SCAL2, I embossed them in my
Cuttlebug and then adhered them to the jar.
Both jars are ready for holiday Goodies!
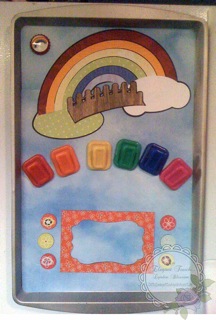
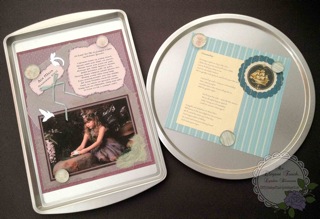
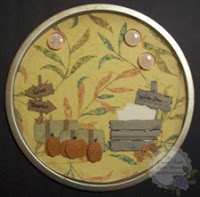
I’ve found many ways to reuse baking sheets – These are old ones that I spray painted, used
discontinued wallpaper for the backgrounds and then .svg files as decorative elements, further
decorated with gems, flowers (from the Dollar Store) and magnets for memos.
I also use some cookie sheets and pizza trays that I picked up at the Dollar Store while working on
scrapbooking pages or other projects. Arrange elements on them with magnets until you have the
whole page designed and decided upon. Then you can secure them to the pages with adhesives.
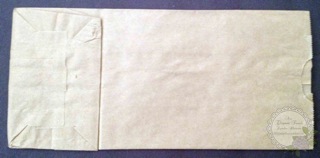
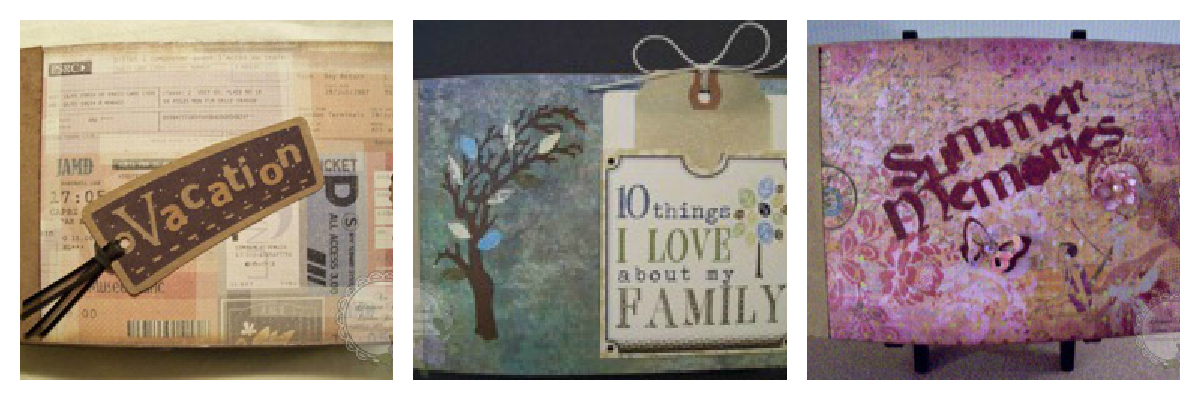
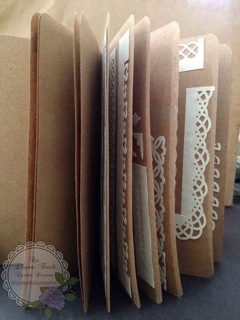
I have turned simple lunch sacks into
Mini-Albums to keep memories –
turning this – into these – They include
many pages for photos and pockets
for memorabilia –
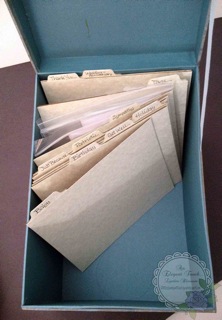
As far as organizing my crafty supplies, I’ve repurposed things for this, also. Here are just a few of
my ‘bright ideas.’
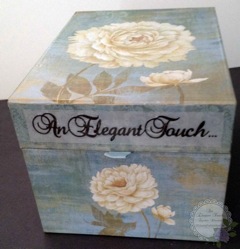
I got the box at Michaels, cut my
‘business/blog name’ on my Cricut
and adhered it to the front of the lid.
For the dividers, I cut pizza and cereal
boxes to fit, covered them with cream
parchment paper and punched tabs.
Some days it’s filled with cards I’ve
made, some days it’s not – Time to
make more!
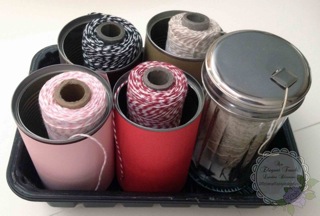
I covered empty soup cans with the
corresponding color to my Timeless Twine
spools. I put my baker’s twine in a Sugar Jar,
of the ‘restaurant style,’ that I picked up at
the Dollar Store.
I made a cutting board lap desk from a
postal box covered with Kraft paper.
It’s lightweight, portable and I’ve found
it to be quite handy for years.
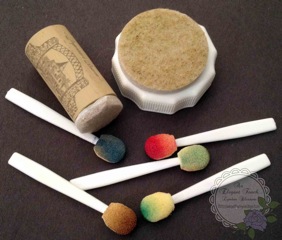
I saw a post recently about using knobs attached to wooden dowel pieces with Velcro added to hold pieces of felt to use for ink blending… I looked around and decided to attach the felted ‘furniture leg pads’ that I
had in a drawer to wine corks and lids that I’d been saving – FREE! I also use makeup sponges for blending
inks –
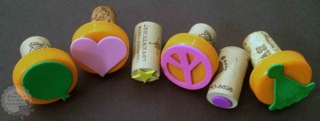
Another idea for corks and lids: glue them together and glue on the little foam shapes to make simple stamping fun – for you or for children!
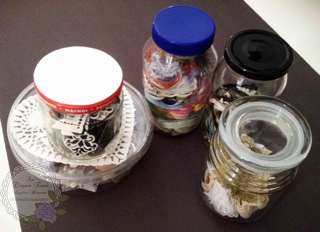
Jars and food containers can also be reused as ‘serviceable,’ too – I use many of them to hold laces, ribbons, chipboard shapes, buttons, pins, any decorative elements –
I use all manner of food containers for
various crafting implements – Here are
vegetable containers in which my felt
marking pens fit perfectly and stack
nicely on the ‘box shelf’ which is their
home –
I keep track of all of the Punches I have in a $1 Kraft-page journal book I got at Michaels – I punch on cream paper and adhere in this book for a quick reference as to what I have while ‘projecting.’
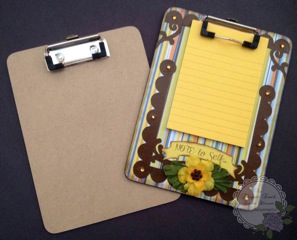
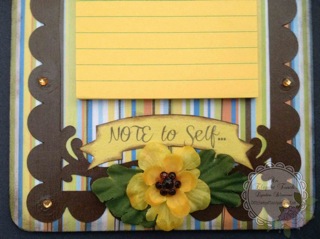
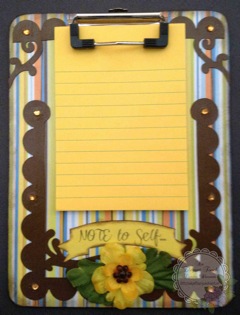
I will leave you with another ‘make-over-magic’ project I made this week – turning a lowly, plain Dollar
Store mini clipboard into a sunny gift for one of my Dear Friends…! The .svg file is from
www.PaperCraftingWorld.com I used Mod Podge to adhere all of the papers and gems and protect
and preserve it while in use – The mini-pads come in several colors and I look forward to making a
rainbow of these to have for quick gifts –
I hope that some of this has been helpful to you! I’d love to have you come by MY blog
(http://aneleganttouch-lynden.blogspot.com) and see what I ‘cook up’ each week – adding ‘An
Elegant Touch…’ to all that I do! If you have some great repurposing or organizational ideas, I’d love
to hear them, too – Have a Lovely Day wherever you are and Thank You from Adelina and me for
stopping by and sharing part of your day with us! *smile*
About the author
 I am a mature, educated, creative woman – a Mother of two grown children – a Gramama of two precious grandchildren – a proud Blue Star Mother of a Marine Captain – a daughter of the King of Kings – a woman looking for her place in the world in the winter of her life…sharing what I do and who I am – with You – adding ‘An Elegant Touch…’ to all that I do…
Lynden Blossom
~ ~ ~ ~ ~ ~ ~ ~ ~ ~ ~ ~ ~ ~ ~ ~ ~ ~ ~ ~ ~ ~ ~ ~ ~
Thank You Lynden for sharing these wonderful tips and tricks with us! Your papercrafting is a delight to see, and I hope I can use some of these ideas around my new home!