Tag: Recipe

  • Comfort Food with Peaches and Almond Cream

    Comfort Food with Peaches and Almond Cream

    This shop has been compensated by Collective Bias, Inc. and its advertiser. All opinions are mine alone. #WarmthInACrust #CollectiveBias
    Peaches and Almond Cream pair perfectly with Marie Callenders Pot Pies #WarmthInACrust #ad
     

    We had a nice 2 weeks of warmer weather, but this weekend saw us with snow again, and temps below zero. It was a neat phenomenon watching my hair frost over while shoveling snow this morning, but it also left me craving some home made comfort food. Of course when I think comfort food, I think Marie Callender’s pot pies.

    As much as I love baking from scratch, pot pies can be time consuming, and you all know how much I love going simple! We had been to Walmart the other day as a family, and let the kids all pick their own pot pie. I figured this way, no one could complain about dinner – sneaky sneaky. I may have also been sick of the immense whining heard this week over my choice of dinners.

    The kids definitely thought this was cool – and dinner was met with very little complaints, other than “Wait, I want to try hers!” So we passed plates and forks around the table until everyone was satisfied they really did pick their favorite pot pie. It might not be home made by me, but one of the things I love about Marie Callender’s pies is that the gravy is home made and it’s got a golden flaky crust. That kind of crust is important!

    To help remember who had what pie, I used the tip of a knife to carve everyone’s intitials into their pie. My kids love being able to claim ownership over things (as the penned names on the back of doors will prove…), so adding their initials was not only useful, but fun as well.


    While we were hanging out at Walmart, I noticed some peaches out. It’s not really peach season, and these peaches could tell – but since I was already thinking about comfort food, peaches and cream came to mind. Is there a better pairing of comfort foods then pot pie and peaches and cream? I don’t think so. While the taste like home made pies baked, I whipped up some Almond Cream to go with the peaches. 


    Peaches and Almond Cream

     
    Peaches and Almond Cream
    Write a review
    Print
    Ingredients
    1. 1 pint Heavy Whipping Cream
    2. 1 tsp almond extract
    3. 2 TBS confectioners sugar
    4. 1 vanilla bean
    5. 4-5 fresh peaches or 2 cans of sliced peaches
    Instructions
    1. Cut open the vanilla bean, and scrape out the seeds.
    2. Combine the seeds with the rest of the ingredients in a large bowl.
    3. Beat on high until stiff peaks form.
    4. Place peaches in individual serving bowls, and add a dollop of Almond Cream.
    Home Maid Simple https://www.homemaidsimple.com/
     
    *The vanilla bean is more for look than flavor. It gives a nice speckled look to the cream.
     
     
    Marie Callender’s Pot Pies know comfort food. That’s why they’ve started the Comforts From Home program. For every code submitted, Marie Callender’s will make a donation to USO2GO, a group that provides electronics, sports games, books, and more to our troops in remote locations. 
     
    Get more recipes at Pot Pie Please
    Stay up to date with Marie Callender’s on Facebook
     
    What’s your comfort food of choice?
  • Pepper Jack Chicken Sandwich

    Pepper Jack Chicken Sandwich

     
    Pepper Jack Chciken Sandwich is a sponsored post by Tyson and The Daily Meal. Opinion and recipe are 100% my own.
    Oh em YUM! So lately our lunches have been…interesting…. When it’s just me and the 2 little at home, I have a hard time really making a good balanced meal. At least for me, don’t worry I feed the kids! I just get a little bored of pb&j, mac and cheese, and ramen. Usually I’ll go for leftovers, but lately we haven’t had too many of those either. 
     
    With a renewed focus on taking care of myself this year, part of that needs to be a good lunch. I whipped this Pepperjack Chicken Sandwich up today, and seriously, you are going to love it! It’s not only full of flavor, but it’s extremely quick and simple to make as well. 
      Pepper Jack Chicken Sandwich
    Pepper Jack Chicken Sandwich
    A little bit of Spice and a whole lot of Yum can be found in this Pepper Jack Chicken Sandwich
    Write a review
    Print
    Ingredients
    1. Tyson’s Crispy Chicken Strips
    2. hoagie rolls
    3. The Laughing Cow Creamy Spicy Pepper Jack
    4. Sliced Mozzarella
    5. Sliced Tomatoes
    6. salt and pepper
    7. Shredded lettuce
    Instructions
    1. Spread the pepper jack across both sides of the hoagie bun. Place spread side down in a frying pan on medium-low heat.
    2. Meanwhile place a chicken strip in the microwave for 1 1/2 minutes.
    3. Carefully remove the hoagie from the frying pan – it may stick a little. Use a spatula to pull it up.
    4. Place chicken strip on bottom half of hoagie, and top with mozzarella. Briefly broil in the oven until the cheese begins to melt.
    5. Add sliced tomatoes, salt, pepper, and shredded lettuce. Enjoy lunch
    Home Maid Simple https://www.homemaidsimple.com/

      Pepper Jack Chicken Sandwich

    Pepper Jack Chicken Sandwich

     
  • The Best 7-Layer Bean Dip

    The Best 7-Layer Bean Dip

    This post is sponsored by LTD Commodities. All opinions are 100% my own. 

    I have a confession to make – I’m a closet football fan. I don’t go out of my way to watch any games, or really pay attention to who’s being drafter where – and I don’t care if you drop by during a game. BUT I get a tad excited for game day. I like seeing other people excited, and sharing good food with them. Even more, I love going to live games, or actually getting out and playing a game or two myself (though it’s been many years since I’ve done that).

    My heart will probably always belong to the New England teams, even though I have now lived the majority of my life in the west. I will always root for the Patriots, and the Red Sox. They’re my teams. While I was prepping for this post I began to browse LTD Commodities, and found the perfect game day entertaining pieces – condiment jars, football platter and dishes, even a Patriot’s branded bowl!

    I like to keep things simple, so even Game Day doesn’t get too crazy. Just some home made hot dog buns, paper plates, chips, and of course 7 layer Bean Dip! This stuff is my favorite to share at parties! It’s quick, easy and the perfect chip dip!

    7 Layer Bean Dip

    Ingredients *amounts are all based on individual preference
    1 can Refried Beans
    Shredded Cheedar
    Salsa
    Sour Cream
    Lettuce, shredded
    Tomatoes, chopped
    Tortilla chips
    Directions
    In a 9×9 pan spread the refried beans (double if you use a larger pan). Top with shredded cheese. Microwave for 1 minute. Let rest for 1 minute. Microwave for another minute. 
    Top with a layer of salsa, sour cream, lettuce and tomatoes. Serve with the seventh layer – Tortilla chips!
    This dip can be served warm, or cooled – making it the perfect game day treat. Whether you’re watching from home, or headed out tailgating. 

    Get more game day party ideas


    Ready to do your own entertaining? LTD Commodities is giving one lucky reader a $50 gift certificate. 
    Enter on the Rafflecopter form
    All entries will be verified. 

    a Rafflecopter giveaway

  • Cauliflower Au Gratin from The Greek Yogurt Alfredo Sauce Cookbook

    Cauliflower Au Gratin from The Greek Yogurt Alfredo Sauce Cookbook

    Cauliflower Au Gratin with Greek Yogurt Alfredo Sauce

    Getting to know other bloggers is so much fun! It’s even more fun when they write a cookbook and ask you to review it. Krista from Far From Normal did just that. When her recipe for Greek Yogurt Alfredo Sauce went viral, she saw an opportunity to share many more recipes that use this sauce in an easy access format – The Greek Yogurt Alfredo Sauce Cookbook.

    The book includes variations of the sauce, pastas, pizzas, snacks, soups and sides. I had a hard time figuring out just where I wanted to start with this one. It all sounded good, and I knew the family would love some pizza, but I decided to head to the sides section.

    I went with the Cauliflower Au Gratin, because it reminded me of how I ate Cauliflower growing up. A nice bit of melty cheese sauce and steamed cauliflower and broccoli. Perfect and filling side! Replacing my cheese sauce with Krista’s alfredo sauce lightens the side, while still keeping a beautiful flavor I can’t resist.

    When I first read over the recipe for the sauce, I was a little skeptical. I don’t do a ton with Greek Yogurt, because none of my kids really like it. I think it’s just too thick and they’re too use to the sweet yogurts. However, the sauce is not overwhelming on the yogurt, and the added parmesan really kicks up the flavor.

    For dinner we served the Cauliflower Au Gratin as a side with Chicken Enchiladas. The combination was amazing! It was 2 thumbs up from Mark, followed up with a “why didn’t you make more?”

    Cauliflower Au Gratin with Greek yogurt Alfredo Sauce. The perfect light side with chicken enchiladas.
    I think we’ll try the Creamy Spinach Soup next! 

    Follow Krista and Far From Normal
    Facebook  *  Twitter  *  Pinterest

    Win a copy of the cookbook!

    a Rafflecopter giveaway

  • Fancy Pudding Cups for New Years Eve

    Fancy Pudding Cups for New Years Eve

    Pudding cups make for a fancy but simple treat for any party. Use whatever you have on hand to make a flavorful treat your family will love. 
     
     
    While I was menu planning last week (oh yeah! I actually planned a menu!), I came across a recipe for these Strawberry-Orange phyllo cups. They were filled with oranges and strawberries, and a yogurt dressing. Although it sounded and looked nice, I went with what I already had on hand – pudding and frozen berries!
     
    Since New Years Eve is upon us, I thought it would be fun to dress them up a bit with some piped almond bark. The kids and I loved them, and there was a little something for each of them – almond bark for one, pudding for another, and berries for the third. I of course enjoyed the whole thing. 
     
    Fancy Pudding Cups make a New Years Eve party treat east and delicious  
    Fancy Pudding Cups
    phyllo dough cooked in muffin tins make for the perfect pudding cup.
    Write a review
    Print
    Ingredients
    1. Phyllo Dough
    2. cooking spray
    3. pudding
    4. Pomegranate arils
    5. blueberries
    6. almond bark
    Instructions
    1. Preheat oven to 350 F
    2. Thaw phyllo dough according to directions on package. Place 2 phyllo dough sheets on top of each other. cut in half lengthwise and width wise, creating 4 rectangles. Coat the top with cooking spray.
    3. Gently press one stack of phyllo dough into pan. I used a mini cheesecake pan, but a muffin tin, or custard cups would also work. Gently press a 2nd stack of the dough across the first stack. Repeat steps 1-3 for each cup you want to make.
    4. Bake for 10 minutes. Remove from oven and let cool on a wire rack. Very gently remove the phyllo cups from pan.
    5. Spoon pudding into the cups, top with berries and almond bark designs.
    For the Almond Bark decor
    1. Melt your almond bark for 30seconds in the microwave. Stir and repeat, until bark is melted and smooth.
    2. Pour into a piping bag, fitted with smallest tip you have – I used a Wilton 4 tip. Be careful because the bark is hot, and will also easily pour out the tip.
    3. Carefully pipe designs onto a sheet of wax paper. As I found out, most will end up cracking if you don’t use the wax paper, and it’s just easier to get them off wax.
    Adapted from Taste of Home
    Adapted from Taste of Home
    Home Maid Simple https://www.homemaidsimple.com/
     

    Happy New Year!

    May you all have a blessed new year. Enjoy family, friends, and good food this year. 


  • DIY Gingerbread Planes Hangar

    DIY Gingerbread Planes Hangar

    This shop has been compensated by Collective Bias, Inc. and its advertiser. All opinions are mine alone. #PlanesToTheRescue #CollectiveBias
     
     
    Have you made a gingerbread house yet? Why not mix it up and build a Planes Hangar instead! Are your kids home for the Christmas break? Are they driving you nuts? Yeah mine too. Don’t get me wrong, we’re having lots of fun, but without the regular routine, I’ve heard probably a million times in the last 2 days – 
     
    • I’m bored! 
    • We have nothing to do. 
    • You won’t let us do anything!
    Well, we had to remedy that asap! Really though children, you have a room full of toys and dress ups, I’m sure you can find something to do – am I right?! Earlier last week, I was walking the aisles of Walmart since it’s too cold to go outside, and I found the Planes Fire and Rescue toys on Rollback! Woot Woot! I know the kids are going to get new toys on Christmas, but that’s not until Thursday and we needed something to break up the monotony of days spent indoors. 
     
     
    My lightbulb dinged, so I grabbed a couple of the Planes:Fire and Rescue Character Assortment die cast set ($4.97 each!). I thought how fun would it be to make our own hangar – it’s like a doll house but for planes!I get home and I’m pulling out the cardboard to make this cool vision in my head, when in walks Mark and says something like “Why don’t you make it out of gingerbread?”.
     
     
    I knew I married this guy for a reason. So I put my cardboard away and started making the gingerbread – which soon became apparent I was terrible at! Seriously, ya’ll my ideas were failing left and right, and my beautiful vision was dimming. That’s when Mark stepped in and I stepped back with the camera, and the vision in my head became a reality plus some!
    We didn’t want the kids to know what we were doing, so we sent them to the other room and turned on the Disney Planes Movie. 


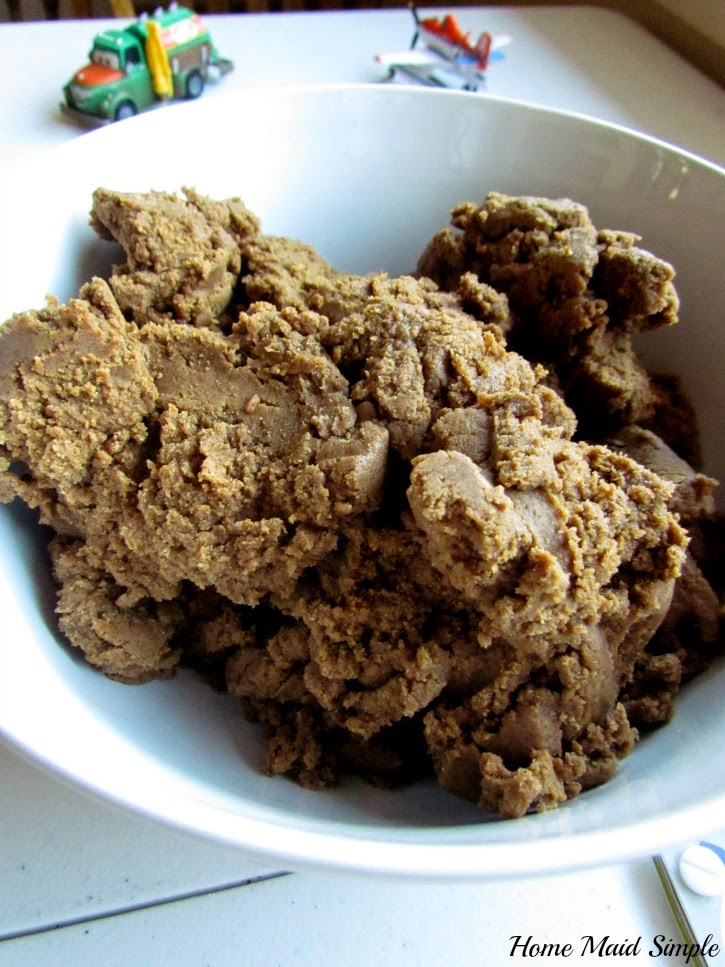
    First you’ll want to make some gingerbread. We doubled 
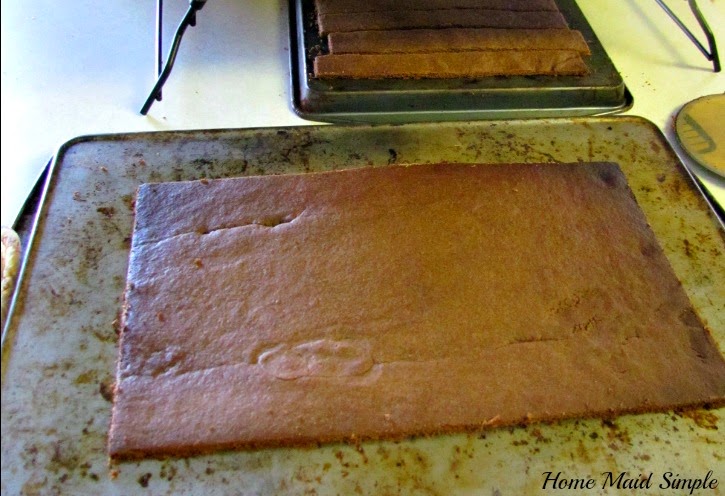
this recipe from Food Network. Follow the recipe up until rolling it out. Before you roll the dough, split it into three portions. Roll out on the back of 3 cookie sheets, or if you have a cookie sheet without a lip use it like normal. Bake according to directions. When it comes out of the oven, you’ll want to start cutting your shapes while it’s still hot! Otherwise it will harden and be impossible to cut. 
     
     
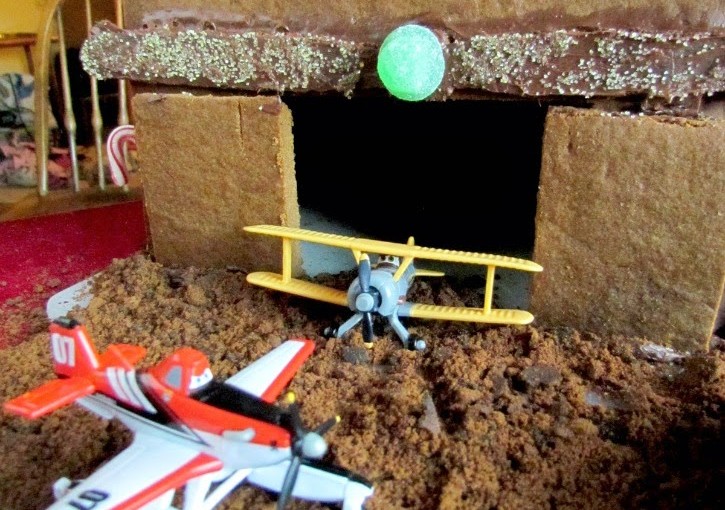
    Sheet 1 you will cut it in half width ways. Then round the tops. Measure the sides to make sure they are an even length all around. On one side cut out the doorway for your planes. Cut the cut out in half to attach as doors to the opening.
     

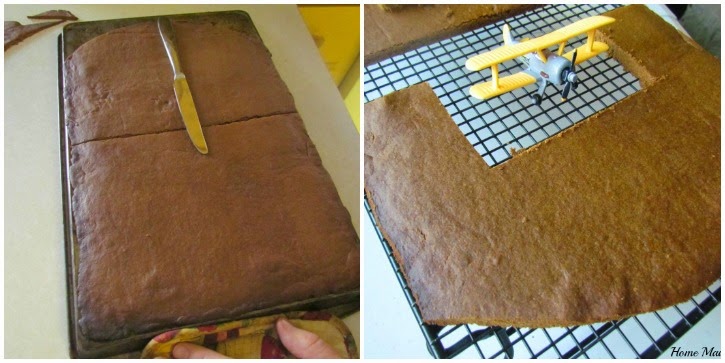
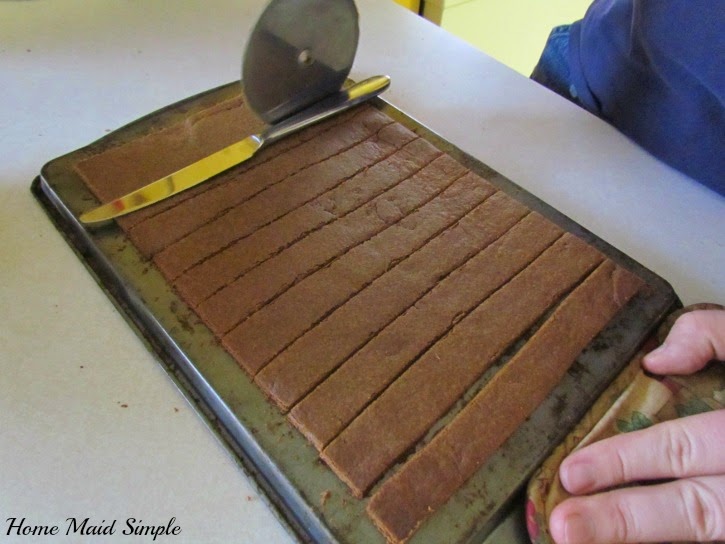
    Sheet 2 you will just cut in half, and trim the edges to be the same height as your front and back pieces. These will be your side walls.
     
     
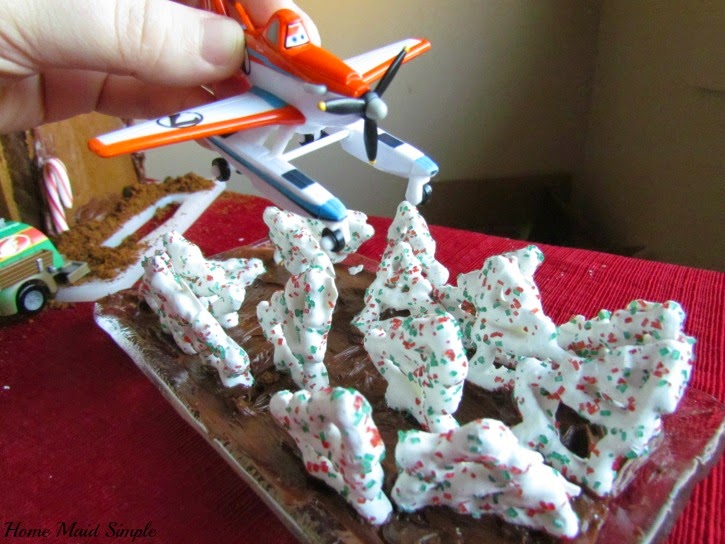
    Sheet 3 is your roof tiles. Trim the edges, then cut in strips width ways. Let all the pieces dry sufficiently, about an hour or 2. Save all the trimmings, and crush finely for ground covering to complete the scene. 
     
     
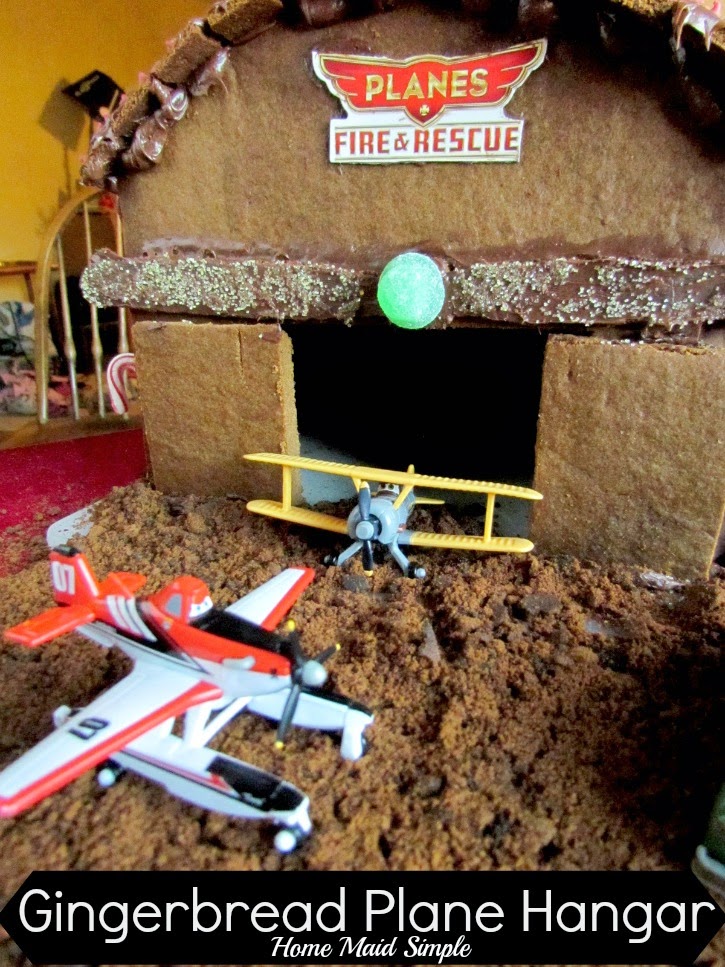
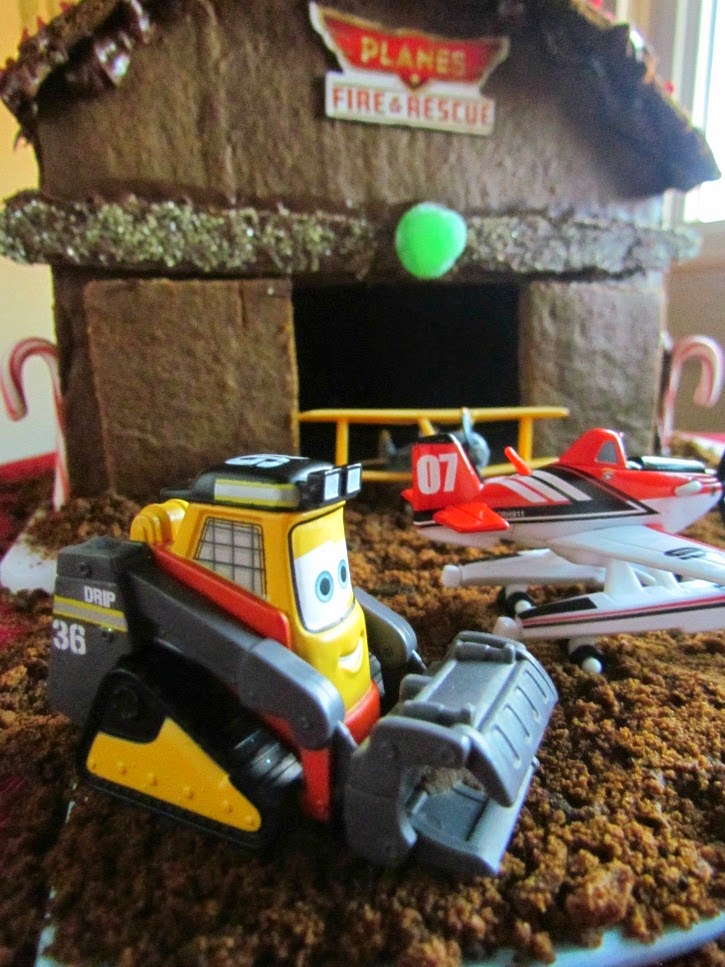
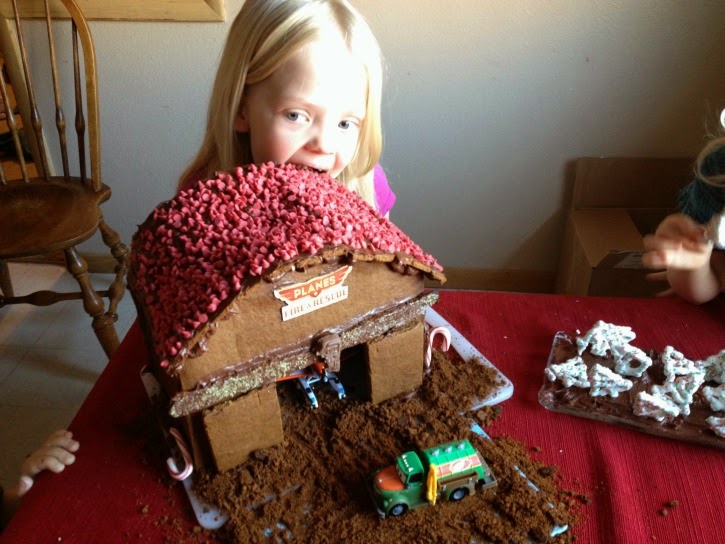
    While Mark was busy with the gingerbread making and assembly I cut out the Planes: Fire and Rescue logo from the packaging. It made quite the nice little touch to our finished hangar. 


    Once the pieces are sufficiently cooled, it’s time to start assembling. We’re big chocolate lovers, so we decided to go with some good old chocolate frosting for glue. Any type of frosting will work, though royal icing will stick the best, we just used a creamy frosting. Watch this quick slide show of the assembly process.


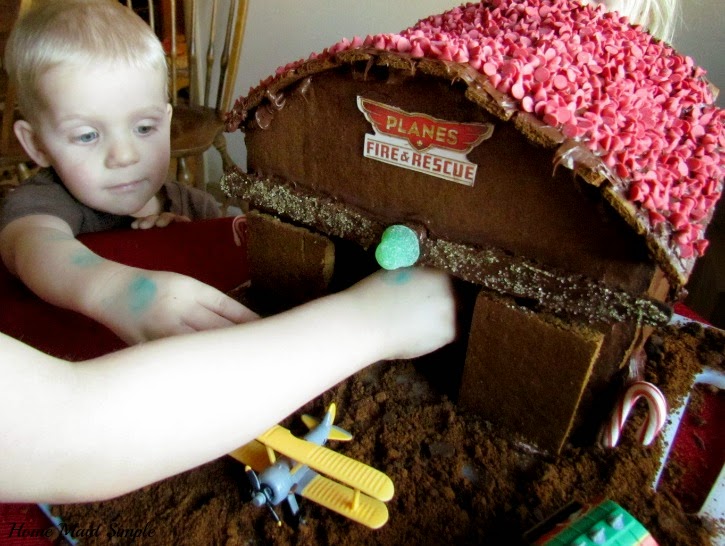
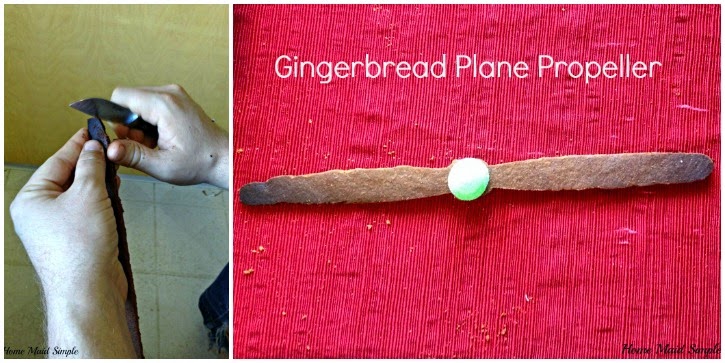
    The final touch before presenting this to the kids was the gumdrop propeller. Mark saved one edge from the sheets of gingerbread and carved it into a propeller. We added some frosting, sprinkles, and a gumdrop nose.

     
    Finally it was done. My vision of awesome was complete! So although I am most definitely NOT an engineer, Mark saved the day and made the kids some of the happiest ones around. 


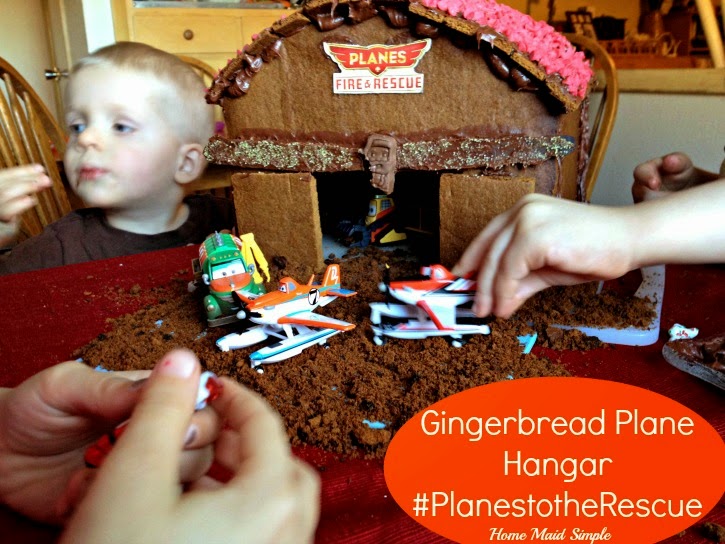
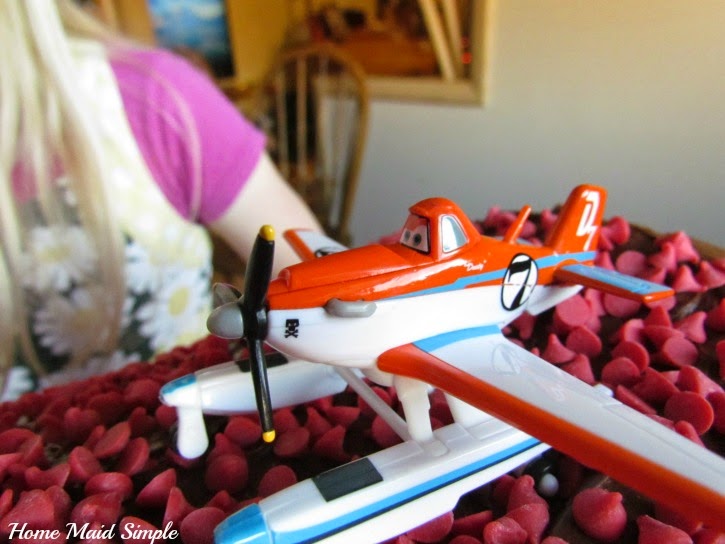
    Presenting the kids with their Gingerbread Plane Hangar with the new Disney Planes toys was a blast, and the exact kind of break we needed. They had fun flying Dusty over the chocolate pretzel forest, landing him on the roof, and attempting to eat the roof.


    Need a last minute Christmas gift? Also on Rollback at Walmart are: 
     
    • Disney Planes Flight to the Finish Speedway
    • Disney Planes Fire & Rescue Die-Cast Vehicles, 3-Pack
    • Disney Planes Fire & Rescue Deluxe Talking Vehicle Assortment
    • Disney Planes Character Assortment die-cast set
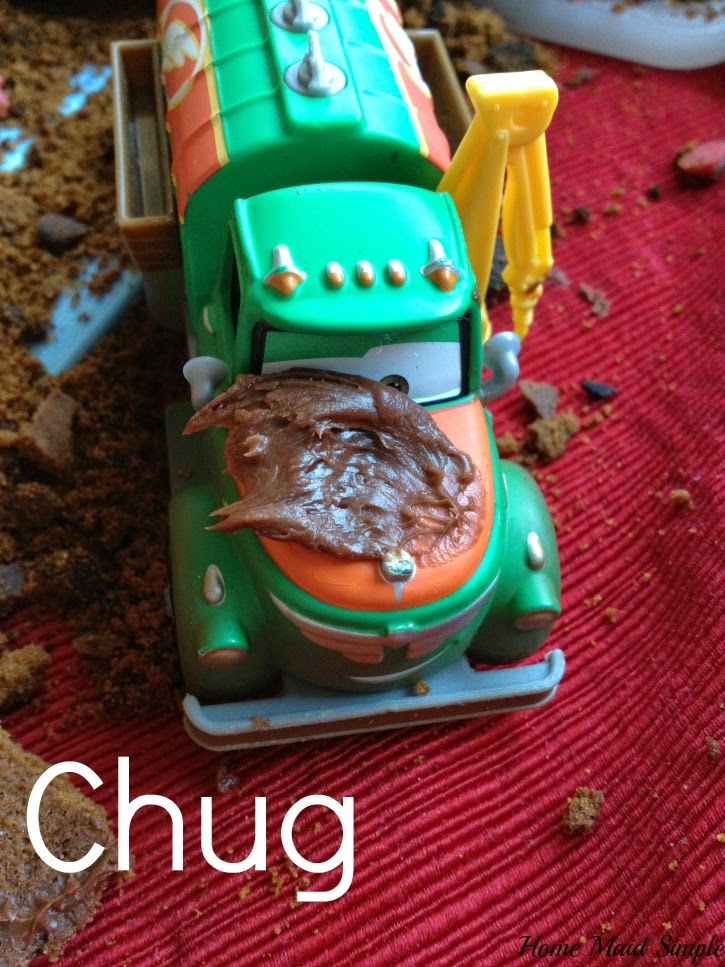
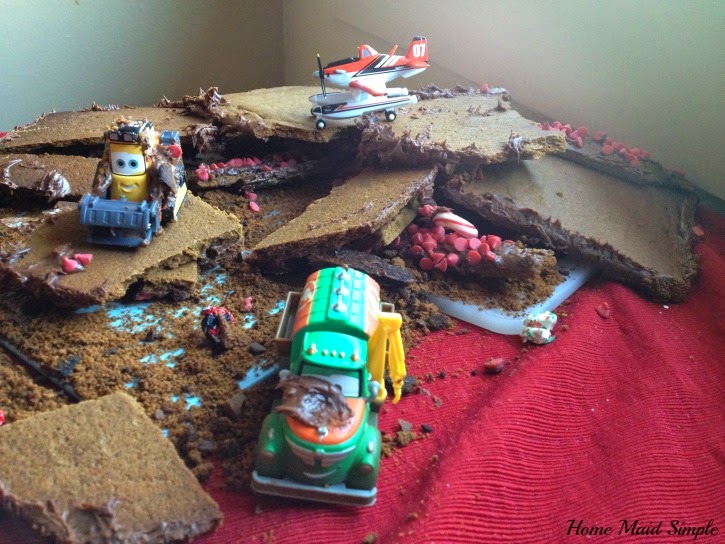
    By the end of the day our Plane Hangar didn’t look too much like a hangar anymore. The gumdrop propeller had been replaced with a half eaten Santa, and the roof “caught fire” and collapsed on the poor characters. It’s all good though, because the Disney Planes are all pretty tough!


    If you’re looking for some last minute fun before Christmas, and haven’t made gingerbread houses yet, I suggest you mix it up and try the Gingerbread Hangar instead.

    What will you be doing to entertain kids this week? Share with me your holiday plans!
     
     
  • Hot Artichoke Dip

    Hot Artichoke Dip

     This shop has been compensated by Collective Bias, Inc. and its advertiser. All opinions are mine alone. #MustHaveMayo & #CollectiveBias
     
     
    Are you looking for a last little something to serve this week? I found this 4 ingredient Hot Artichoke Dip using KRAFT Real Mayo Mayonnaise this week, and was so excited! I love artichoke dip, and was quite disappointed when my favorite restaurant took it off their menu. Boo! Recipes I’ve tried in the past are pretty good, but tend to be really complicated. 
    I did NOT need complicated this week. Sure we’re not going anywhere, and we don’t have company visiting, but since I go to school online, and then add in all the holiday hustle and bustle, and the kids being home from school – I don’t have the time for complicated dishes. Thankfully I didn’t have to compromise on taste, because this Hot Artichoke Dip is divine. 


    Hot Artichoke Dip

    Recipe from KRAFT

    Ingredients:
    1 can (14oz) Artichoke hearts, drained and chopped
    1 cup KRAFT Real Mayo Mayonnaise
    1 cup KRAFT Grated Parmesan Cheese
    1 clove garlic, minced
     
    Directions:
    Heat oven to 350 F. 
    Mix ingredients until well blended. 
    Spread into the bottom of a pie dish. 
    Bake 20-25 minutes or until lightly browned. 


    So simple right?! I thought it would be nice to have individual servings as well, so I put some of the mix into my flan dishes and cooked for approximately the same time – just keep an eye on them so you don’t overcook. 
     
    While I was editing these photos, and asking Mark his opinion on some, he turns to me and goes – Is that Mayonnaise? He had already been impressed with the flavors of this dish, but even more so when he realized just how easy and simple the ingredients were. 


    If you’re entertaining a small group, the individual servings add just that extra touch to make your guests feel special. Really, who wouldn’t want a serving pre-made just for them? If your gathering is a bit larger, or even just your family and you want to save on dishes, keep the dip in the pie pan. Either way, it’s going to be a crowd pleaser. My 4-year-old absolutely loved this, and she’s normally wary of trying new foods. 
     
     
    Don’t forget things to serve with this dip! We love it in crusty bread, or with pita chips. You could also try it with veggies and crackers! Make it an appetizer, side dish, or even snack. My family hosts an hors d’oeuvres contest every year, and although I didn’t get to join in this year, next time I’m pretty sure I’ll be entering this recipe. 
     
     
    I found all my ingredients for this recipe at Walmart in the Mayonnaise aisle – nestled in with the other salad dressings and dips. I turned around, and there were the artichoke hearts. A quick step over and I found our grated parmesan. All that was left was garlic over in the produce (or my cupboard, because hello, garlic is a staple!)
     
     
    If you need more inspiration, check out the Cooking Up Good website. It has recipes, sweepstakes, loyalty programs, coupons and more! What will you whip up for the holidays? Let me know in the comments!
     
    Love this recipe? Try our Baked Spinach and Artichoke Dip as well!
     
    Baked Spinach and Artichoke Dip for your Super Bowl party!  
     
  • Relax and save this Holiday Season

    Relax and save this Holiday Season

    This post is part of
    the HEALTHY ESSENTIALS
    ®
    2014 program by Johnson & Johnson Consumer Companies, Inc. and
    The Motherhood, who sent me a box of products and compensated me for
    my time. Opinions, experiences and photos shared here are all my own,
    and I hope you enjoy them.

    Third party trademarks
    used herein are trademarks of their respective owners.


    The holidays are upon us, and that usually means lots of shopping, baking, cooking, wrapping, running around, and last minute everything! That of course usually comes with a ton of stress as well, and sometimes indulging in way more sugar then we otherwise would.
    I’ve got you covered though with the help of Johnson & Johnson’s Healthy Essentials, I can indulge (and so can you!) during this busy time of year, but with a whole lot less guilt.  Did you know Splenda® makes a brown sugar blend? Neither did I until now. I’m so glad I found it though. It has made the immense amount of cookies I’ve baked and eaten a little less guilty. I decided to try out some homemade caramels this week, and they turned out wonderful!


    Seriously, I love caramels. I’ve never made them at home before, because well, that’s a lot of sugar that I would end up eating. I may have been a bit too excited about the Splenda Brown Sugar…but it just totally made me smile.  Are you ready to indulge in half the calories this season? 

    Homemade Caramels

    Ingredients
    1/4 cup + 2 TBS Splenda Brown Sugar
    1/3 cup salted butter
    1/3 cup Corn Syrup
    1/3 can Sweetened Condensed Milk
    Directions
    Combine all the ingredients in a pan. Cook over medium heat, while constantly stirring. When it starts to boil, cook for another 2-5 minutes. Or drop a little into a bowl of ice water. It if forms a good ball, you’re ready. Remove the caramel from the heat. Pour into a buttered 9×9 pan. Allow to cool completely. Cut, and wrap in either wax paper or plastic wrap. 

    Now that I have a plate full of caramels (and I may have made a second batch and just poured it into a jar for ice cream topping…), I can sit back and relax tonight. With other products like Neutrogena’s long wear makeup, and Clean & Clear’s Night Relaxing face wash, I can truly relax this season. I may have a lot of running around to do still, and many more lines to stand in at the post office, but I don’t have to let those things stress me out.

    Find savings on your Healthy Essentials this holiday – up to $35 in printable coupons!

    How are you relaxing this holiday season?

  • My First Cooking Show: Ep 2 Sugar Cookies

    My First Cooking Show: Ep 2 Sugar Cookies

    My First Cooking Show. Come bake up some Sugar Cookies with your host Venice. #Kidsinthekitchen

    Back in November we found the awesome Northpole aisle at Walmart, and while picking up some other items there, I just had to get the Bake Like an Elf set for Venice. I debated saving it for Christmas, but thought it would be a lot more fun for her to bake with it before Christmas and share those goodies with all of you. 


    Enjoy!
  • Panipopo Samoan Coconut Rolls

    Panipopo Samoan Coconut Rolls

    When I saw we were visiting Samoa this month, I thought how perfect! It’s so cold here, somewhere with a bit more island flare was just what I needed. So it makes complete and total sense that I made rolls right?

    I was actually planning on a more fruity dessert, like this Fa’alifu Fa’i. My kids eat bananas like we’ll never have any again, so…I had to change plans. I needed some rolls, and the Panipopo seemed like such an easy and tasty twist to traditional rolls.

    I found a recipe at Samoa Food for Sweet Coconut Buns, but changed the coconut topping a tad. Basically, all you need is your favorite dinner roll recipe, and some coconut milk or juice. The recipe at Samoa Food calls for coconut milk, but I only had Coconut Juice in my pantry.

    After letting the rolls rise, pour the Coconut Juice over the top, then bake at 375 F for 30-35 minutes.