Category: Breads

  • Fresh Pumpkin Bread Recipe

    Fresh Pumpkin Bread Recipe

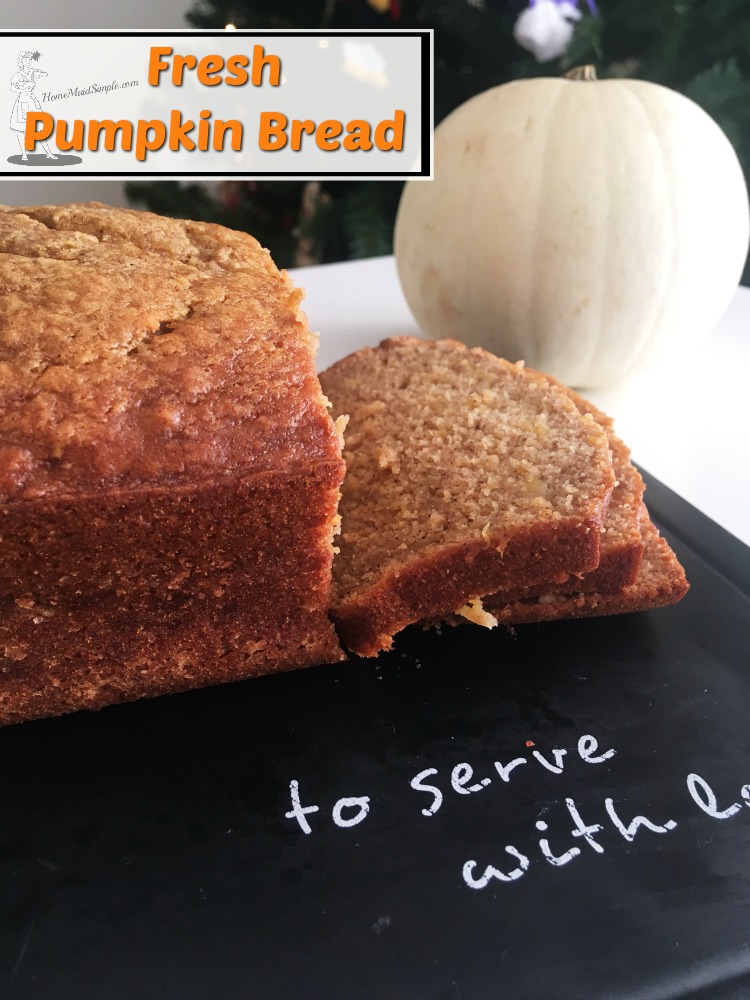
    Fresh pumpkin gives this pumpkin bread recipe all the amazing flavor a quick bread should have.

    This recipe for Fresh Pumpkin Bread is everything your pumpkin loving self has wanted.

    I’m not a big pumpkin lover like many are these days. Pumpkin pie, pumpkin cookies, pumpkin drinks  – I can easily pass them all up. 

    What I can’t pass up is the opportunity to keep food from going to waste. As it was, we happened to have 1 large pumpkin leftover from Halloween that never got carved. I couldn’t just throw it out! So I pureed it up, and stuck it in the fridge. 

    Pumpkin Bread Recipe

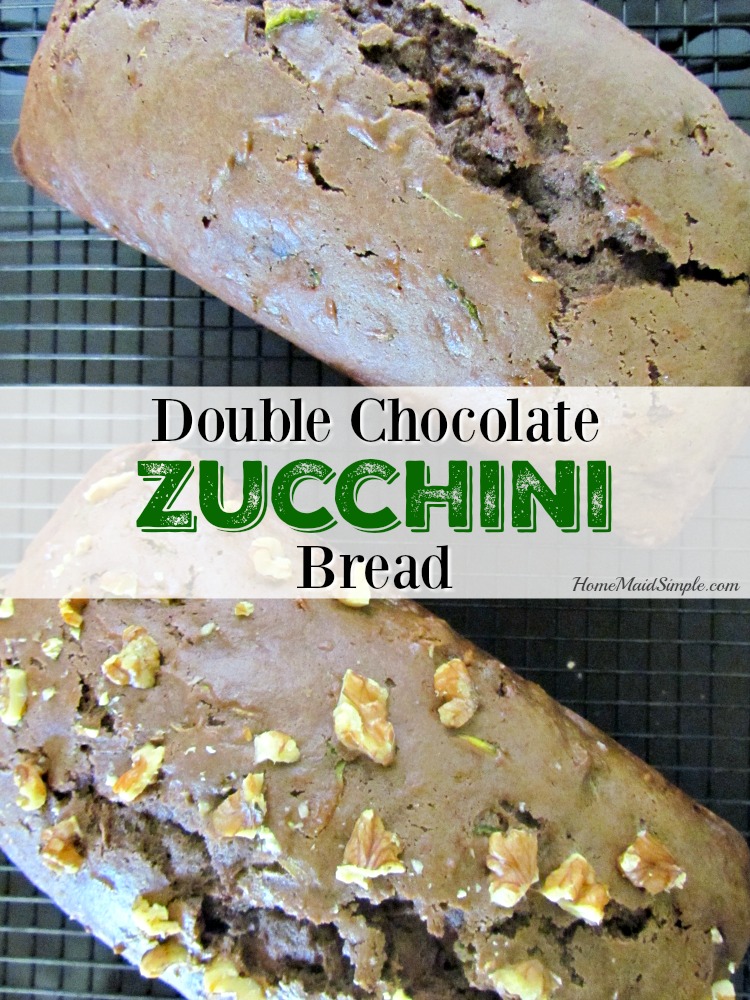
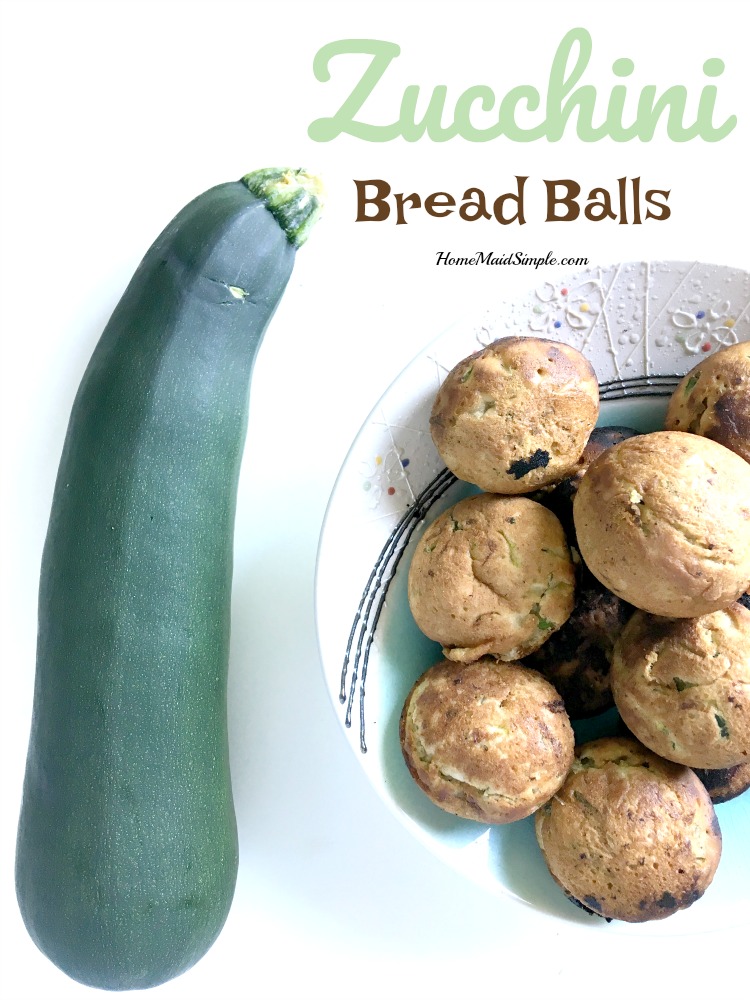
    I got to thinking, what in the world could I use this pumpkin for now? When of course, it dawned on me – quick bread! If you’ve been around, you know I love these quick sweet breads. From my Mom’s Banana Bread to my Double Chocolate Zucchini Bread and Zucchini Bread Balls, I  just can’t get enough of them.

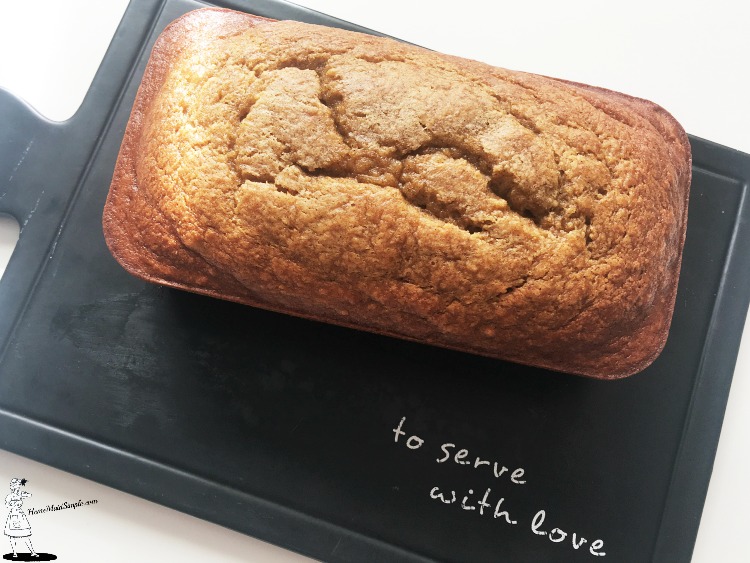
    The pumpkin bread did not disappoint. The kids gobbled up both loaves for after school snack, though they did leave some for Mark and I to enjoy as well. 

    I’ll be straight up honest, it definitely tastes like pumpkin. But in bread form, I really didn’t mind it. Who knows, maybe by next year I’ll be eating all things pumpkin with the rest of you – though probably not likely.

    Pumpkin Bread Recipe

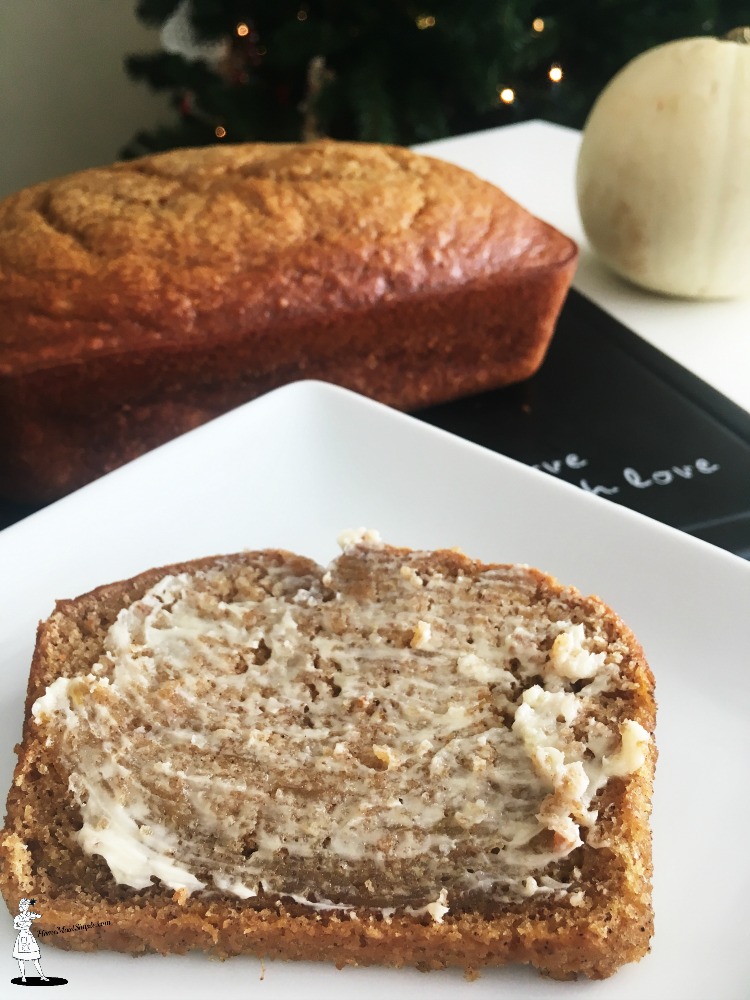
    I hope you enjoy this recipe for Pumpkin Bread as much as we have. 

    Print Recipe
    Pumpkin Bread Yum
    Delicious quick bread featuring fresh pumpkin
    Cook Time 50 minutes
    Servings
    loaves
    Ingredients
    Cook Time 50 minutes
    Servings
    loaves
    Ingredients
    Instructions
    1. Preheat oven to 325 F.
    2. Beat the eggs, 1 cup pumpkin, vanilla, and sugar.
    3. Sift flour before measuring. Then add salt, baking soda, and cinnamon.
    4. Mix the dry and wet ingredients.
    5. Add the rest of the pumpkin and mix well.
    6. Grease two loaf pans. Evenly divide the mixture between the two pans.
    7. Bake for 60 minutes, or until a knife inserted in the center comes out clean.
    Share this Recipe
  • Zucchini Bread Balls Recipe

    Zucchini Bread Balls Recipe

    Zucchini Bread Balls are as simple as whipping up your favorite recipe and using a special pan. 

    Zucchini Bread Balls recipe is bite sized portions of your favorite sweet bread.

    I often struggle with the creative side of my brain. I’m a very analytical thinker, and therefore out of the box ideas, and “playing pretend” has been quite the struggle for me. 

    This became apparent to my family when I was just 2 years old and refused to stir the fake cookie batter in our rendition of Little Red Riding Hood until there were actual ingredients in the bowl. Grandma couldn’t have cookies made from thin air. 

    I’m not saying I can’t be creative. I can, it’s just not as natural for me as it is for others. I like to follow recipes, only changing a few things here and there as I go along. I prefer instructions to build crafts, and my poor kiddos have no idea what I’m building when I play LEGO’s with them – truth be told, neither do I.

    So this past month, when our oven’s pilot light went out, I could have let the non-creative side cry and give in to stove top pasta every day for a month, or I could allow that glimmer of creation eek out a bit. 

    As it turns out, necessity breeds creativity.  Share on X

    Zucchini Bread Balls recipe is bite sized portions of your favorite sweet bread.

    Now I know, there are other dishes besides pasta I can cook on the stove top. Really we weren’t hurting for actual meals. The real let down came to our sweet tooth. The kids are home for the summer, and they want cookies! Our garden is growing, and I wanted Zucchini Bread! I have not found a solution to the cookie dilemma yet, but these stove-top Zucchini Bread Balls are the bomb! 

    I don’t know that I’ll ever make a loaf again since these don’t require slicing, and losing precious crumbs all over the counter. Plus they’re bite-size. Everything is better bite-size, right?

    The key to my creative genius this month was an Aebelskiver pan. Mark bought me one early in our marriage so I could make poffertjes – a Christmas morning staple from my childhood. 


    If the pan can make pancake balls, couldn’t it make other sweet bread balls? I had to try, and cross my fingers that it would be successful. It was, though I learned some valuable lessons in the process.

    Zucchini Bread Balls recipe is bite sized portions of your favorite sweet bread.

    When making Zucchini Bread Balls, heat your pan over high heat, but just before adding the batter, turn it down to low. The cast iron pan will retain the heat for a nice even ‘bake’. Left on high, and you’ll burn the outside of the balls, and have a very doughy center. On the same token, if you don’t heat the pan hot enough you’ll be waiting a long time for those balls to cook. 

    Zucchini Bread Balls
    Yields 28
    Zucchini Bread balls made on the stove-top makes adorably delicious bite sized treats.
    Write a review
    Print
    Prep Time
    5 min
    Cook Time
    10 min
    Total Time
    15 min
    Prep Time
    5 min
    Cook Time
    10 min
    Total Time
    15 min
    Ingredients
    1. 1 1/2 cups flour
    2. 1 tsp Roasted Saigon Cinnamon
    3. 1/2 tsp baking soda
    4. 1/4 tsp salt
    5. 1/4 tsp baking powder
    6. 1/4 tsp ground nutmeg
    7. 1 cup sugar
    8. 2 cups shredded Zucchini
    9. 1/4 cup vegetable oil
    10. 1 egg
    11. 1/4 tsp California lemon peel
    Instructions
    1. Combine flour, cinnamon, baking soda, salt, baking powder, and nutmeg. Set aside.
    2. Combine zucchini, sugar, oil, egg, and lemon peel.
    3. Add flour mixture to zucchini mixture, and stir just until combined.
    4. Heat Aebelskiver pan on high for 1 minute. Turn heat to low.
    5. Fill each hole half full with batter.
    6. When the bottom is browned, use a toothpick to turn the batter, and cook the other side.
    7. Remove from pan, and enjoy warm with butter.
    Home Maid Simple https://www.homemaidsimple.com/


  • Prepping for Thanksgiving is easy with Freezer Rolls

    Prepping for Thanksgiving is easy with Freezer Rolls

    Freezer Rolls were made possible by FreezerLabels. All opinions are my own. 

    Less than one week until Thanksgiving now! If there’s any way to prep for the holiday feast, I like to do it. As much as I love being in the kitchen, I love making it as simple as possible on the day of as well. We’d much rather be socializing and playing games while the turkey roasts than still putting together all the extras, right? That’s why I taught myself how to make Freezer Rolls. These are just like what you can buy at the store, but homemade! This post contains affiliate links and I will be compensated if you click through and make a purchase. 

    Start Thanksgiving Prep early with these freezer rolls.

    Not that I don’t like the ease of buying premade rolls, or even the frozen rolls occasionally, but I truly love making bread from scratch. It reminds me of my mom, and covering our table in flour as we all helped to knead, shape and bake the bread. I have been tasked with bringing a batch of rolls to Thanksgiving, so I went ahead and got those halfway done the other day. All that’s left will be letting them rise and bake

    Prepping for Thanksgiving is easy with Freezer Rolls and labels from FreezerLabels

    Freezer Rolls are made just like any other roll. Take any old roll recipe, and whip it up. I like my Herb Dinner Rolls the best, but it works with any recipe!

    Try one of these Roll Recipes

    Buttery Soft Rolls from Tastes of Lizzy T

    Sweet Potato Dinner Rolls from Bunny’s Warm Oven

    Freezer Friendly Homemade Dinner Rolls from Six Dollar Family

    Easy Yeast Rolls from Eating on a Dime

    Amish Potato Dinner Rolls from I Am Homesteader

    Once you choose your recipe, you’ll take the following steps. Mix your ingredients and give the dough a good kneading. TIP: If you want to keep the mess to a minimum, try kneading it on a large serving tray. The flour stays contained, and you won’t have dough stuck to your table. 

    Prepping for Thanksgiving is easy with Freezer Rolls and labels from FreezerLabels

    Cover and let the dough rise until double, just like you normally would. After the dough has risen, shape it into your rolls. At this point, you’ll want to put the rolls on parchment paper 
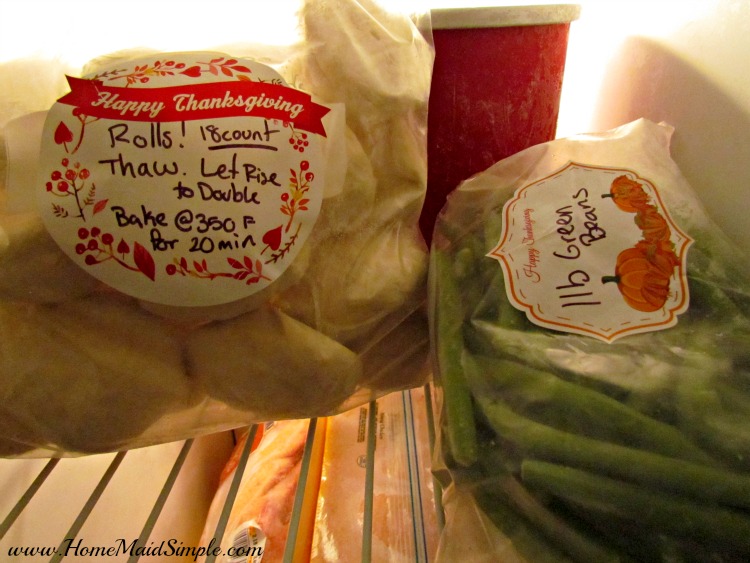
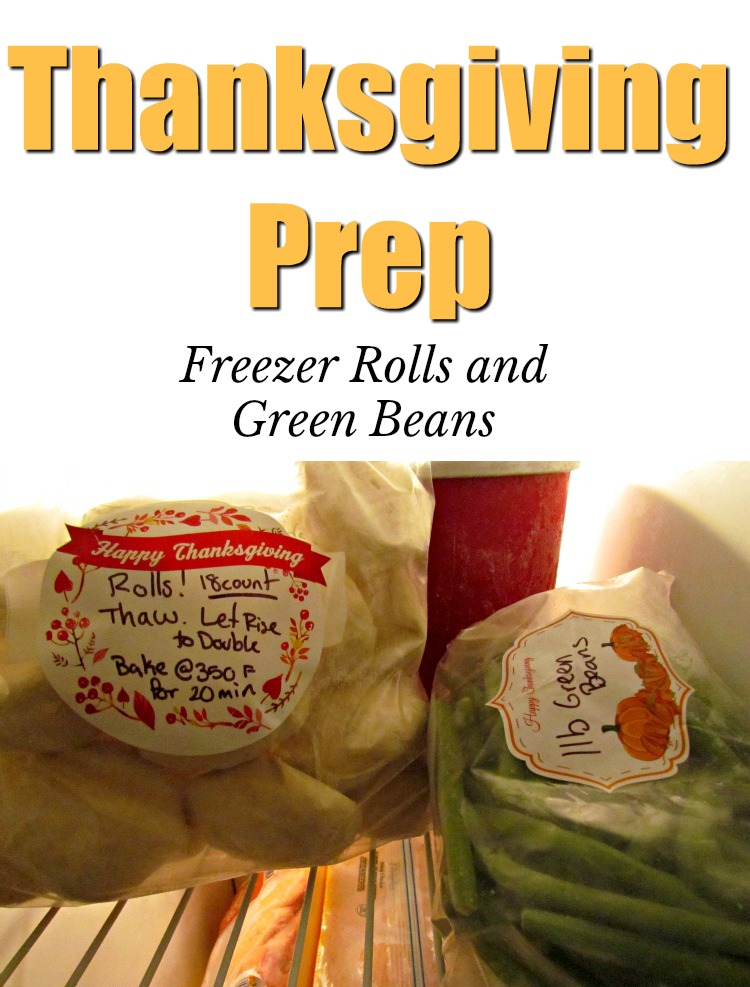
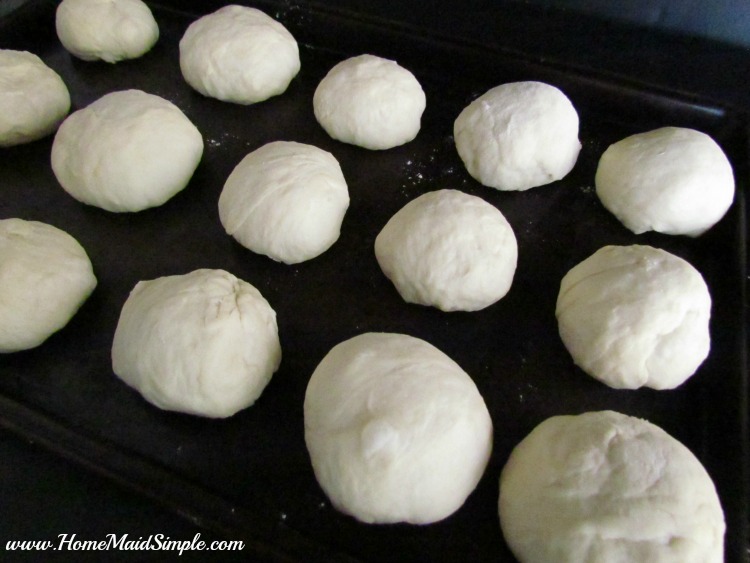
on a baking tray. Notice – I forgot the parchment paper when I took the photos. It really helps keep the dough from sticking to the pan when flash freezing.

    Prepping for Thanksgiving is easy with Freezer Rolls and labels from FreezerLabels

    Place your pan of rolls in the freezer. Leave them there for about an hour or two. The last step is to move them into a freezer bag, and label it. I got these fun Thanksgiving labels from FreezerLabels. They have a number of fun free printables, or you can have your own printed. I had mine printed from the company because I figured their labels will better adhere to my freezer bags then ones I print myself. Also, when it comes to printing things like labels, making sure they print correctly – not really my area of technical expertise.

    Freezer Rolls
    Make rolls days in advance, just freeze before letting them rise!
    Write a review
    Print
    Ingredients
    1. Favorite Roll Recipe – ( http://www.homemaidsimple.com/herb-dinner-rolls/ )
    2. parchment paper
    3. Freezer bags
    4. FreezerLabels
    Instructions
    1. Make rolls according to your directions.
    2. Place shaped rolls on parchment paper on a baking sheet.
    3. DO NOT let rise.
    4. Place in Freezer for an hour or two.
    5. Pack rolls in Freezer bags.
    6. Label with cook temp and time.
    7. Store in Freezer.
    8. When ready to cook, let thaw over night, and rise to double the size.
    9. Bake, and enjoy!
    Home Maid Simple https://www.homemaidsimple.com/

    While I was in the Thanksgiving prep mood, I also prepped the green beans for Mark’s required Green Bean Casserole. I was concerned they wouldn’t stay fresh a full week in my fridge, so in the freezer, with a label, they went. 

    Freezing Green Beans

    To freeze the green beans, flash freeze the green beans for 20 minutes on a baking tray. Just like the rolls, put them on a parchment first. After the flash freezing, dump them in a freezer bag and place back in your freezer.

     What’s your must-have Thanksgiving dish?


  • Mom’s Banana Bread

    Mom’s Banana Bread

    Spread a bit of butter on my Mom’s Banana Bread for a delicious mid-afternoon snack, or even breakfast!
     

    It is getting windy and cold here in North Dakota. Growing up in New Hampshire, I actually enjoy the cold. The wind is a whole different story, though! Brrr. I remember cold days walking in the snow and ice home from the bus stop, and entering the house to smell a freshly baked loaf of banana bread. It always chased the cold away.

    Now that we walk to and from school in some pretty bitter winds, I hope to create similar memories of warmth and comfort for my kids. So I pulled out my mom’s banana bread recipe again this week. This is one recipe I will never try to alter or improve on. It’s perfect the way it is. However, you can always add a little more yummy with chocolate chips, or as I did this week butterscotch chips.

    You can see in this Instagram pic just how well loved this recipe is. 

    Now if you’ve been around awhile, I have shared the recipe in the past, back near the beginning of our Foodie Friday parties – but I had no pictures! So here’s the update with pics so you can pin it to come back whenever you feel like baking a little comfort in your home.


    Mom’s Banana Bread
    Chase the cold away with a warm slice of banana bread
    Write a review
    Print
    Ingredients
    1. 1 cup shortening
    2. 2 cups sugar
    3. 4 eggs
    4. 5 ripe Bananas
    5. 3 1/2 cup flour
    6. not quite 2 tsp baking soda
    7. 1 tsp salt
    Instructions
    1. Preheat oven to 300 F
    2. Cream together shortening, sugar, eggs, and bananas,
    3. In a separate bowl combine the flour, baking soda, and salt.
    4. Add dry ingredients to the wet ingredients and mix well.
    5. Grease 2 loaf pans, and fill with dough.
    6. Bake for 75 minutes, or until a knife inserted comes out clean.
    Notes
    1. Don’t have enough bananas? Use 1 cup Applesauce in place of each missing banana.
    Home Maid Simple https://www.homemaidsimple.com/


  • Food of the World: Pan Dulce or Mexican Sweet Rolls

    Food of the World: Pan Dulce or Mexican Sweet Rolls

    A sweet taste of the south, these Pan Dulce sweet rolls will satisfy your cravings for Mexican food. This post contains affiliate links and I will be compensated if you click through and make a purchase. 
     
    We love Mexican Food around here. Tacos, burritos, chimis – they’re pretty regular fare for us. One year Mark even gave me Mexican Family Favorites Cook Book by Maria Teresa Bermudez for Christmas with a request I make something from it frequently. I’ve not been very good at actually using the book, so I decided to take this month’s theme to try something new. 
     
    Looking through the book I had a hard time deciding. I finally had it pinned down to trying Mexican Cheese Souffle and Pan Dulce. Unfortunately I can’t find Pimiento’s at any store around here! So the souffle was out. Pan Dulce looked perfect for a weekend snack with the kids. I have to admit though, after looking up some other Pan Dulce recipes online, I realized most have some colored top on them, while the recipe from this book does not. In fact, the recipe I used from my book tastes pretty similar to a regular sweet roll, just rolled up differently. I did make one minor change only because I didn’t have any ground anise, I’m sure the anise flavor would have given it that authentic flavor we seemed to be missing in ours. 
     
    Pan Dulce or Mexican Sweet Rolls
     
    Pan Dulce or Mexican Sweet Rolls
    Write a review
    Print
    For the dough
    1. 1 3/4 cup flour
    2. 1 1/8 tsp active dry yeast
    3. 1/4 tsp ground anise seed
    4. 1/8 tsp ground Cinnamon
    5. 1/2 cup Milk
    6. 2 TBS brown sugar
    7. 1 TBS sugar
    8. 2 TBS Shortening
    9. 1/2 tsp salt
    10. 1 TBS Corn Syrup
    11. 1 egg, beaten
    Filling
    1. 1/3 cup Flour
    2. 1/4 cup Brown Sugar
    3. 1 TBS sugar
    4. 1/8 cup butter
    5. 1 egg yolk
    6. 1/8 tsp vanilla
    7. dash of Cinnamon
    Instructions
    1. Combine 1 cup flour, yeast, anise and cinnamon in a mixing bowl.
    2. In a saucepan, heat milk.
    3. Add sugars and shortening to the milk. Continue stirring over medium heat until the shortening melts.
    4. Add salt and mix until sugars are dissolved completely.
    5. Combine the milk mixture with flour mixture, plus the 3/4 cups flour.
    6. Add corn syrup and egg. Mix well.
    7. Form dough into a ball. On a lightly floured surface knead dough (or use a stand mixer with dough hook), until smooth and elastic.
    8. Cover and let sit for 1 hour, 15 minutes.
    9. Turn the dough once during this time.
    10. In the meantime, cream the flour, sugars and butter for the filling.
    11. Add egg yolk, vanilla and cinnamon.
    12. When the dough is ready, knead lightly in hands, and separate into 8 balls.
    13. Preheat oven to 375 F.
    14. Flatten the balls out to 6 inch circles.
    15. Spread 1 TBS (approx.) of the filling over the dough circle.
    16. Roll up like a burrito
    Adapted from Mexican Family Favorites
    Home Maid Simple https://www.homemaidsimple.com/
     
    Rolling the bread was the hardest part to figure out. Maybe it makes sense and I’m trying to make it difficult, but I tried a couple different folds. A couple we folded straight in half and pinched the edges together. Some I just rolled, like a taquito, and others I rolled more like a burrito with the ends folded in. I don’t think the folds matter, they all tasted great. I enjoyed how easy the burrito looking rolls were to hold. 


    Please take a moment to visit all the hosts and see what they’re cooking up today! Then grab some of your recipes from Mexico and come share with us. This months linky is open to any recipe from Mexico.

    Don’t forget to grab the button —> and invite your friends to join in!

    Next Month: France

     
    [inlinkz_linkup id=403096 mode=1]

  • Herb Dinner Rolls with #STAROliveOil

    Herb Dinner Rolls with #STAROliveOil

    *I am a member of the Collective Bias®  Social Fabric® Community.  This post for Herb Dinner Rolls has been compensated as part of a social shopper insights study for Collective Bias and its client.*
     

    Are you a butter lover?  I am. I love a good piece of bread spread with lots of yummy butter. Some things we really should eat in moderation though.

    Growing up I lived in a duplex with my Aunt and Uncle on one side, and us on the other. Every Saturday morning we would head to my Aunts kitchen for pancakes and waffles. While my Aunt took shape orders for pancakes, my Uncle taught me how to spread butter on a waffle so it would penetrate every hole. Oh the deliciousness!

    Then one day, my Uncle no longer ate butter. With high cholesterol he had to start finding alternatives. I couldn’t imagine having to replace butter with something that wasn’t the real stuff, until recently. As an adult I am a little more aware of health concerns and just how bad some foods can be if you are high risk.

    So I’ve been trying to find better ways to feed my family an keep us healthy.  I heard about Star Butter Oil, and wondered if it would be a good alternative for actual butter when cooking.  It took me a little to find it, but there it is was on the top shelf in Walmart with the other oils.

    I have been having so much fun in the kitchen replacing butter with the Butter Flavored Olive Oil.  It has been amazing! I kid you not, I never thought a butter replacement could be just as good, or in some cases even better then butter. A few things I have tried so far include

    • Scrambled eggs. Mark loves his eggs scrambled in melted butter.  Without telling him, I used the butter flavored olive oil. He loved it, and didn’t even suspect my sneaky exchange. 
    • Grilling meat and veggies. I normally use EVOO to grill on the stove top. Since using Star butter Olive Oil, I don’t think I’ll go back. When you get comments like “Wow that smells amazing” and all you’ve done is toss some onions in the oil, you know you have a winner. 
    • Grilled Cheese Sandwich. We all make these right? You slather the bread with butter, add some cheese, maybe ham, if you are feeling fancy, and then you get one of the best lunches in history. 
    • Herb Dinner Rolls were my latest butter and Olive Oil exchange that turned out beautifully. I hardly had time to get photo’s my family has been all over them!
    • Check out these awesome recipes for more ways to use the Star Butter Olive Oil


    GIVEAWAY
    Star Fine Foods is giving away 10 Butter Flavored Olive Oils on their Facebook Page
     

    Herb Dinner Rolls
    Butter flavored Olive Oil gives these Herb Dinner rolls the perfect touch of flavor
    Write a review
    Print
    Ingredients
    1. 1/2 cup butter, softened
    2. 1/2 cup Sugar
    3. 2 tsp Salt
    4. 3 cups Warm Water
    5. 1 TBS Yeast
    6. 7 cups Bread Flour
    7. 1/4 cup STAR Butter Olive Oil
    8. 1/4 tsp Marjoram
    9. 1/4 tsp Thyme
    Instructions
    1. Combine butter, sugar, salt, water, and yeasr in mixing bowl. Let sit 10 minutes
    2. Add 3 cups flour and mix well.
    3. Slowly add the rest of the flour until dough is no longer sticky.
    4. Knead dough for 15 minutes
    5. Place in a greased bowl, cover and let rise 1-2 hours or until doubled in size.
    6. Shape into rolls about 2 inches in diameter.
    7. Place in baking pan, cover and let rise 1 hour, or until doubled
    8. Bake at 350F for 20 minutes
    9. Combine STAR butter oil and herbs in small bowl.
    10. Brush on rolls while still warm.
    11. Serve and Enjoy!
    Home Maid Simple https://www.homemaidsimple.com/

    Connect With Star Fine Foods
     
     
  • Double Chocolate Zucchini Bread

    Double Chocolate Zucchini Bread

    The first year I planted a large garden, I wasn’t sure how much I could get to grow. So I planted 6 zucchini plants, and they all grew and produced. We ate zucchini in one form or another every week for the rest of the year. This Double Chocolate Zucchini Bread was one of the good recipes that came from that gardening mistake. This post contains affiliate links. I will receive compensation when you click through and make a purchase.
     
     
    My sister in law had given me her recipe about a month ago, so I was going to use that. It seems to be common though for me to misplace written recipes. I seriously need a better system!  So I started going through my cookbooks, and then thought to myself – it can’t be much different than Banana Bread, right?

    That’s when I pulled out my mom’s Banana Bread recipe and decided to make a few alterations – like adding some cocoa – and created a Double Chocolate Zucchini Bread.

    www.FlirtyAprons.com

      Double Chocolate Zucchini recipe.
    I love quick breads like this one. They’re pretty easy to change up to your preference without messing it up. Since this recipe makes 2 loaves, I like to garnish the top of one loaf with some chopped walnuts. It adds that extra bit of goodness but leaves one loaf nut free for those friends and family members who prefer it that way.
     
    Double Chocolate Zucchini Bread with Walnuts recipe  

    Double Chocolate Zucchini Bread
    Yields 2
    Add more veggies to your diet with this zucchini bread – just don’t forget the chocolate too!
    Write a review
    Print
    Prep Time
    20 min
    Cook Time
    1 min
    Total Time
    1 hr 20 min
    Prep Time
    20 min
    Cook Time
    1 min
    Total Time
    1 hr 20 min
    Ingredients
    1. 1 1/4 cup Zucchini, shredded – about 1 medium zucchini
    2. 1 1/2 cups Sugar
    3. 1/2 cup Shortening
    4. 4 eggs
    5. 4 TBS Cocoa Powder
    6. 4 Cups Flour
    7. 1 1/2 tsp Baking Soda
    8. 1 tsp Salt
    9. 1 cup Semi-Sweet Chocolate Chips
    10. Chopped Walnuts (optional)
    Instructions
    1. Preheat Oven to 300° F
    2. In a large bowl combine zucchini, sugar, shortening, eggs, and cocoa.
    3. In a small mixing bowl combine flour, baking soda, and salt.
    4. Mix dry ingredients into the wet ingredients. Combine well.
    5. Spray 2 loaf pans with cooking spray.
    6. Separate and spread batter into the pans.
    7. Optional – top with crushed walnuts.
    8. Bake for 60-70 minutes, or until a knife inserted in the center comes out clean.
    Walnuts
    1. Add walnuts to one zucchini loaf and please both nut lovers and non.
    Home Maid Simple https://www.homemaidsimple.com/

    Of course, not everyone enjoys chocolate in their bread. I have my days where I prefer a healthier zucchini bread too. If that’s you try this Zucchini Bread recipe.

    What’s your favorite way to eat Zucchini?