Category: Food of the World

  • Malagasy Vanilla Fruit Salad

    Malagasy Vanilla Fruit Salad

    Enjoy a bowl of fresh fruit flavored with vanilla bean and transport yourself to the island of Madagascar. 
     
    Well I’m a week late getting this up, so I apologize about that. I had it all made and ready to go last week, but it was one of those high stress times in my life. Not much got done except around the house. I’ve been doing some huge purging everyday, and then I repurge the same room a few days later. When did we collect so much stuff?
     

    I would love to move to some tropical island, where we live off the fruit that grows abundantly, and a small garden. Our toys would be the sand, and the kids would enjoy working and playing outside all day. Ah that would be the life. 
     
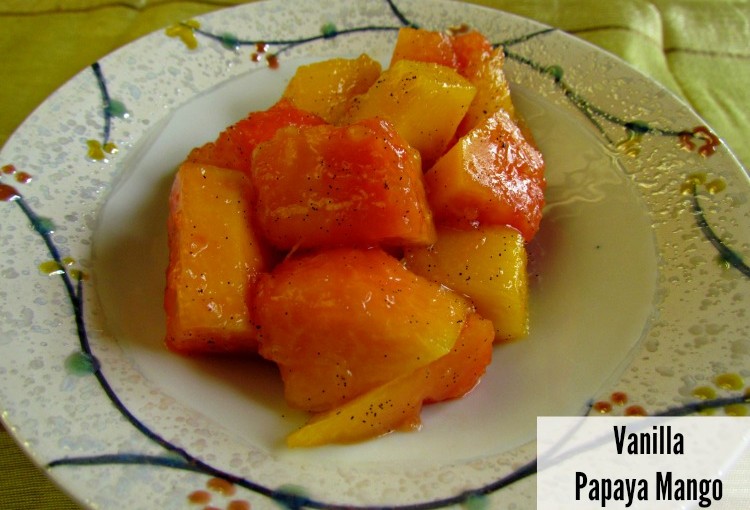
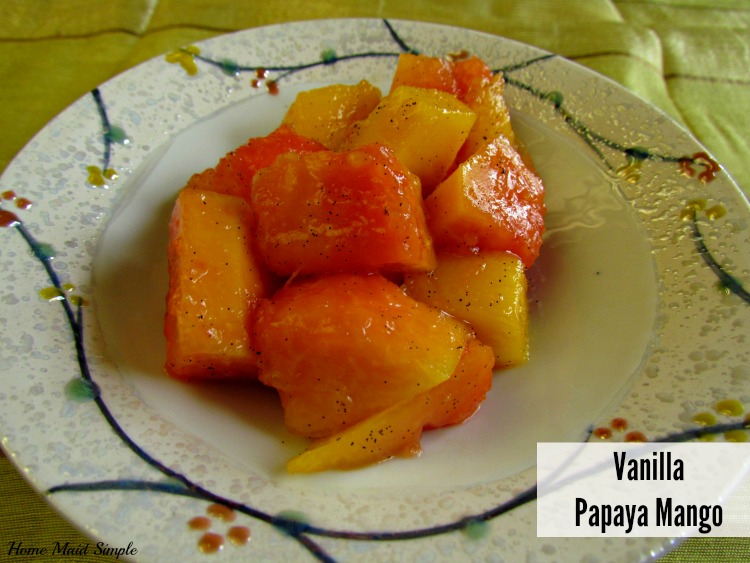
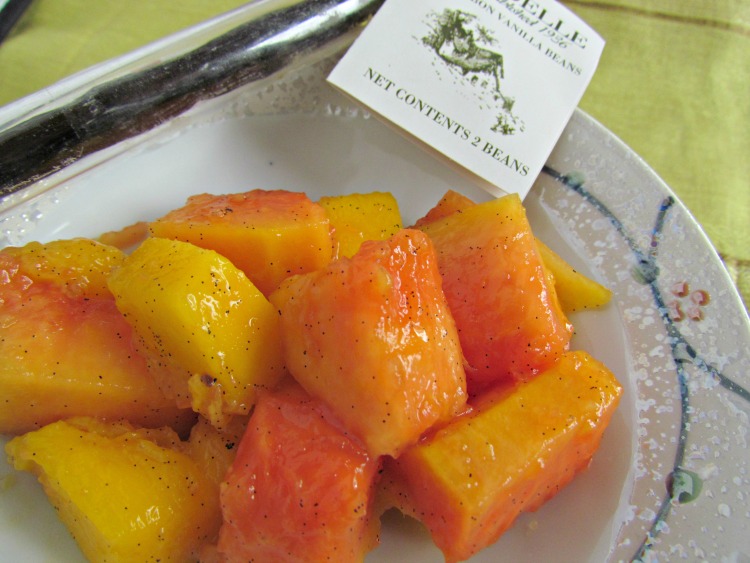
    This month Food of the World is visiting Madagascar. The cuisine there is referred to as Malagasy, which I learned came from the old country name of Malagasy. They eat quite a variety of foods, as they have influence from many countries. When it comes to dessert’s though, it’s usually a bowl of fresh fruit. I was quite excited when walking through Walmart and found a papaya. Here in the frigid north I did not expect to ever find fresh papaya! Sadly it was not the most flavourful fruit I’ve had, but it worked nicely in this mix with mango and vanilla bean. 


    Malagasy Vanilla Fruit Salad
    Write a review
    Print
    Ingredients
    1. 1 Papaya, cut into chunks
    2. 3 mangoes, cut into chunks
    3. 1 vanilla bean
    Instructions
    1. Mix the papaya and mango together.
    2. Slice the vanilla bean lengthwise.
    3. Using the back of your knife, scrape out the seeds, and mix with the fruit.
    4. Enjoy a bit of Madagascar.
    Home Maid Simple https://www.homemaidsimple.com/
     
    Fun Fact! I use Rodelle Vanilla beans which are considered “Bourbon” vanilla beans. This is because they come from Madagascar, not because they use Bourbon. 


    Join us next month when we visit Cuba
    on July 14th
     
    Linky Party on June 9th :
    Please visit their blogs and follow their sites!
     
    Mireille: http://www.theschizochef.com/blog/
     
     
  • Chicken and Broccoli Curry

    Chicken and Broccoli Curry

     
    We’re headed to southeast Asia this Food of the World party, and down to Indonesia. As always, I came across a number of recipes I’d love to try, but life is too busy! So I went with the simplest dish I could find, and made it my own. Curry is a common food in Indonesian culture, and as it happens, a dish I’ve never actually made before. 
     
    My mother in law had the chance to visit Cambodia recently, and sent me a number of their spices, like Lemongrass, Turmeric, saffron, and red and green curry’s to name a few. Along with the spices she also sent a Cambodian cookbook – but I’ll save that for another Food of the World party! Cambodia does sit close to Indonesia so I would venture to guess they use many of the same spices in their cuisine.  


    Aren’t those fun! I can’t wait to give more of them a try. For this recipe, I wanted to keep it simple, with ingredients we had on hand, and a mild flavor for the kids. So we went with the green curry powder. I found it a little lacking in flavor, and wish I’d added another layer, or used coconut milk. Alas, maybe next time.


    Chicken and Broccoli Curry
    Taste the flavors of Indonesia in this Chicken and Broccoli Curry
    Write a review
    Print
    Ingredients
    1. 1 broccoli floret, chopped in bite size pieces
    2. 2 chicken breasts, cut in 1″ pieces
    3. 6 pearl onions, quartered
    4. 2 cups milk
    5. 2 TBS Green Curry Powder
    6. 2 TBS flour
    7. 2 TBS Butter
    8. dash of salt
    9. 4 cups rice, cooked
    Instructions
    1. Begin melting butter in a medium sauce pan.
    2. Add flour, and curry powder. Mix.
    3. Add milk and whisk until smooth.
    4. Bring to a simmering boil.
    5. Add chicken and cook until done.
    6. Stir in broccoli and onions.
    7. Simmer for another 5-10 minutes.
    8. Serve over rice.
    Home Maid Simple https://www.homemaidsimple.com/


    Join us next month when we visit Madagascar on June 9th. 
     

    Share any Indonesian Recipes below!

  • Korean Egg Rolls

    Korean Egg Rolls

    Korean Egg Rolls
     
    We’re split pretty evenly around here on liking eggs and not. Some of us love them, while the others don’t want anything to do with them. I converted Princess R today though with these Korean Egg Rolls. Who knew tossing some carrots in with the egg is all it would take. 


    While searching for a good Korean recipe this month I came across this recipe for egg rolls, or Tamagoyaki, from Eugenie Kitchen. I showed it to Mark, who immediately wanted one. He watches a lot of anime, and said one thing they always eat (and makes him hungry watching), is an egg roll. He thought we needed a square pan, but thanks to Eugenie Kitchen, we found it wasn’t necessary, though I’m sure it would help some to have the square pan – I’ll just put it on my list. 
     
    I had a lot of fun making this, mostly because it was SO SIMPLE, but also because I got to use some chopsticks my mother in law sent from Japan. While taking pictures, I tried a new trick I learned as well, and it worked! 
     
    Korean Egg Rolls. Duck Chopstick Holder
     
    Isn’t that a cute little chopstick holder? It reminds me of the wooden ducks my grandma had, but in miniature form. 
     
    Get this Korean Egg Roll Recipe at Eugenie Kitchen
     
    Have a Korean Recipe you’d like to share with us? Link it up below, then find a new Korean recipe to try.
    Join us next month as we visit Indonesia (May 12th)
     
     
    Linky Party on May 12th :
     
    Please visit their blogs and follow their sites!


  • Brazilian Beef Croquettes

    Brazilian Beef Croquettes

    Enjoy Brazilian Beef Croquettes at home with this simple recipe

    Hey, World Travelers! We’re headed to Brazil this month for our Food of the World party. Like most month, I had a hard time narrowing down what I wanted to cook up. Then as I was working on these Beef Croquettes I started worrying they wouldn’t be too photogenic, but they turned out better than I expected. So if I can make these, so can you!!

    I seem to get myself into these pickles with needing to fry stuff, but I don’t own an actual fryer. I actually prefer it that way, since a pot or pan usually works just as well, and frees up space in the kitchen for other fun gadgets.

    I found the recipe for these Brazilian Beef Croquettes over at Cuca Brazuca. I made a few changes, both in amounts and flavors (whoops, who took my Worcestershire sauce?). While browsing and learning more about the Brazilian Croquette, I found there are many different varieties including a cod croquette. That is for sure going on my list to make! 

    Brazilian Beef Croquettes
    Write a review
    Print
    Ingredients
    1. Ingredients
    2. 1lb stewed meat
    3. 1/4 onion, chopped finely
    4. 3 green onions, chopped finely
    5. 1 tsp dried parsley
    6. 1/4 tsp cumin
    7. 1/2 tsp paprika
    8. 1/4 tsp pepper
    9. dash of salt
    10. 2 tsp soy sauce
    11. 1/2 cup milk
    12. 3 TBS Wheat flour
    13. 2 eggs
    14. drizzle of Olive Oil
    15. 2 cups Breadcrumbs
    16. 3 TBS cold water
    17. 1 TBS Corn Flour
    Instructions
    1. Over medium low heat cook onions until tender.
    2. Add meat, cumin, paprika, pepper, and parsley. Brown meat. Cover and cook another 10 minutes.
    3. Remove from the heat and allow slightly cool. Meanwhile, mix the wheat flour and milk together.
    4. In a food processer (or I used my blender), chop beef mixture until it makes a paste. It does not take very long at all.
    5. Return meat paste to pan, and add milk mixture, salt and soy sauce. Heat over medium heat until well combined. Refrigerate.
    6. Mix eggs, cold water and olive oil in a shallow dish. In a separate dish combine corn flour and breadcrumbs.
    7. Heat fryer, or vegetable oil in a pan about 1-2inches deep
    8. Once the meat is set enough to hold it’s shape, form into logs about 3-4 inches long, and 1inch wide. Roll meat in the egg mix, and then the breadcrumbs. Place in hot oil and brown all around.
    9. Remove to a cooling rack lined with paper towels.
    Home Maid Simple https://www.homemaidsimple.com/
     
    Traditionally it looks like Croquettes are eaten with a tahini sauce. We had ours with a side of sticky rice. 
     
    Looking for more Brazilian cuisine? Check out the linky below, or I also found this site The Amazing Flavours of Brazil you may want to check out. 
     
    Join us next month when we visit Lebanon on March 10th. Sign up for the mailing list and I will let you know when the party is live. 


  • Food of the World: Souvlaki Pita

    Food of the World: Souvlaki Pita

    Join bloggers as we travel the world through cuisine made at home. Enjoy this Souvlaki Pita with all the flavors you’d expect to find in Greece.

    When Princess V was just a little toddler, she loved Banana’s. I was at the bookstore, when I came across this book – Daddy’s Girl by Garrison Keillor


    It’s all about this Dad and his little girl and the adventures they have throughout life. One section is called B-a-n-a-n-a-s. It lists a bunch of foods she’ll eat, but at the end she’s still asking for bananas. Well one of the foods listed is Souvlaki. I’ve always wondered what it was, and had this goal – yes from reading a board book – to try out Souvlaki. 
     
    As I was researching Greek food, there is was again – Souvlaki. I knew it was time to give it a try. Guys, I can’t believe I didn’t do this sooner!! It’s full of flavor, and OH SO EASY!  Normally it is served with Tzatziki which is a cucmber yogurt. I didn’t have all the ingredients for it when I started, so you’ll notice I just used yogurt and cucumbers on mine. I have big plans this month though revolving around Greek food – tzatziki, hummus, and homemade pita to give you an idea.  
     
    Souvlaki Pita
    Write a review
    Print
    Ingredients
    1. Pita Bread
    2. Plain Yogurt
    3. Cucumber, chopped
    4. Red Pepper, sliced
    5. Boneless Pork Ribs
    6. Red Onion, sliced
    7. Feta
    8. salt and pepper
    Instructions
    1. Skewer the meat and peppers.
    2. Season with salt and pepper to taste.
    3. Grill until done.
    4. Spread some yogurt onto the Pita Bread.
    5. Top with cucumbers, pork, onion, and feta.
    Notes
    1. There are no amounts, because it’s based on you! This is easily adaptable for 1 to 10+.
    Home Maid Simple https://www.homemaidsimple.com/
     
    whoops! Almost forgot to add my Feta. 


    Meet the Hosts:
     
    As you may notice – this month we are visiting Greece. Did you know that the official name of Greece is actually The Hellenic Republic? I had no idea. Of course that’s according to Wikipedia…
     
    Next month: India


  • Food of the World: Asparagus Flan

    Food of the World: Asparagus Flan

    Ever wonder why French Women don’t get fat? In the book by just such a name, I learned to make this Asparagus Flan that is divine. Try it out, then check out the book.
     
    Earlier this year I read a book called French Women Don’t Get Fat. It was really quite an interesting read, and not what I expected at all. The author Mireille Guiliano, takes a practical approach to food, based on her families French culture and traditions. Throughout the book, Mireille includes different recipes and sometimes a story from her childhood to go with it.
     
    I chose to cook up the Asparagus Flan because we had just received a bundle of asparagus in our weekly produce delivery. My mom also recently stalked our fridge with eggs, fresh from her chickens. If you can get a hold of them, I promise you, farm fresh eggs are indeed better than store bought. 
     
    The Asparagus Flan sounded like a wonderful way to use both the asparagus and eggs while getting the kids to eat some veggies without too much complaint. Mireille has you peel the asparagus, which is something I’ve never done, but it made the veggie much easier to eat. I felt it also gave the texture a nice little boost then if they hadn’t been peeled. 
     
    Bon Appetit!
    Asparagus Flan
    Write a review
    Print
    Ingredients
    1. 16 stalks Asparagus
    2. 4 Apple Smoked Bacon slices
    3. 8 eggs
    4. 2 cups milk
    5. 1 cup Heavy Whipping Cream
    6. salt and pepper to taste
    7. 1 TBS fresh Parsley, chopped
    Instructions
    1. Preheat oven to 350 F.
    2. Remove the tough ends of the asparagus and peel them. Cut into 1 inch pieces.
    3. Boil asparagus in slightly salted water for about 5 minutes. Set aside to cool.
    4. Chop the bacon into small pieces, and saute.
    5. Drain the asparagus and dry the grease off the bacon.
    6. In a large bowl, combine eggs, milk, cream, salt and pepper, and parsley.
    7. Pour into a deep dish pie pan.
    8. Sprinkle the asparagus and bacon over the egg mixture.
    9. Bake for 30 minutes, or until cooked through.
    10. Serve with French bread.
    Adapted from French Women Don’t Get Fat
    Home Maid Simple https://www.homemaidsimple.com/


    Visit the Hosts!
     
    Have any French recipes to share with us this month? We’d love to see what your cooking up. Please remember to keep with the country of the month as you link up.
     
    Next month: Greece
  • Food of the World: Pan Dulce or Mexican Sweet Rolls

    Food of the World: Pan Dulce or Mexican Sweet Rolls

    A sweet taste of the south, these Pan Dulce sweet rolls will satisfy your cravings for Mexican food. This post contains affiliate links and I will be compensated if you click through and make a purchase. 
     
    We love Mexican Food around here. Tacos, burritos, chimis – they’re pretty regular fare for us. One year Mark even gave me Mexican Family Favorites Cook Book by Maria Teresa Bermudez for Christmas with a request I make something from it frequently. I’ve not been very good at actually using the book, so I decided to take this month’s theme to try something new. 
     
    Looking through the book I had a hard time deciding. I finally had it pinned down to trying Mexican Cheese Souffle and Pan Dulce. Unfortunately I can’t find Pimiento’s at any store around here! So the souffle was out. Pan Dulce looked perfect for a weekend snack with the kids. I have to admit though, after looking up some other Pan Dulce recipes online, I realized most have some colored top on them, while the recipe from this book does not. In fact, the recipe I used from my book tastes pretty similar to a regular sweet roll, just rolled up differently. I did make one minor change only because I didn’t have any ground anise, I’m sure the anise flavor would have given it that authentic flavor we seemed to be missing in ours. 
     
    Pan Dulce or Mexican Sweet Rolls
     
    Pan Dulce or Mexican Sweet Rolls
    Write a review
    Print
    For the dough
    1. 1 3/4 cup flour
    2. 1 1/8 tsp active dry yeast
    3. 1/4 tsp ground anise seed
    4. 1/8 tsp ground Cinnamon
    5. 1/2 cup Milk
    6. 2 TBS brown sugar
    7. 1 TBS sugar
    8. 2 TBS Shortening
    9. 1/2 tsp salt
    10. 1 TBS Corn Syrup
    11. 1 egg, beaten
    Filling
    1. 1/3 cup Flour
    2. 1/4 cup Brown Sugar
    3. 1 TBS sugar
    4. 1/8 cup butter
    5. 1 egg yolk
    6. 1/8 tsp vanilla
    7. dash of Cinnamon
    Instructions
    1. Combine 1 cup flour, yeast, anise and cinnamon in a mixing bowl.
    2. In a saucepan, heat milk.
    3. Add sugars and shortening to the milk. Continue stirring over medium heat until the shortening melts.
    4. Add salt and mix until sugars are dissolved completely.
    5. Combine the milk mixture with flour mixture, plus the 3/4 cups flour.
    6. Add corn syrup and egg. Mix well.
    7. Form dough into a ball. On a lightly floured surface knead dough (or use a stand mixer with dough hook), until smooth and elastic.
    8. Cover and let sit for 1 hour, 15 minutes.
    9. Turn the dough once during this time.
    10. In the meantime, cream the flour, sugars and butter for the filling.
    11. Add egg yolk, vanilla and cinnamon.
    12. When the dough is ready, knead lightly in hands, and separate into 8 balls.
    13. Preheat oven to 375 F.
    14. Flatten the balls out to 6 inch circles.
    15. Spread 1 TBS (approx.) of the filling over the dough circle.
    16. Roll up like a burrito
    Adapted from Mexican Family Favorites
    Home Maid Simple https://www.homemaidsimple.com/
     
    Rolling the bread was the hardest part to figure out. Maybe it makes sense and I’m trying to make it difficult, but I tried a couple different folds. A couple we folded straight in half and pinched the edges together. Some I just rolled, like a taquito, and others I rolled more like a burrito with the ends folded in. I don’t think the folds matter, they all tasted great. I enjoyed how easy the burrito looking rolls were to hold. 


    Please take a moment to visit all the hosts and see what they’re cooking up today! Then grab some of your recipes from Mexico and come share with us. This months linky is open to any recipe from Mexico.

    Don’t forget to grab the button —> and invite your friends to join in!

    Next Month: France

     
    [inlinkz_linkup id=403096 mode=1]

  • Food of the World: Dublin Coddle

    Food of the World: Dublin Coddle

    Explore the Irish cuisine with Dublin Coddle. A heartwarming meal of meat and potatoes.
     
     
    While reading about Ireland this month, and their cuisine I found that we eat a pretty normal Irish diet. When I think of Ireland and their cuisine the first thing that always comes to my mind is Corned Beef and cabbage.  I was surprised to learn from Diane (Simple Living and Eating) that corned beef isn’t traditionally eaten in Ireland. From all the recipes I came across, I also found this to be true. Not one had corned beef listed. 
     
    I was having a hard time deciding what to make for this months party, because I wanted to try something new, but it seemed like most of the recipes were things we eat on a fairly regular basis. 
     
    • Shepherds Pie
    • Meat and potato stews
    • full breakfast, or “fry up”
    These were all things I grew up on and continue to make for my family.  I know it doesn’t stem from our Irish heritage…because we have no Irish heritage.  I would guess it probably came from my grandma who ate potatoes on a daily basis because they were the most versatile and affordable food during the great depression.  
     
    The only recipe I came across, was something I’d rather never make myself, or probably eat – Black Pudding. So I kept searching, and came across Dublin Coddle. I stuck with a very basic recipe, and although a good meal, I wish I had added a few more herbs or spices to it.  It was a bit bland, but one that was easy to put together.


    Dublin Coddle
    Serves 6
    Write a review
    Print
    Ingredients
    1. 1 pint water
    2. 2 cups cooked chopped Pork Roast
    3. 12 Pork Sausage links
    4. 1 yellow onion
    5. 4 medium-small Russet Potatoes
    6. 1/4 cup fresh Parsley
    7. salt and pepper to taste
    Instructions
    1. Preheat oven to 300 F.
    2. In a medium pan, bring the water to a boil. Add the pork roast and sausages. Cook for 5-10 minutes until the sausage is no cooked through.
    3. Meanwhile cut the onion into 8 chunks and place in a deep roasting pan.
    4. Wash and slice the potatoes and add to the onion.
    5. Spoon the meat out of the water and add to the roasting pan as well.
    6. Pour enough of the water from the cooked meat over the coddle just enough to cover.
    7. Top with the parsley. Cover with a piece of buttered parchment paper, and the lid.
    8. Bake for 1-2 hours or until potatoes are soft.
    9. Serve warm with Soda Bread.
    Home Maid Simple https://www.homemaidsimple.com/


    Mireille  http://www.eastwestrealm.com  

    I can’t wait to see what all these ladies cooked up from Ireland. I may just throw a St Patrick”s day party with all their recipes.  
    If you’re new to the party you can grab the button over there under the Foodie Friday button—–>
     
     
    Or just enjoy browsing the many foods from Ireland. Don’t forget to visit all the hosts as well


    Next Month we’re visiting: United Kingdom. This can include recipes from England, Northern Ireland, Scotland, and Wales.


    [inlinkz_linkup id=380852 mode=1]

  • Mozzarella en Carrozza: A visit to Italy

    Mozzarella en Carrozza: A visit to Italy

     
    I had all intentions of revamping, and getting better pictures of my Baked Spinach and Artichoke Dip, but the more I researched Italian Cuisine, the more I wanted to try something new. Of course, I’ll still be heading back to that dip, because it is divine, but today I decided to go with something new. 
     
    Mozzarella en Carrozza. 
     

    Basically a cheese sandwich. I know it doesn’t sound all that new, but trust me it is!  I found the recipe first on Mangia Bene Pasta.  I really enjoyed browsing her recipes, and learning a little more about traditional Italian food. I kept coming back to the Mozzarella en Carrozza though, because my parents recently told me about this new Gourmet Cheese Sandwich shop that they visited.

    Normally my cheese sandwiches consist of buttered bread and Cheddar cheese, sometimes a slice of ham.  This sandwich is so much more though! It’s just as easy to make, giving you a new lunch option.

    Mozarella en Carrozza
    Yields 3
    Visit Italy and spin your normal grilled cheese with this Mozzarella en Carrozza
    Write a review
    Print
    Ingredients
    1. 6 slices Bread
    2. Mozzarella Cheese – make it as cheesy as you want
    3. 1/2 cup flour
    4. 1 cup milk
    5. 1 egg
    6. a pinch of salt and pepper
    7. Olive Oil
    Instructions
    1. Heat olive oil in a pan over medium heat.
    2. Whisk egg with salt and pepper.
    3. Place slices of the mozzarella between 2 slices of bread.
    4. Dredge sandwich through milk, then flour, then egg.
    5. Carefully place in frying pan.
    6. Cook until golden, then flip and cook the other side. It takes no longer than 1 minute per side.
    7. Eat alone, or dip in some marinara sauce.
    Home Maid Simple https://www.homemaidsimple.com/
    You can eat the Mozzarella en Carrozza by itself, but I enjoyed mine dipped in Hunts Italian Sausage sauce. It was like a pizza, but in sandwich form. So delicious!
     
     
    I am so excited that Diane has invited us all to join in the Food of the World party. A big welcome to all the Co-Hosts. Take a moment and go visit them. 
     
    If you have any Italian recipes you’d like to share, please link up below! This party goes all month long, so come on back and see what new recipes are being shared. 


    [inlinkz_linkup id=369590 mode=1]

  • Pork Curry Steamed Buns

    Pork Curry Steamed Buns

    It looks like I may have a lot of “Fails” with this Food of the World party, but we sure are having fun learning about different countries and their cuisine. This month Diane had us visiting Malaysia. See how we made Pork Curry Steamed Buns, and grab some recipes to make your own.


    Malaysian cuisine has melded with many of its neighboring countries, to create its own unique flavors on Asian dishes. While doing my research I came across Rasa Malaysia. the #9 Food Blogger in the world! That is pretty impressive and makes me surprised I hadn’t come across her before. Bee, the owner is from Malaysia, but now based out of California. She shares traditional Asian dishes, that are simple to make, and some with a more Westernized twist. 
     
    I browsed the Malaysian section on her site and had a hard time choosing something. After looking at recipes forever Mark leaned over, and said: “Try those steamed buns!”  Yeah, that sounds good…except steaming bread sounds tricky. Mark recalled our trip to Japan though, where we had a pork filled steamed bun that he just loved – and so did everyone else because the line to get one was huge!
     
     
    Mark got pretty excited about trying these out, that he jumped up and started cooking up a couple different pork curries. Of course, he didn’t write anything down, so I have no recipe for you – but head over to All Recipes and search curry. There’s a lot of good ones on there. So while he did that, I followed Rasa Malaysia’s recipe for Sweet Potato Mantou (or Steamed Buns).
     
    I was a little nervous, when it took a long time to rise, but crossed my fingers they would still turn out. My verdict – these are better baked than steamed unless you have the right equipment. Bee’s recipe has you put the buns on baking or steaming paper sheets. I didn’t have either, and didn’t think they would matter – they do!  By not using these, the bottoms of our buns were still very doughy. 
     
    Eventually, I gave in, and just baked the last of them. Ah-maze-ing!  Oh, and I also used Bread Flour because I couldn’t find Bao Flour (I found steamed bun mix at our Asian Market, but not Bao flour).  That could have been the reason for the extra long rise time, but I really don’t know. 
     

    I think the sweet potato addition to the dough, really was wonderful, but they worked better in the oven. So if you want to make these, but also want to avoid steaming them, I baked mine for 10 minutes in a 350 oven.

    Do you have a favorite recipe from Malaysia? Share it in the comments!