Category: Desserts

  • Panlevi: Aruba sponge cookies

    Panlevi: Aruba sponge cookies

    This month’s Food of the World has us visiting Aruba. I’ve been pretty excited about all these tropical places we’re visiting this year, when of course life got ahead of me. Way ahead of me! Thankfully, Mireille from The Schizo Chef, has an Aruba heritage and was able to help me out with a recipe this month, saving me time digging through recipes. Bonus, it was the perfect first day of school snack as well.

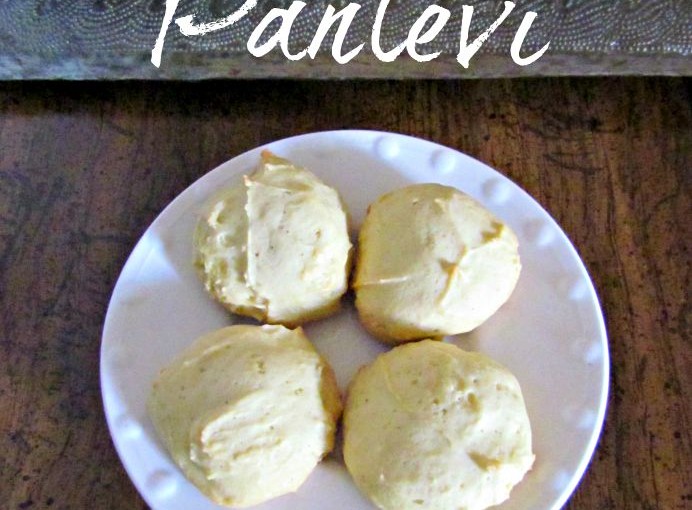
    Mmm don’t those look great?! You know what’s really awesome, though, these cookies mix up and bake real simple. Texture wise, it’s not your normal cookie – crispy outside, but semi spongey inside. I can’t really tell you how mine compare to others though, since there are only 2 other online recipes for Panlevi and they are exactly the same as the one I used, and have no pictures!


    Panlevi
    Aruban Sponge Cookies
    Write a review
    Print
    Ingredients
    1. 4 eggs
    2. 1 cup sugar
    3. 1/4 tsp nutmeg
    4. 1 tsp vanilla
    5. 2 1/2 cups flour
    6. dash of salt
    Instructions
    1. Preheat oven to 325 F
    2. Beat eggs until frothy. I’d even venture to try whisking them for a more frothy and light texture.
    3. Add in sugar and mix. Add nutmeg and vanilla. Mix well.
    4. Sift flour and salt. Fold into egg mixture.
    5. Drop by spoonful onto greased cookie sheet. Bake for 20 minutes. Edges should be lightly browned.
    Adapted from Asina Nos Ta Cushina by Jewell Fenzi
    Adapted from Asina Nos Ta Cushina by Jewell Fenzi
    Home Maid Simple https://www.homemaidsimple.com/
    Linky Party on June 9th :
  • Strawberry Ice Cream Recipe

    Strawberry Ice Cream Recipe

    Two weeks left in May, which means 2 more Strawberry recipes for National Strawberry month! Today’s is probably going to be my favorite to share, because oh em, you guys! This Strawberry Ice Cream will melt in your mouth and be gone all too quickly. This post contains affiliate links and I will be compensated if you click on and purchase through these links. 

    I only received a complaint from 2 people in the family and that was that it lacked sugar, because guess what?! Yeah, I cut the sugar down for a healthier (no health claims, just less sugar) strawberry ice cream option. I found it delightful, and the perfect afternoon refresher. I’m accidentally in love with this ice cream, and kind of sad I made such a small batch. Baby, I surrender to the Strawberry Ice Cream (bonus points if you can name that tune!)

    Right now I”m seeing some great sales on strawberries as they are currently in season. Stock up and make more than just ice cream. You’ll need at least one jar of this Strawberry Curd to add to the ice cream. It may sound intimidating, but I promise it’s so worth it to make. You’ll be adding it to more than just this Strawberry Ice Cream. 


    Strawberry Ice Cream
    Less sugar makes this treat a superb treat as you transition from spring to summer.
    Write a review
    Print
    Ingredients
    1. 1/2 pint whipping cream
    2. 1/2 cup milk
    3. 1/4 cup sugar
    4. 1/3 cup Strawberry Curd – http://www.homemaidsimple.com/strawberry-jam-and-strawberry-curd/
    Instructions
    1. Mix all ingredients together.
    2. Add to your ice cream maker, and freeze up.
    3. After the ice cream machine does its thing, put it in a bowl, covered with plastic wrap and place in the freezer overnight.
    4. Top with fresh chopped strawberries, and enjoy!
    Home Maid Simple https://www.homemaidsimple.com/
    After you try this Strawberry Ice Cream, why not make one of these other Strawberry Recipes while the prices are prime for the picking. 


    What’s your favorite flavor ice cream?


  • Spring Cupcakes with Strawberry Curd Filling

    Spring Cupcakes with Strawberry Curd Filling

    Let’s continue National Strawberry Month with these beautiful, simple, and tasty spring cupcakes. Fill them with a little strawberry curd, and top with a candy flower that anyone can create.
     
     
    The strawberry curd I shared last week was the inspiration for these, however, the Starburst flowers on top add to the spring look and flavor beautifully. You can find the recipe below, but it is so incredibly simple you can switch it up to fit your fancy.  


    Spring Cupcakes with Strawberry Curd Filling
    A quick cupcake with strawberry curd filling, topped with a starburst flower creates a beautiful spring centerpiece.
    Write a review
    Print
    Ingredients
    1. 1 box White Cake Mix + ingredients to make it
    2. Strawberry Curd
    3. Vanilla Frosting
    4. Starburst flowers
    Instructions
    1. Mix and bake cake mix according to the package directions for cupcakes.
    2. Put the strawberry curd in a piping bag fitted with a filling tip.
    3. Insert into the cupcakes and fill with yummy goodness.
    4. Use another piping bag and fill with the frosting.
    5. Frost your cupcakes, and top with Starburst flowers.
    Home Maid Simple https://www.homemaidsimple.com/
    On to the Starburst flowers! So I was walking around the store grabbing items to make the strawberry curd when these flowers just popped into my head. I’ve been playing with starbursts since I was a kid, but had never made flowers like this before. They are incredibly easy, however, your fingers will get pretty sticky, especially if you’re making a couple dozen. 
     
     
    You’ll need a pair of scissors, starbursts, and candy pearls. Start by unwrapping your starbursts, and then flattening them with your fingers until they’re about half their normal thickness. 
     
     
    Next, you’ll make 2 small cuts towards to the center, without cutting all the way through to the center. After the first two cuts, you’ll shape the corner into your first petal. Then work your way around cutting and making the rest of the petals. 
     
     
    Once your petals are all formed, add a pearl candy to the center, and Voila! Starburst flowers to make any dessert spring worthy. 
     

    Related – Valentine Toppers


  • Chocolate Chip Peanut Butter Ice Cream

    Chocolate Chip Peanut Butter Ice Cream

    Peanut, Peanut Butter! I love the sweet and salty flavor mix of this Peanut Butter Ice Cream. I received Pic’s Really Good Peanut Butter in exchange for this post. All opinions are my honest thoughts. This post contains affiliate links and I will be compensated if you click on and purchase through the links. 
     
    I bought myself an ice cream maker this month. It’s been on my wishlist for pretty much ever, but Mark claimed he doesn’t like home made ice cream. So I put it off. Well one day Mark comes home and is all “I saw an ice cream maker on sale today, you should get it”. You don’t have to tell me twice! Besides I had just gotten some Pic’s Really Good Peanut Butter that I knew would make some flavorful ice cream.
     
    Before I get into the recipe, let me tell you about Pic’s Really Good Peanut Butter. The first thing you should know, it really is Really Good! It also is all natural consisting of Peanuts and Salt (less than 1%). When compared to my regular peanut butter, I was baffled – 7 ingredients vs 2 ingredients. Why do we add sugar to our peanut butter? Pic Picot was also annoyed when sugar was added to his Peanut Butter – so he did what one would, and began making his own. Without all that added stuff.  

    Really Good Chocolate Chip Peanut Butter Ice Cream

     
    Really Good Chocolate Chip Peanut Butter Ice Cream
    A delicious combination of sweet and salty with natural peanut butter
    Write a review
    Print
    Ingredients
    1. 2 cups Heavy Whipping Cream
    2. 1 Cup Milk
    3. 3/4 cup sugar
    4. 1/4 cup Pic’s Really Good Peanut Butter, Crunchy
    5. 1 cup milk chocolate chips
    Instructions
    1. Mix the cream, milk, sugar and peanut butter well.
    2. Add to your ice cream maker and mix according to manufactures directions.
    3. About halfway through the cycle, add chocolate chips, and continue churning.
    4. Store in the freezer.
    Home Maid Simple https://www.homemaidsimple.com/
     
     
    Connect with Pic’s
     
    We also tried my No Bakes with the Pic’s Peanut Butter, and oh my! Better than ever. What will you try Pic’s Peanut Butter on?


  • Valentine Cupcakes

    Valentine Cupcakes

    See my 2 favorite methods for topping cupcakes, and then make your own! Candy Cut-Outs and melted chocolate make beautiful toppers for Valentine Cupcakes. This post contains affiliate links and I will be compensated if you click on and purchase through them.

    Originally posted on Your LDS Blog.
    I love Valentines Day! It’s such an optimistic holiday as we share our love with those close to us. Some may argue with me, but I’ll keep loving this holiday, and sharing my love with those around me.

    This weekend our ward put together a Valentines Dinner and Talent Show for the adults. I skipped signing up for a talent, because well, there are some talents that just aren’t shareable for a show. However, I did sign up for a dessert and decided it would count just fine as my talent. The method I’m going to share is actually really simple and can be used in so many other applications to make it your own.

    There are 2 ways I prefer to decorate cupcakes. Well, 3 if you count just topping them with frosting and sprinkles, but let’s get real, we all love having a little more decor on the top right? Method one involves a little melting on the stove, and method 2 you’ll need some cookie cutters.

    Cupcake Topper Ingredients

    Here’s what you’ll need – White Almond Bark and red food coloring (or whatever color you want!), piping bags, and the smallest piping tip you have, a cupcake (I made these heart surprise cupcakes), frosting, and starbursts or tootsie frooties. I usually prefer tootsie frooties, as they just mold better, but since I couldn’t find any at the store, I went with Starbursts.


    Method 1

    On LOW heat melt the almond bark. Add 2-3 drops of food coloring. and stir until well mixed in. Let the almond bark cool slightly, but not too much or it will start to harden back up. Lay out some parchment paper, and begin piping your designs.

    Melt white chocolate and pipe designs for Valentine Cupcakes

    Method 2

    If you are using starbursts, you’ll need to microwave them for about 10 seconds. Tootsie Frooties can skip this step. Use a rolling pin to roll out the candy and then cookie cutters to cut out the shapes. If you want to get a little bigger on your designs, just smoosh a couple candies together. For a more 3D design use your hands and mold the candies into your preferred shape.

    Starburst-Decorations

    Now you can skip the fondant that no one likes anyway, and still have smooth designs to add to your treats. For more inspiration see how I used Tootsie Frooties for Princess Peach Cupcakes.


  • Fancy Pudding Cups for New Years Eve

    Fancy Pudding Cups for New Years Eve

    Pudding cups make for a fancy but simple treat for any party. Use whatever you have on hand to make a flavorful treat your family will love. 
     
     
    While I was menu planning last week (oh yeah! I actually planned a menu!), I came across a recipe for these Strawberry-Orange phyllo cups. They were filled with oranges and strawberries, and a yogurt dressing. Although it sounded and looked nice, I went with what I already had on hand – pudding and frozen berries!
     
    Since New Years Eve is upon us, I thought it would be fun to dress them up a bit with some piped almond bark. The kids and I loved them, and there was a little something for each of them – almond bark for one, pudding for another, and berries for the third. I of course enjoyed the whole thing. 
     
    Fancy Pudding Cups make a New Years Eve party treat east and delicious  
    Fancy Pudding Cups
    phyllo dough cooked in muffin tins make for the perfect pudding cup.
    Write a review
    Print
    Ingredients
    1. Phyllo Dough
    2. cooking spray
    3. pudding
    4. Pomegranate arils
    5. blueberries
    6. almond bark
    Instructions
    1. Preheat oven to 350 F
    2. Thaw phyllo dough according to directions on package. Place 2 phyllo dough sheets on top of each other. cut in half lengthwise and width wise, creating 4 rectangles. Coat the top with cooking spray.
    3. Gently press one stack of phyllo dough into pan. I used a mini cheesecake pan, but a muffin tin, or custard cups would also work. Gently press a 2nd stack of the dough across the first stack. Repeat steps 1-3 for each cup you want to make.
    4. Bake for 10 minutes. Remove from oven and let cool on a wire rack. Very gently remove the phyllo cups from pan.
    5. Spoon pudding into the cups, top with berries and almond bark designs.
    For the Almond Bark decor
    1. Melt your almond bark for 30seconds in the microwave. Stir and repeat, until bark is melted and smooth.
    2. Pour into a piping bag, fitted with smallest tip you have – I used a Wilton 4 tip. Be careful because the bark is hot, and will also easily pour out the tip.
    3. Carefully pipe designs onto a sheet of wax paper. As I found out, most will end up cracking if you don’t use the wax paper, and it’s just easier to get them off wax.
    Adapted from Taste of Home
    Adapted from Taste of Home
    Home Maid Simple https://www.homemaidsimple.com/
     

    Happy New Year!

    May you all have a blessed new year. Enjoy family, friends, and good food this year. 


  • Caramel Apple Cupcakes

    Caramel Apple Cupcakes

    It’s Friday and day 5 of our Halloween Bash blog hop! Glad you could join us on this fabulous Friday for more Halloween ideas from me and my talented blogging friends! Today I’m sharing these fun, delicious, but most importantly EASY Caramel Apple Cupcakes. It’s just not Halloween without some caramel apples right?
    Caramel Apple Cupcakes
    Caramel Apple Cupcakes everyone can enjoy with less mess.
    Write a review
    Print
    Ingredients
    1. Spice Cake Mix
    2. 3 Medium apples
    3. 1/4 cup brown sugar
    4. Cream Cheese Frosting
    5. Caramel topping
    6. Popsicle sticks
    Instructions
    1. Peel, core and slice 2 of the apples into bite size pieces (I seriously love my apple peeler/corer/slicer for this!). Combine the apples with the brown sugar in a frying pan. Cook up until the sugar is dissolved, and the apples are soft. Set aside.
    2. Mix the spice cake batter according to directions. Fold in the apple mixture.Fill cupcake liners 1/2-3/4 full.
    3. Bake according to the cake’s directions (or whatever spice cake recipe you’re using). Let cool.
    4. Core and slice the 3rd apple. Frost the cupcakes, top with an apple slice, and popsicle stick. Drizzle the caramel across the apples. You may actually want to do that before adding the sticks….
    Home Maid Simple https://www.homemaidsimple.com/

    Caramel Apple Cupcakes

    If desired, add some spooky rings for a fun party favor. Then enjoy!

    *Tip* Do not add the sliced apples and caramel until just before serving, otherwise the apples will start to brown and look unappealing. Enjoy!


    The fun ideas don’t stop here! Continue checking out the creative Halloween projects my blogging friends have created for our blog hop by clicking on each of the links below, for the Halloween projects you’d like to see in more detail and it’ll take you right to that post with additional information and photos on how to create it. Have fun and pin away!
    Over 110 fun & fabulous Halloween projects & ideas! #halloweenprojects #halloween #diyhalloweenideas

    1. Happy Halloween Treat Bucket
    2. Beware of the Bam-BOO
    3. Halloween Beeswax Candles
    4. Caramel Apple Cupcakes
    5. Halloween Treat Bag Tags – Free Printable
    6. Halloween Cookie Pops ~ Nutter Butter Bats & Mummies
    7. Halloween Photo Booth Props
    8. Halloween Candle Jars
    9. Ghost Candles
    10. Dollar Store Spider Halloween Wreath
    11. Healthy Halloween Class Treat
    12. Little Pumpkin Button Cards
    13. Pumpkin Playdough Mats
    14. Craft for Kids: Finger Puppet Monsters
    15. Creepy Halloween Jar Labels
    16. Halloween Party Favor and Printable
    17. Kids Halloween Lanterns
    18. Candy Box Head Skeletons
    19. Sweet & Salty Halloween Treat

    Follow our Fabulous Halloween Ideas Pinterest board for even more inspiration!

    Be sure to come back tomorrow for another 20 awesome Halloween ideas!

    Thanks to all 110+ fabulous bloggers participating! We’d love for you to visit their blogs and see what else they’re up to!

    100 Directions || 365daysofcrafts || a girl and a glue gun || A Prudent Life || Addicted 2 DIY || Albion Gould || Ashlee Marie || Atta Girl Says || Bakerette || BD Design || BellaGrey Designs || Black and White Obsession || Bloom Designs Online || Blue i Style || Bombshell Bling || bumblebreeblog || C.R.A.F.T. || Celebration Lane || Clean and Scentsible || Clearsnap || Confetti Sunshine || Crafts by Courtney || Creations by Kara || Creative Juice || Cutesy Crafts || Design Dazzle || Dress It Up Crafts || Echoes of Laughter || Everyday Party Magazine || Eye Candy Creative Studio || Fairfield World || Fearlessly Creative Mammas || Five Heart Home || Fizzy Party || Free Time Frolics || Frenchie || FrugElegance || Glued To My Crafts || GreatStitch || Happiness is Homemade || Here Comes the Sun || Home Maid Simple || Honeybear Lane || hoopla palooza || Hydrangea Hippo || I Dig Pinterest || ICE Resin || inkhappi || Insitefull Living || It’s Sew Lorine || Jaco’lyn Murphy || Jen A. Street || Just My Little Mess || Just Us Four || Katarina’s Paperie || Kiki and Company || Laura Kelly’s INKlings || Let’s Eat Grandpa || Let’s Go Junking || Liz on Call || Love The Day || Made by a Princess || Made From Pinterest || Made to be a Momma || Major Hoff Takes A Wife || Make Life Lovely || My Craftily Ever After || My Daylights Blog || My Insanity || Nature’s Knockout || Not Just A Mommy || One Creative Mommy || Organize & Decorate Everything || Our Thrifty Ideas || Paleo Priests || Persia Lou || Pink Cake Plate || PinkWhen || Play. Party. Pin. || Practical Parenting || Reclaim Yourself Retreat || See Vanessa Craft || She’s Crafty || Simple Sojourns || Simply Designing || Soiree Event Design || Sowdering About || Splendid Design || Stuffed Suitcase || Super Simple with Terri O || Suzys Sitcom || Sweet and Simple Magazine || Swish Printables || Sypsie Designs || That’s What Che Said || The Benson Street || The Cards We Drew || The Gunny Sack || The Happy Scraps || The Life of Jennifer Dawn || The Scrap Shoppe || The Things I Love Most || Tikkido || Two Thirty~Five Designs || Wait ‘Til Your Father Gets Home || Walnut Hollow Blog

  • Do Good Cherry Cheesecake Beignets

    Do Good Cherry Cheesecake Beignets

    I received product to write this post. All opinions are my own. 
     
    I couldn’t help myself people. I know I know, Beignets are normally left empty. I saw those little puffs of air though, and just had to get some cherry cheesecake goodness inside. I hope you enjoy. 
     
    Cherry Cheesecake Beignets #recipe
     
    Back in July, Mark was volunteering at a booth for the local July 4th activities. In the booth next to him was Robyn of My Sweet Mercy. They got to talking as people in neighboring booths do, and he mentioned this blog of mine. A business card was exchanged, and well, here we are. The following is My Sweet Mercy’s recipe for Beignets, with my cherry cheesecake filling. You can watch Robyn making them here.


    Cherry Cheesecake Beignets
    Fill beignets with a cherry cheesecake for a sweet treat you will love.
    Write a review
    Print
    Ingredients
    1. Cherry Cheesecake Filling
    2. 1/2 cup cherry pie filling
    3. 1/4 pkg cream cheese
    4. 1/4 cup sweetened condensed milk
    5. Mix all together and refrigerate.
    6. Beignets
    7. 1 cup Sweet Mercy Vanilla Baking Mix
    8. 1/3 cup milk
    9. Oil for frying
    Instructions
    1. Mix together mix and milk.
    2. Roll out dough and cut into 2×2 squares.
    3. Heat oil to a sizzle.
    4. Brown beignet in the oil on both sides and then drain.
    5. Once they’ve cooled cut a little slit in the side.
    6. Fill with Cherry Cheesecake filling. S
    7. prinkle powdered sugar on top for a real treat.
    Home Maid Simple https://www.homemaidsimple.com/
     
     
    My Sweet Mercy began as a cupcake shop to get Robyn through a time of severe depression. It was her “sweet mercy”. Over time she decided to close the shop, but sell the baking mixes for home use.
    Robyn is on a mission to continue spreading sweet mercies to those in need. Right now when you purchase from My Sweet Mercy, a portion is donated to Operation Underground Railroad – an organization working to save children from slavery.
    While reading Robyn’s story, which you can find on MySweetMercy, I felt like I was reading my own story. Just swap baking with blogging and there it is. Did you know I started blogging because of depression? After Princess C was born I went through my own dark time. After a lot of counseling and reading self help books, I turned to blogging when I found myself pregnant again, and wondering if the PPD would come back. My journey began at 3 Princess Academy in 2010, where I continued to share family updates until almost 1 year ago when I decided to devote my full attention here to Home Maid Simple. 
     
    Over the years I’ve often thought of quitting. Other things got in the way, I didn’t feel good enough, who has the time, “you do what??”…but I always came back to why I began. This helps me feel good. Home Maid Simple is “my sweet mercy”. And every time you all read my posts it’s a reminder to me of that. 
    Connect with My Sweet Mercy
     
  • Candy Apple Cookies and Cider

    Candy Apple Cookies and Cider

    This recipe for Candy Apple Cookies has been compensated by #CollectiveBias, Inc. and its advertiser. All opinions are mine alone.
     
    Fall has arrived! Well, maybe not officially, but the weather here in North Dakota has decided that it’s time for fall. I’m not complaining though. I love fall. Most especially though, I love apples – apple cider, candy apples, applesauce, bobbing for apples, picking apples, and basically all apple recipes. It’s not really fall without all these goodies. 
     
    #FlavorofFall #shop #CollectiveBias

    Probably my absolute favorite way to spend a chilly fall day is curled up by a fire, with a cup of hot cider, a plate of cookies within reach, and a good book. In order to get this ideal scene though I’ve got to do a little bit of work. I WISH I could go to an apple orchard and pick my own apples, but as far as I’ve been able to find, there aren’t any near me – for that matter I don’t see any in the whole state. So since I can’t get my apples fresh off the tree personally, I do the next best thing – I grab some apple products from Walmart.

    Motts and M&Ms at Walmart #FlavorofFall #shop #CollectiveBias

    Yes, we sure did find some Candy Apple m&m’s. These became the inspiration behind the Candy Apple Cookies made with Motts Natural Apple Sauce. We also picked up some of Motts Apple Juice to create a quick and easy Cider. Enjoy the #FlavorofFall with the following recipes.

    #FlavorofFall #shop #CollectiveBias
    Quick Apple Cider
    Easy apple cider.
    Write a review
    Print
    Ingredients
    1. 64oz Motts Apple Juice
    2. 1 tsp ground cinnamon
    3. 15 whole Allspice
    4. 1/2 tsp grated lemon peel
    5. 1/2 tsp grated orange peel
    Instructions
    1. Combine all the ingredients in a large pot.
    2. Bring to a boil.
    3. Serve warm with Candy Apple Cookies!
    Home Maid Simple https://www.homemaidsimple.com/

    #CollectiveBias #FlavorofFall #shop

    Candy Apple Cookies

    Candy Apple Cookies
    Write a review
    Print
    Ingredients
    1. 2 3/4 All Purpose Flour
    2. 1 1/2 cups packed light brown sugar
    3. 1 tsp Sea Salt
    4. 1/2 tsp baking soda
    5. 3/4 cup Motts Natural Apple Sauce
    6. 1/2 cup shortening
    7. 2 eggs
    8. 1 tsp apple pie spice
    9. 1 cup Candy Apple M&Ms
    10. Caramel
    11. 1/2 cup Peanut Butter M&Ms, crushed
    Instructions
    1. Preheat oven to 375 F
    2. Combine flour, sugar, salt, baking soda, apple sauce, shortening, eggs, and spice.
    3. Mix well and fold in the Candy Apple M&M’s.
    4. Drop by Tablespoon onto ungreased cookie sheet.
    5. Bake for 10-12 minutes.
    6. Cool completely.
    7. Meanwhile, soften up the caramel sauce and crush the peanut butter M&M’s.
    8. Dip half of each cookie in the caramel, and roll through the crushed M&M’s.
    Home Maid Simple https://www.homemaidsimple.com/
     
    #FlavorofFall #shop #CollectiveBias


    Candy Apple Cookies #FlavorofFall #shop #CollectiveBias

    Now if you are making these with your kids and an electric mixer, remember one thing – make sure it’s off before you plug it in. Or you might end up like this

    #FlavorofFall #shop #CollectiveBias

    Oh these cookies and cider were so good. The kids especially thought it was fun dipping cookies into caramel. It adds a fun little mix to regular old cookies, and they are packed full of fall flavors.

     
    I can’t let the school kids miss out too much though, so I picked up some small juice drinks to pack in their lunches as well. Got to get them enjoying the new season as well. 
     
     
    #FlavorofFall #shop #CollectiveBias


    Coupons
  • Strawberry Cheesecake Shortcake

    Strawberry Cheesecake Shortcake

    Strawberry Cheesecake Shortcake is a sponsored recipe. This post contains affiliate links, purchasing through them gives me a commission at no extra cost to you. All opinions are my own
     
    I love strawberry season! Those fresh plump red berries call my name every spring. I find they pair perfectly with these cheesecake filled shortcakes.
    I was so excited when I learned The Daily Meal and Driscoll’s berries were holding a Strawberry Shortcake contest. I remember as a kid going to the pick your own strawberry patch, and just loading up on strawberries and wishing I could stay there forever – or at least all day.  Now I take my kids to our local pick your own patch to fill baskets of their own. They even encourage the kids to taste some berries while picking. 
     
    The crumbly shortcake makes a perfect base for the no-bake cheesecake filling. Topped with a bright red berry they go from being delicious to taste but also to the eye.  
     
    When I first heard about the contest from Driscoll’s and The Daily Meal my mind kept jumping to cheesecake. I don’t know why, but a nice pink cheesecake from fresh strawberries sounded so delightful. I debated making a shortcake crust but finally chose to make the cheesecake compliment the shortcake. I hope you enjoy these!
     
    Strawberry Cheesecake Shortcake
    A delicious shortcake holds this Strawberry Cheesecake in place for a feast of the tastebuds and eyes.
    Write a review
    Print
    Shortcake
    1. 2 cups All Purpose Flour
    2. 1/4 cups Sugar
    3. 1 TBS Baking Powder
    4. 1 tsp Baking Soda
    5. 1/4 tsp salt
    6. 1/2 cup Shortening
    7. 1/2 cup Buttermilk
    8. 1 tsp McCormick Valencia Orange Peel
    9. 2 eggs – 1 whole, 1 divided
    Cheesecake
    1. 1 cup finely chopped Driscoll Strawberries
    2. 4oz cream cheese, at room temperature
    3. 1/2 can sweetened condensed milk
    4. Juice from 1/2 a lemon
    5. 1/2 tsp Almond Extract
    6. Whole Strawberries for garnish
    Instructions
    1. Preheat oven to 450
    2. Combine flour, sugar, baking powder, baking soda, and salt in a medium bowl.
    3. Cut in the shortening, until well combined.
    4. Add the buttermilk, orange peel, 1 whole egg, and 1 egg yolk. Mix until well combined.
    5. Split the batter between 6 mini cheesecake wells.
    6. Beat the remaining egg white, and brush the tops of the batter. Bake for 10 minutes, or until golden brown on top.
    7. Remove from pan and set aside to cool.
    8. Using a mixer, combine cream cheese, milk, lemon juice, and almond extract until smooth.
    9. Stir in cut Strawberries.
    10. Cover and refrigerate for 1-2 hours.
    11. Once the shortcake is cooled, scoop out the centers. Set aside the crumbs for garnishing.
    12. Fill the shortcake with 2-3 TBS of Strawberry Cheesecake Filling.
    13. Refrigerate until ready to serve. Or for a more stiff filling and cool treat, freeze for 30 minutes.
    14. Before serving, top each shortcake with a whole strawberry and crumble the extra shortcake across the top.
    Home Maid Simple https://www.homemaidsimple.com/
     

    How do you like your Strawberries?