Category: DIY

  • DIY Tomato Cage Ghost

    DIY Tomato Cage Ghost

    Halloween is coming, and the spooky decor is starting to show up on porches. Make this DIY Tomato Cage Ghost with three simple items – 2 you may already have on hand! This post contains affiliate links and I will be compensated when you click on and make a purchase. 

    Do you love my DIY Tomato Cage Ghost Witch?  I truly thought I was being original when I came up with this idea. Then a fellow blogger posted some Halloween projects, and what is included – none other than tomato cage ghosts!  Well, I was still going to be original because I put mine together a bit differently than the others I looked at.

     
    It’s really quite simple to make your own Tomato Cage Ghost. We headed out and bought a tomato cage for $1.99, and a foam head form (hobby lobby) for $5.99. I already had a pile of white fabric in my stash, and a metal hanger in our closet. So this project cost me a total of about $8. Not too shabby for a lasting Halloween decoration. 
     
     
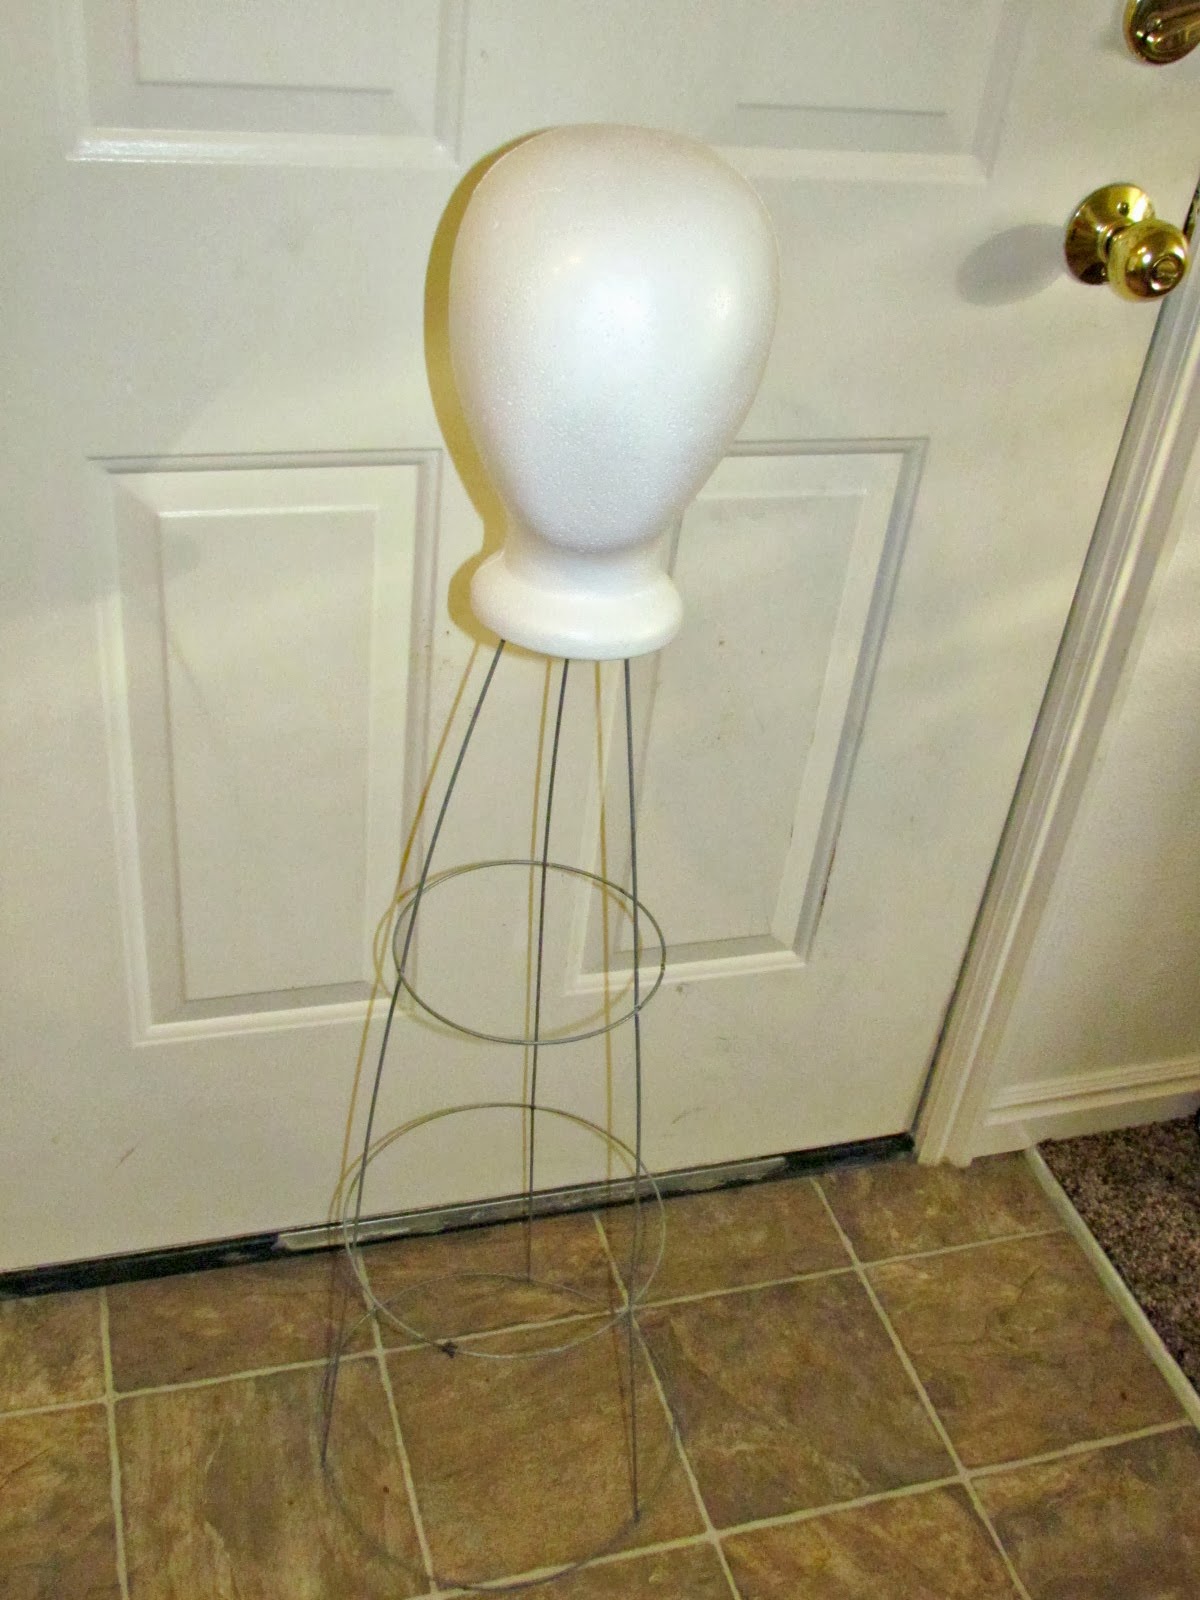
    You’ll start your ghost by attaching the foam head to the prongs on the tomato cage. My original idea actually used a foam ball, but the cost was similar, and we thought a head shape might give it a more ghostly look.  
     
    Now you’re ready to cut and attach the fabric.  You’ll want to cut one piece approximately 3 1/2 feet by 3 feet.  Once you have that main piece, the rest you can cut into 2-3″ strips, and varying lengths. The strips you will now attach to the middle rung on the tomato cage. 


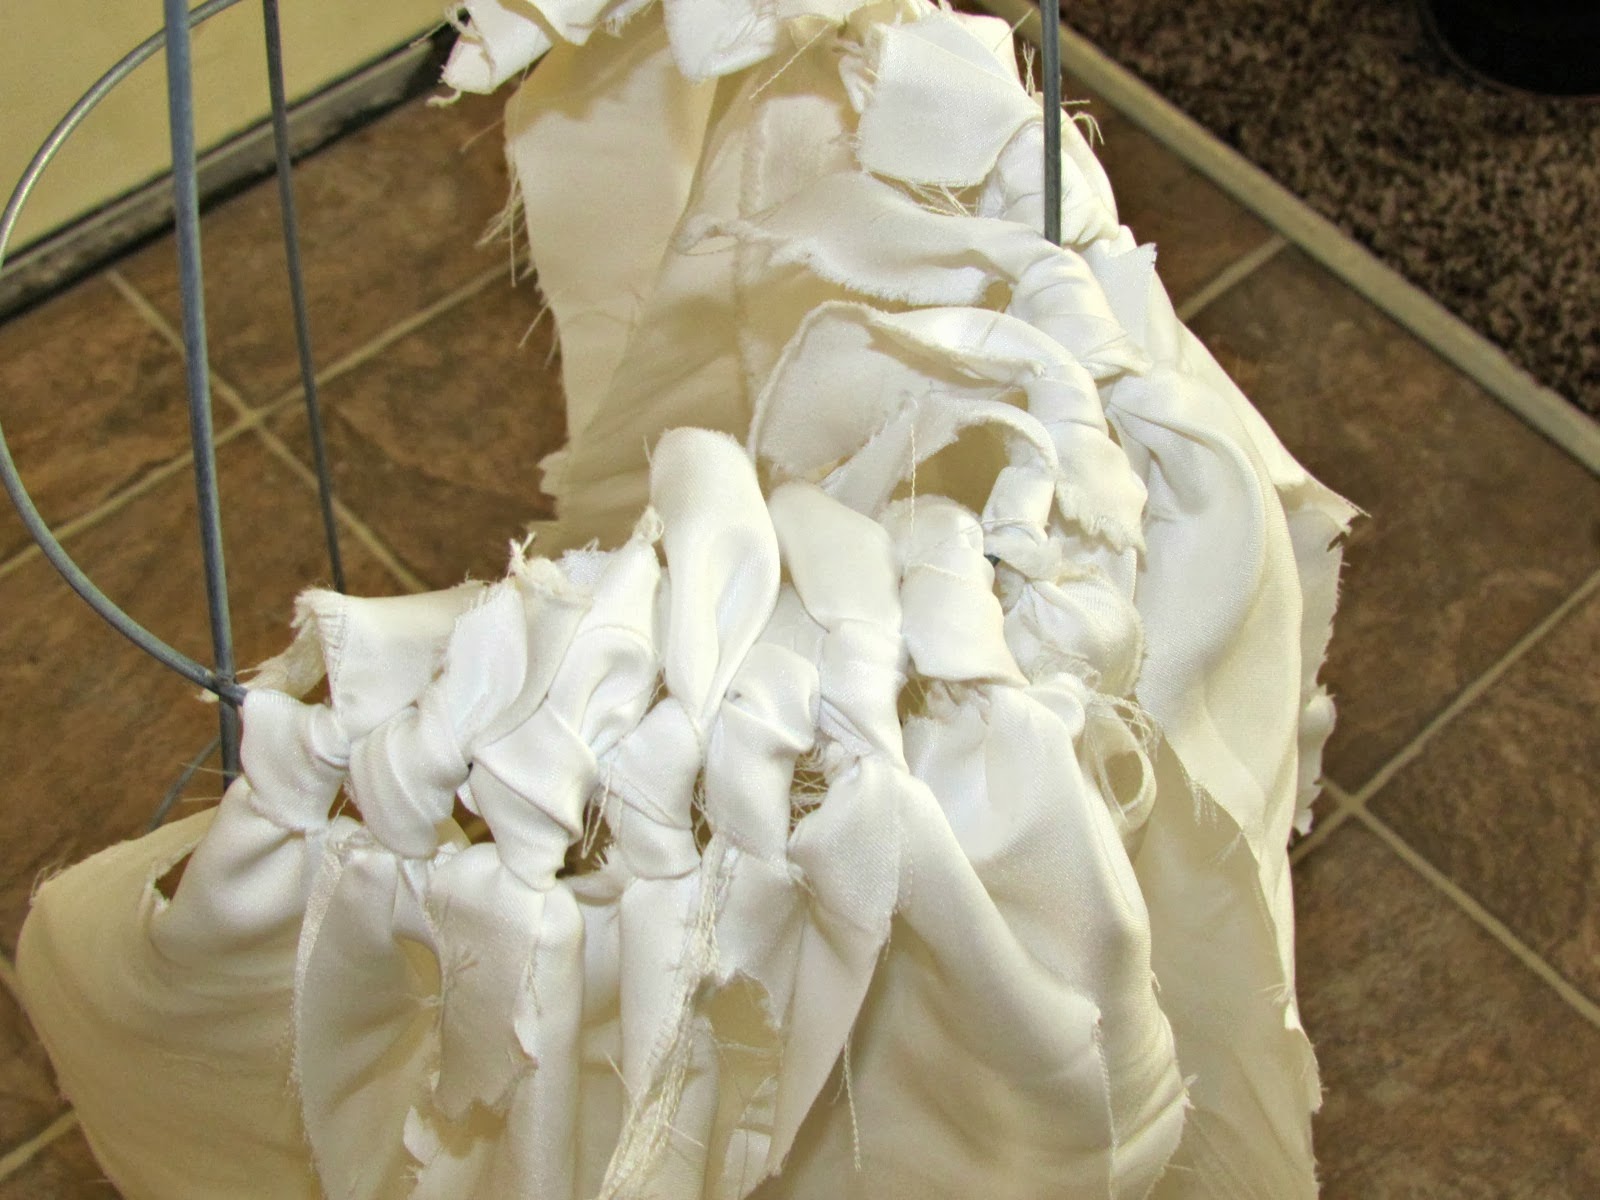
     Fill the rung tightly, and try to tie the knots from both sides, so they overlap more diversely. Mine ended up facing the same way at first, which made for a less chaotic and looking ghost.
     
    Time to attach the hanger! This will help create “arms” for your ghost. Twist the hanging end so it stick straight up, and then maneuver it into the middle of the foam head. Like so….
     
     
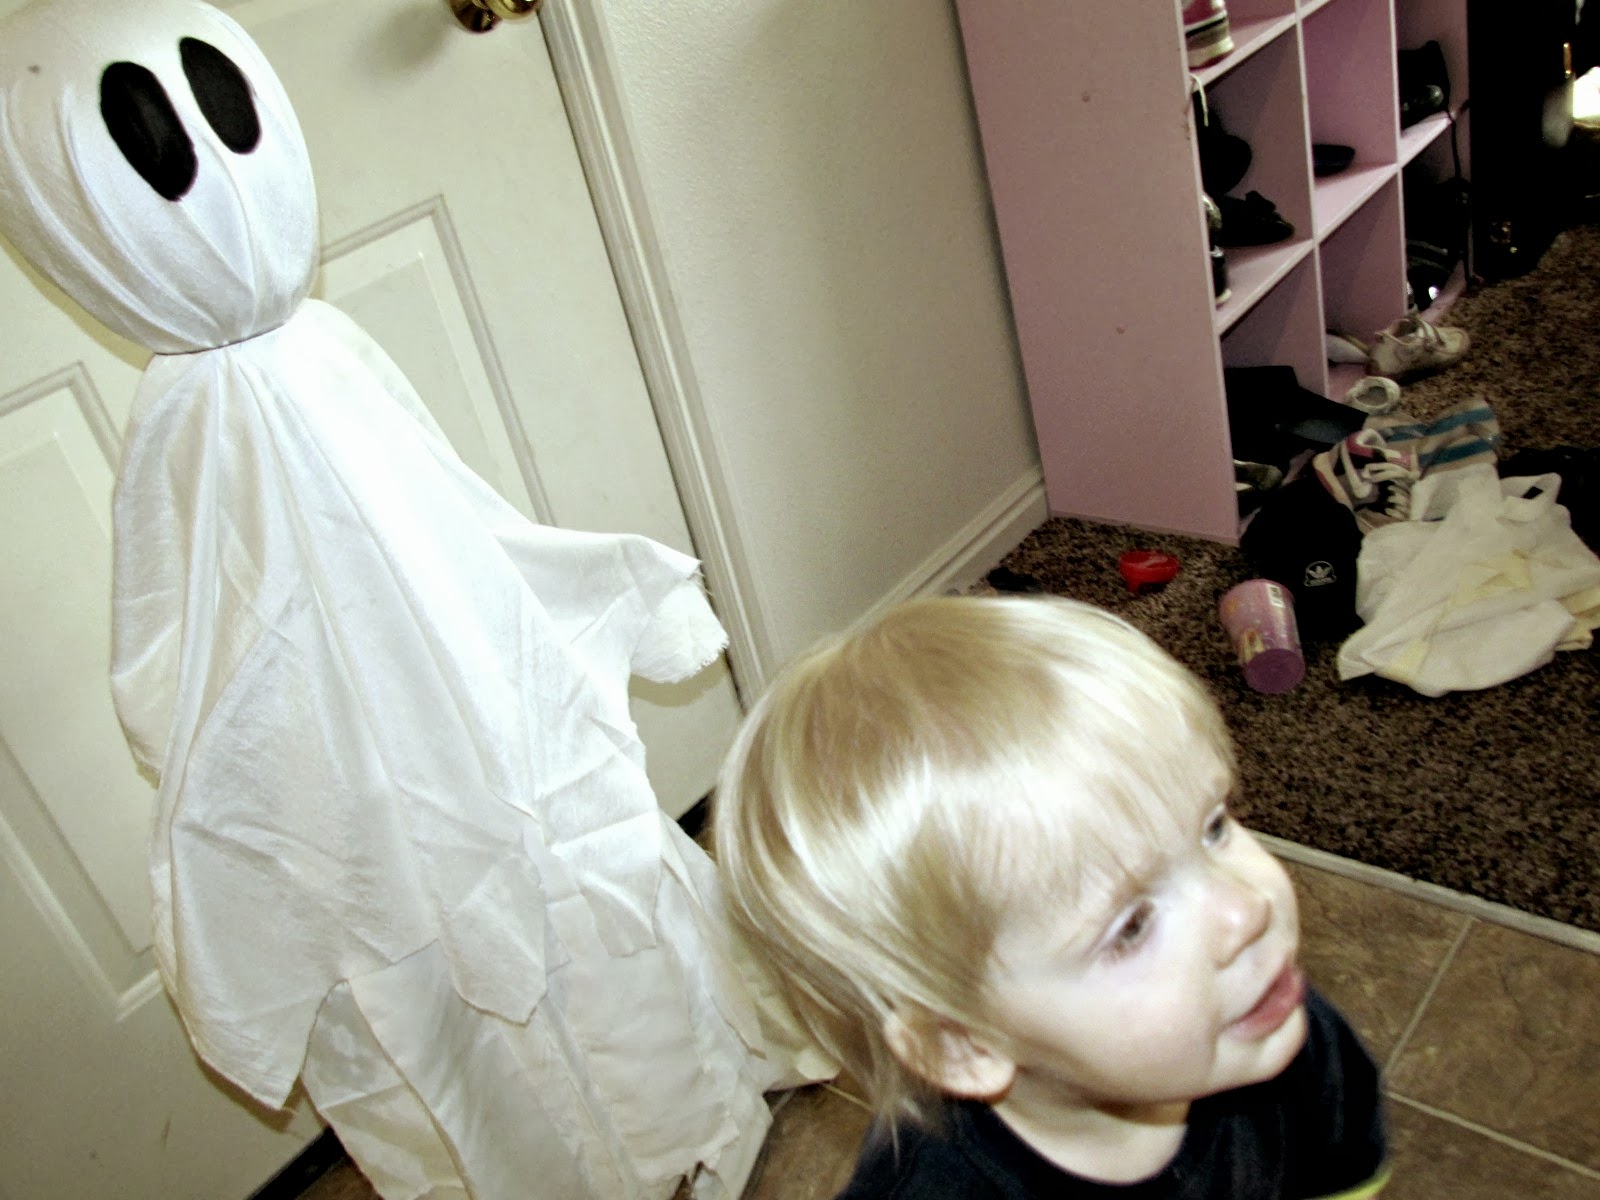
    You’re ready for the finishing touch. Remember the large piece of white fabric we set aside? Drape it over the head of your ghost. I used some black thread to tie it on around the bottom of the head. I wrapped it a couple times for a strong hold. The thread is thin enough that it’s not all that noticeable and gives your ghost a little more shape. 
     
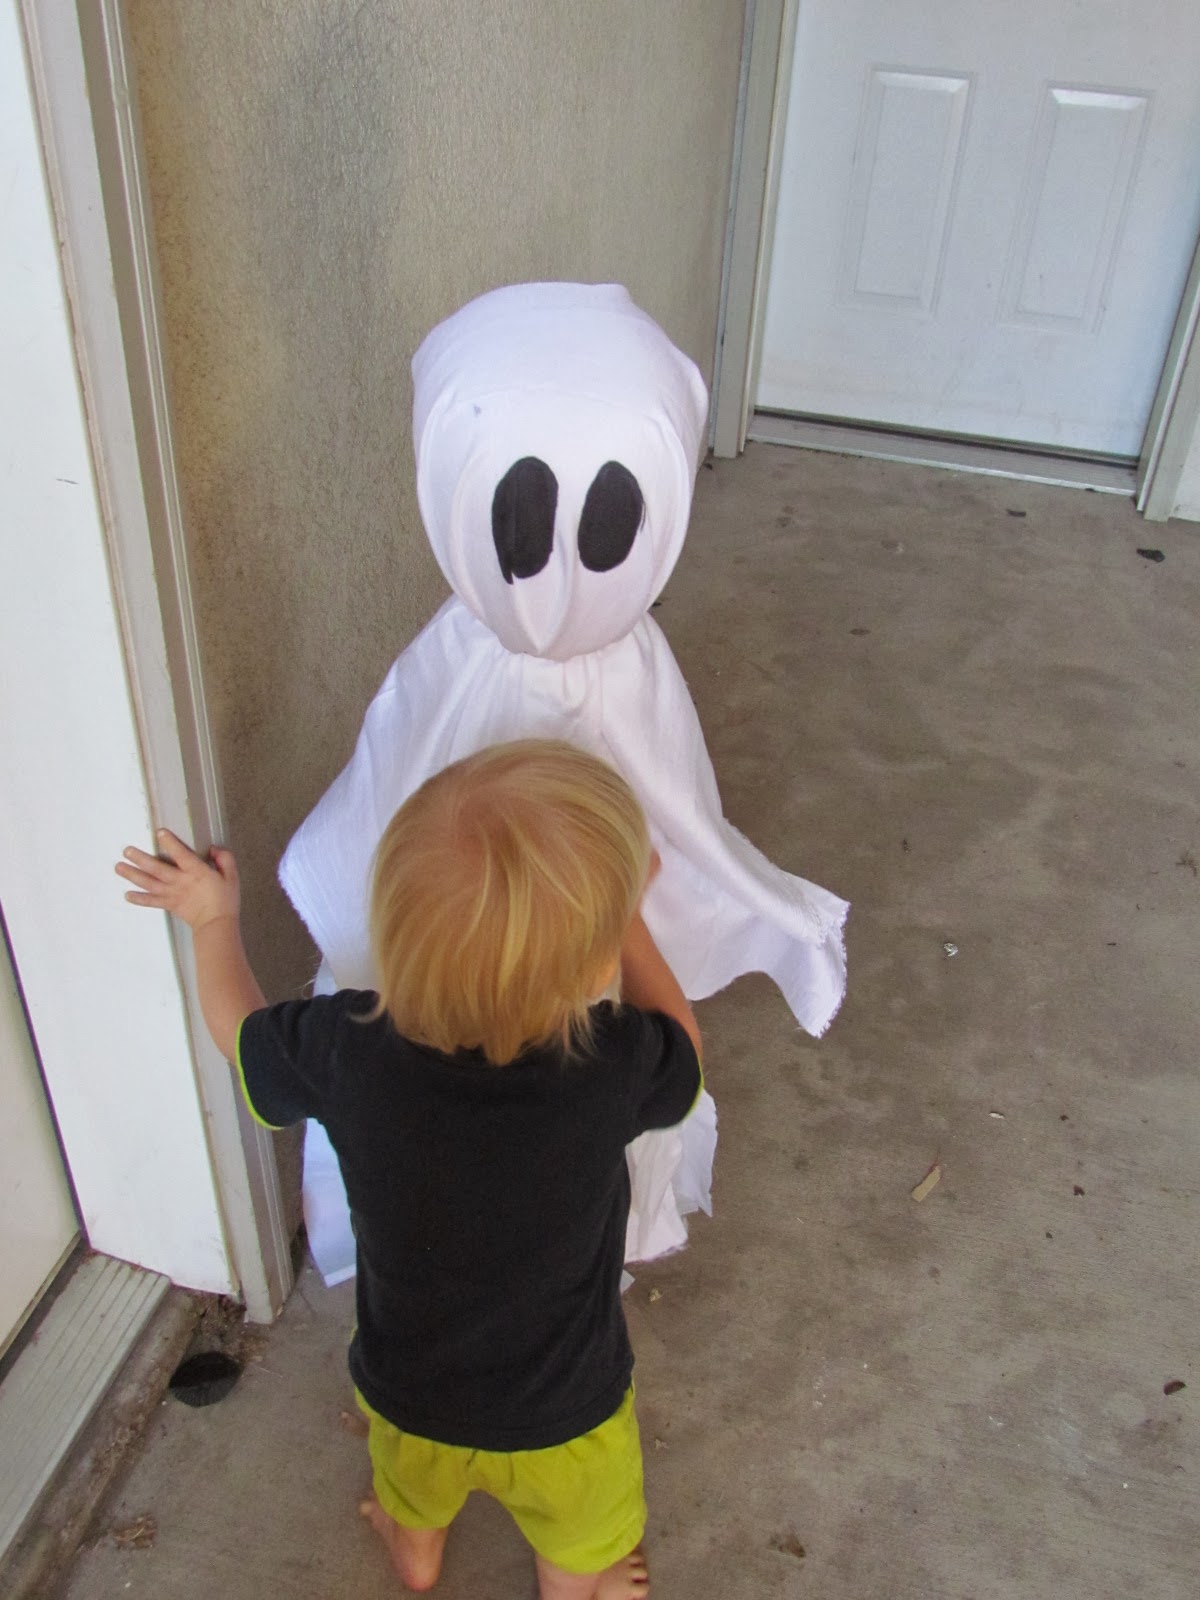
    Use a permanent marker, or paint, to add some long spooky eyes and voila!  Prince L has had a blast running up to the ghost trying to knock it down, while saying “Ooooo ooooo”


    The ghost is just how it started out though. Shortly after placing our ghost on the porch for all to see, I thought it needed a little extra…and thus the Ghost Witch was born. Can you think of anything more scary than a dead witch come back as a ghost?  


  • DIY Ikea Chair Recover

    DIY Ikea Chair Recover

    While white is a beautiful color and allows any and everything to match it, it’s not very conducive for a home with many small children. Check out this Ikea chair recover, and find inspiration for recovering your chairs! 

    These Ikea chairs were so much fun to recover. Back in August I asked over on Facebook some opinions on different fabrics I had, and there was a 100% vote for the striped fabric. I was a little nervous, since I’ve never done something with so many curves – all my past recovers have been pretty straight-edged – but I had to give it a try.

    Three years and 4 kids, completely killed the white fabric from the original chair. I assume I thought the white fabric would be OK, because the fabric was removable. I was pretty good at washing the covers, but it didn’t stop them from turning very grey, and pen just doesn’t come out.  Mark suggested I try bleaching them, when I first mentioned my plan to recover them, so I gave it a try, but nothing changed.

    The recover began!  I wish I wrote down the name of these chairs, but Ikea no longer sells this particular style.  They are very similar to the Pello Chair though. From what I can tell the biggest different is the Pello Chair has some padding, while my chairs are just fabric stretched over a metal frame.

    I started the actual sewing process while the two older girls were at school and Prince L took his nap. Princess R enjoyed the time watching her favorite movies and eating snacks. It would have been great if I had a serger for some of the edges, but I had to make do with my sewing machine. If I keep up this sewing spree I’m on I may be able to justify buying one.

    It really was simple to do, and any easy sewer could figure this out. All I did was remove the original cover from the frame, and then carefully undo all the seams. Since I had two chairs, I kept one intact so I could refer to it later on how the seams were put together. Once I had the cover completely taken apart, I traced it out on the new fabric, giving myself an extra 1/2″ for any mistakes, and larger seams. Then I put it all back together.

    I forgot to take an immediate before picture, so this is not the greatest quality, but you can see what the original chairs looked like here in our home. 
     
    Do you like my new chairs? Guess what! I am selling these beauties!  I know I know, why would I go through all the trouble of recovering them, just to sell them. They do look good in our new home. My problem is what you couldn’t see behind the camera….a matching love seat set practically sitting on top of each other.  All in the name of a good picture.
     

    For more Ikea Chair recover check out these links I stumbled across while trying to find the name of my chairs. 


  • 5 Best homemade Fathers Day Gifts

    5 Best homemade Fathers Day Gifts

    I just love Fathers Day! Holidays like this one, though make me want to get a little more simple and homemade. We buy nice things for birthdays and Christmas, but when it comes to celebrating parenthood, I like it to come a little more from the heart. These 5 homemade Fathers Day Gifts speak to Dad from the heart of children.
     

    5 Best Homemade Fathers Day Gifts 

    1. Car Shirt from The Blue Basket
    Perfect for the overworked Dad taking naps on the floor. Minimal effort for Dad, but the kids will remember an activity like this their entire lives!
    2. Tie Basket from Me – directions below.
    An easy way to keepsake kids handprints while making a useful treat basket for Dad. 
    3. Father’s Day Photo Collage from Positively Splendid
    I love this sentimental display of love from children. This would be great for any Dad’s office desk, or nightstand
    4. Father’s Day Treat Jar from My Sisters Suitcase
    One of my favorite LDS Children’s hymns is “I’m so glad when Daddy comes home”. Putting the words onto a jar full of kisses will make anyone smile. 
    5. Father’s Day Shirt and Tie from Paper Crave
    Sometimes a good mix of homemade and store-bought is needed. These treat bags are the perfect way to wrap Dad’s gift. 


    Last year I had fun putting together the Tie Basket with the Princesses. They got to put their hands in some paint, and leave their mark around the terra cotta pot.  I cut a simple tie out of fabric and hot glued it on. We then filled it with Mark’s favorite treats.  
     
    I absolutely love all these ideas I’ve come across over the years – and thanks to Pinterest can actually find again!. This year I did something similar to Positively Splendid’s Photo Collage. Instead of a single collage though, I made a photo book .  Included in it, I asked the Princesses a few different questions about their Daddy. Things like

    What’s your favorite thing about Daddy? and Why is Daddy your Superhero?

     
    I learned that I need to talk to them each separately. Otherwise, they end up all saying the same thing 

    Daddy gets us apples and bananas when they’re too high. 

    I had so much fun making this book for Mark, and going through old pictures of the kids. Now I’m trying to make one for my own Father and Mark’s Dad. Unfortunately, I’m always a little late on my timing, so the photo books are going to get here after Fathers Day, but they will be worth the wait!

    Are you looking for a few more fun and creative Fathers Day Ideas?  Check out the free PDF file from Disney Planes full of Fathers Day Activities.

    Download Spend the day with dad! Father's Day Activities
     
     
    Happy Fathers Day to all the Dad’s out there!
  • DIY Drum Light

    DIY Drum Light

    DIY Drum Light


    We felt our dining room needed different lighting. The dome light just didn’t give adequate light. In fact, I kept it off more often than on, because it made so little difference, and I saved the money. Since we were remodeling already, I figure a new light was in order as well. 
    While browsing Pinterest, I came across this DIY Drum light tutorial over at From Gardners 2 Bergers.  Although I really liked how she made her drum light, she also linked over to another tutorial at The Keylor Family.  I felt my talent for craftiness was best suited with The Keylor Family’s tutorial. 
    With the dining room remodel accomplished I decided to add my finishing touch with a drum light, in pure hopes we’d get much more light in the room than the current fixture gave.  A trip to the thrift store for a hanging chandelier, then to Hobby Lobby for the biggest Embroidery Hoops (23 inches)available, plexiglass, and some muslin and I was ready to begin.


    DIY Drum Light

    The materials:
    2 Large Embroidery hoops
    Plexi Glass – long enough to fit around the hoops. I used 3 sheets
    Fabric
    Chandelier
     
    Lay your plexi glass down and tape together. Carefully wrap the glass in between the hoops inner and outer hoops. Tighten the hoop, and flip it over. Attach the glass hoop to the 2nd embroidery hoop. 
    Lay out your fabric, and carefully glue it over the edges to the inside of the embroidery hoop. Having 2 hands helps to hold the fabric tight and straight. 
     
    The real hard part came next. Figuring out how to hang the light inside.  Through a collaborative effort with Mark, we got this.
    A piece of wood sandwiched between a section of the light, and resting under the embroidery hoops. Our first attempt was wire hangers, but they weren’t sturdy enough.
    And finally the light was hung! In my personal opinion, it’s pretty awesome!  Mark thinks it’s a little too big, and in truth it could be smaller, but hey it gives us a lot more light now!
     
    I don’t want to leave you just hanging there so here’s a grand look at our finished dining room, complete with a DIY drum light!
     
  • Budget Wall Art: Love Is Spoken Here

    Budget Wall Art: Love Is Spoken Here

    When budgets are tight, but you need some inspiration or beauty added to your life, a little bit of DIY Wall Art is all you need. 

    Budget wall art you can love looking at.

    Related Content:

    1. Frame Your Own Canvas
    2. How to Hang Art Like the Pros
    3. Star Map Art

    I pretty much spent my day yesterday looking at the wall in our front room. We had this large bare spot that needed something, but a framed picture would’ve looked too cluttered.  We got to thinking about vinyl lettering and decided we’d go that route.  Then Mark came up with the brilliant idea to just paint it.  It would be a lot cheaper, and could actually fit into our budget.

    The first step was designing what we wanted.  I knew it would say “Love is Spoken Here”, but I still needed a good font.  After playing around for a bit with the fonts, Mark sat down, and in 5 minutes had the whole design done on photoshop.

    Make some budget wall art for the home.
     
    To humor Mark, and because not many people will make the connection, the font and star are taken from his favorite band – Smashing Pumpkins. The next step was finding someone to print our 2-foot by 3-foot design.  We went with AlphaGraphics for just under $4! Now that’s a deal.
     
    After picking up the poster, I taped it up on the wall and marked the corners where I wanted the final image to be. 
    Wall art on a budget
    Once I had it where I wanted it, I removed it from the wall to cut out the letters, creating a stencil. Anywhere the white wasn’t attached (middle of R), I laid some tape on to keep it in place.  Then it was back on the wall.
    make budget wall art with your own stencil
    At this point, I then used a pencil to trace the whole design right on to the wall. Finally the fun part! Painting. We used some black acrylic paint that we already had on hand. Mark helped for a little bit until Rosalina woke up from her nap. At that point I got Venice and Chloe to help take some pictures. 
    Making wall art on a budget is simple.
    After we took the stencil off, I went back around a few of the edges with a fine brush. This helped fix where some of the paint dripped or seeped through the paper.
     
    It only took about 5-hours from start to finish but was worth every minute and the neck ache. Did you notice my yard sale find? I picked that candle holder up knowing that this was exactly where it would be going!
     

  • Love Blocks

    Love Blocks

    These love blocks add a nice touch to the home for Valentines. Simple to make, and a great reminder for the family to do all things with Love!

    This was going to be part of my Valentines Decorations, but circumstances didn’t allow me to get to it until after. My mom’s ward was making these the week before Valentines.  I was supposed to be visiting their house that week, but the weather was bad, and we were down to one car.  So I finally picked up the blocks this week and made them on my own.  It was a lot of fun, and they look great!  I think they’ll be out for some time still.


    What you’ll need for your Love Blocks

    Purchasing through the below links helps me keep this blog going!

    The blocks were already painted for me, but this would be really easy to do.  Cut a 2×4 down to the size you want your letters, then sand and paint.
     
     
    Mod Podge some colorful paper on the blocks.  The letters are vinyl cutouts, with a sticky back.  There are a lot of places that make vinyl letters like this.  In the future, I’ll just use my cricut to cut the letters out of paper.  Then mod podge them on.  After sticking the letters I added another layer of mod podge to seal it all.
     
     
    Once the mod podge has sealed add different embellishments – paper flowers, ribbons, gems – with hot glue. Then display for everyone to enjoy!
     
    Where would you display these Love Blocks?