Tag: desserts

  • Easy Apple Crisp Recipe

    Easy Apple Crisp Recipe

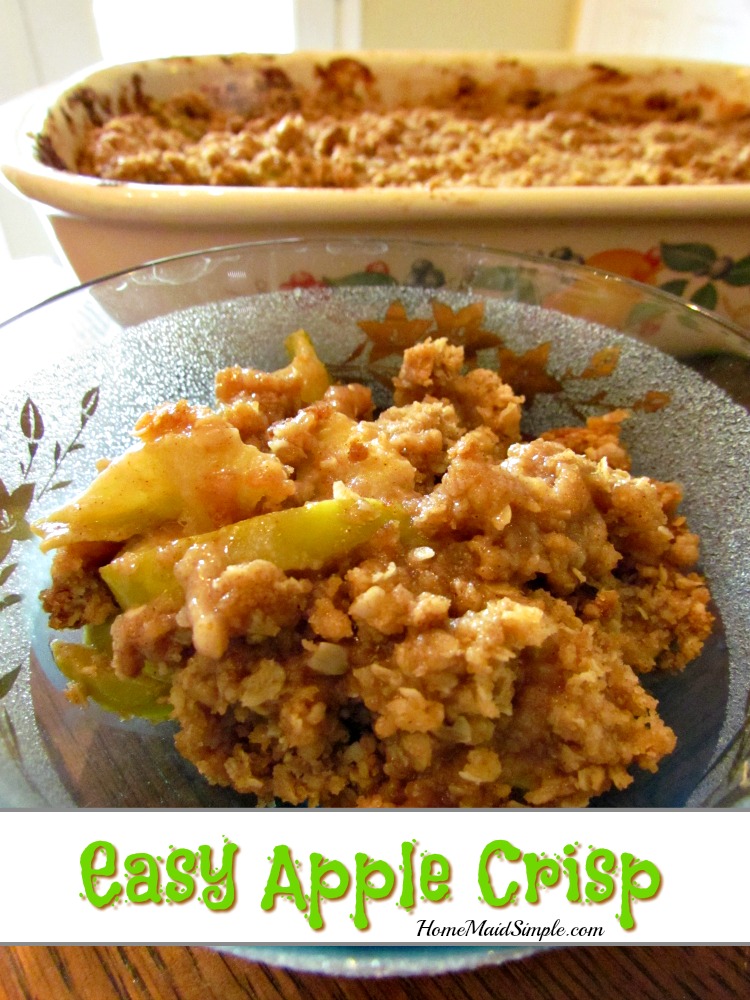
    Fall is here, and I can’t help myself! I have to get apples and bake with them. It’s the one thing on my fall bucket list every year. Enjoy this easy Apple Crisp recipe to kick off your fall bucket list. 

    Start your fall bucket list with a check mark by this easy apple crisp recipe.

    While my in-laws were visiting, we’ve had plenty of late night family gatherings. Since we almost always do these at my brother in laws home, I figured I could at least contribute to the night and bring a yummy dessert. Apples were on my mind, and I know it’s a fruit all my kids and niece and nephews will eat – so an apple crisp made perfect sense. 

    Apple crisp that is finger licking good!

    There was not a bite left over of this delicious apple dessert. If you ask my niece it was pan-licking good! She almost followed me out the door trying to get one last taste of the already devoured apple crisp. This apple crisp I think was a bit creamier than normal apple crisp with the addition of evaporated milk to the mix instead of regular milk. But why don’t you make it and let me know!


    Easy Apple Crisp
    Serves 14
    Easy pan licking good Apple Crisp. Taste fall in your mouth.
    Write a review
    Print
    For the topping
    1. 1 cup flour
    2. 1 cup old fashioned oats
    3. 1/2 cup SPLENDA Brown Sugar Mix
    4. 1 tsp baking powder
    5. 1 tsp ground cinnamon
    6. dash of salt
    7. 2/3 cup salted butter, cut into small bits
    For the Apple Filling
    1. 5 large Granny Smith apples, sliced
    2. 6 Tbsp saltd butter, melted
    3. 4 Tbsp flour
    4. A squirt of Lime juice
    5. 4 Tbsp evaporated milk
    6. 1 tsp vanilla extract
    7. 1/2 cup brown sugar
    8. 1 tsp ground cinnamon
    Instructions
    1. Preheat the oven to 375 F
    2. Combine flour, oats, SPLENDA, baking powder, cinnamon, and salt in a medium bowl. Refrigerate.
    3. In a large bowl, mix melted butter, flour, lime, evaporated milk, vanilla, brown sugar, and cinnamon until well combined.
    4. Toss apple slices in mixture to coat.
    5. Spread in a 9X13 pan.
    6. Crumble oat topping over the apple mix.
    7. Bake for 33 minutes. Remove and allow to cool
    Adapted from Tastes Better From Scratch
    Home Maid Simple https://www.homemaidsimple.com/
    Next up on the bucket list – apple picking with the kids! It’s another fall must do for me, followed swiftly by a drive to see the beauty of the fall leaves changing colors. I don’t know about the rest of you, but I find this season to be a bit magical.

    What’s on your fall bucket list?

    Check out this post on the many health benefits of apples. I knew there was a good reason to like this fruit!

  • Pecan Apple Trifle + KitchenAid Sweepstakes

    Pecan Apple Trifle + KitchenAid Sweepstakes

    This shop has been compensated by Collective Bias, Inc. and its advertiser. All opinions are mine alone. #BakeInThefun #CollectiveBias
     
    How would you like to win a KitchenAid Mixer? Just in time for fall baking you have 2 chances each week through 10/1/2015 to win!
     
    Fall weather is here. For me that means apple picking and baking are about to be all I can think about – actually it’s already all I can think about. When M&M’s® Pecan Pie flavors hit the shelves, baking was not far away. This Pecan Apple Trifle takes everything I love about fall and layers it in a delicious treat fit for company. 
     
    Pecan Apple Trifle #BakeInTheFun ad
     
    One of my favorite treats to bake in the fall are pies. I run into the problem though, that Mark loves Pecan Pie and I prefer Apple Pie. As pies, they don’t really mix, but in a trifle! Now we’re talking. By combining the fall flavors we both love in a cake and then layering it – truly a fall treat we can all agree on. 
     
    Pecan Apple Trifle #BakeInTheFun ad
     
    This trifle is so easy to make! With a few key ingredients, and a little bit of time, you’ll be ready to impress any fall guests with this trifle. Starting with M&M’s® Pecan Pie 9.9oz bags, you’ll also want to pick up some Pillsbury™ Moist Supreme® Cake Mix and Pillsbury™ Creamy Supreme® Cream Cheese Icing, Mott’s® Applesauce, and Snapple® Apple. I found all the ingredients at my local Walmart.
     
    Pecan Apple Trifle ingredients at Walmart #BakeInTheFun
     
    Enter here to win a KitchenAid Mixer
     
    Pecan Apple Trifle ingredients #BakeInTheFun ad


    To make the trifle, start by preheating your oven to 350 F. Mix up the cake mix according to the Pillsbury directions – only leave out the oil! Exchange the oil straight across for some Mott’s® Original Applesauce – 1 to 1 ratio here.

    exchange oil for applesauce in cake mix. ad

    Pour the cake mix into a 9×13 pan (or larger), and bake for 30 minutes. The larger the pan, the thinner the cake, and  better it lays in the trifle.

    While the cake is baking, get the cream part of the trifle ready. One thing we all agree on, is cream cheese icing. I had been looking for Snapple® Fall Spice, but couldn’t find any, so grabbed my favorite Snapple® Apple instead to give a little more apple flavor to the trifle. Opening the Snapple® was like transporting me straight to the apple farms.

    Whip those all up, then set it aside while you wait for the cake! I was in a bit of a hurry, because who isn’t in the fall? So rather than waiting for the cake to cool on it’s own, I tossed it in the freezer for about 10 minutes. The cake cooled enough to cut and start layering on the trifle.

    Layering Pecan Apple Trifle #BakeInTheFun ad

    Star the trifle with a layer of Snapple® infused Pillsbury™ icing. Next add a layer of cake. Follow it by more icing. Then add a layer of M&M’s® Pecan Pie and chopped pecans. You could also add a layer of chopped apples here, which I fully intended to do…but when I went to grab them there was one lone apple sitting in my bowl. Whoops! At least I know someone’s making good snack choices.

    Cake Layered trifle #BakeInTheFun ad

    Continue layering until the bowl is full. I got 3 layers of cake in my bowl. Top off the trifle with the last of the Pillsbury™ icing, and a good heaping display of M&M’s® Pecan Pie – the real star of this dessert.

    Pecan Apple Trifle
    Find all your fall favorites in this Pecan Apple Trifle
    Write a review
    Print
    Ingredients
    1. 2 9.9oz packages M&M’s® Pecan Pie
    2. 1 box Pillsbury™ Moist Supreme® cake mix
    3. 1/4 cup Mott’s® Applesauce original
    4. 3 eggs I used brown solely because they look more fall-ish
    5. 1 cup water
    6. 2 16oz tubs Pillsbury™ Creamy Supreme® Cream Cheese icing
    7. 5 TBS Snapple® Apple
    8. chopped pecans optional
    9. chopped apples optional
    Instructions
    1. Preheat oven to 350 F.
    2. Mix cake mix, applesauce, water, and eggs. Pour into 9×13 pan. Bake for 30 minutes, or until a toothpick inserted in the center comes out clean.
    3. Whip icing and juice together. Set aside.
    4. Cool cake completely. Cut into 1/2 – 1 inch squares.
    5. In the bottom of a large bowl, layer icing, cake, then icing again. Add M&M’s®, pecans and apples. Layer more cake, icing, then M&M’s® pecans and apples again. Continue until bowl is full.
    6. Top trifle with a final layer of icing, a heaping handful of M&M’s®, apple slices, and pecans.
    7. Enjoy with company.
    Home Maid Simple https://www.homemaidsimple.com/
    Do me a favor and PIN THIS!
    Put together a Pecan Apple Trifle for fall company #BakeInTheFun ad


    What are you favorite fall flavors? Find more Fall-inspired treats
  • Mini Apple Pies for Custodian Week

    Mini Apple Pies for Custodian Week

    Sunday night I got an email from the kids school. It’s Custodian Week, and they were letting us know all the ways they will be celebrating the 4 custodians who take care of the building, and if there was anyone who would like to help provide treats. I love celebrating those who are often overlooked, so of course I said yes, an then started planning these Mini Apple Pies.

    Mini Apple Pies packaged on top of a red apple make fantastic gifts!

    It’s fall, so naturally apples came to my mind, but since it’s a school celebration, apples made even more sense! I signed up to bring our custodians treats on Tuesday, giving myself 1 whole day to plan, shop and bake these mini Apple Pies.

    Being Monday, I figured it was a great Family Home Evening to get the kids involved in making something for their school. They loved adding the spices to the apples, and cutting out the crusts. While I tend to get a bit anxious with the kids in the kitchen, this actually was the perfect recipe to get us all involved.

    Mini Apple Pies

    Mini Apple Pies

    makes 6 mini pies

    Ingredients
    2 Gala Apples
    3 TBS Sugar
    1 tsp Corn Starch
    1/2 tsp cinnamon
    1/4 tsp nutmeg
    1 pkg refrigerated Pie Crusts 
    1 egg
    1 TBS water
    Directions
    Preheat Oven to 450 F
    1. Dice apples into small bite size pieces – 1/2 inch at the biggest. 
    2. Heat a skillet over medium-low heat. Add apples, sugar, corn starch, cinnamon and nutmeg. 
    3. Stir until sugar is dissolved. Cook until apples are tender. Remove from heat and set aside. 
    4. Unroll 1 pie crust. Using a glass cup, we cut out 6 mini pie crusts. You can also use the top of the pie tin as a guide. 
    5. Push crusts into pie tin. Fill with apple filling.
    6, Unroll 2nd pie crust. Using a smaller glass cup (or bottom of pie tin), cut out 6 more circles. 
    7. Fold them in half and cut slits for vents during baking. 
    8. Top pie filling with 2nd crust and seal edges. 
    9. Mix egg with water. Brush pies with egg wash
    10. Place on a cookie sheet. Bake for 10-15 minutes, until crusts are golden brown.
    11. Let cool for 10 minutes, then enjoy. 
    To make into a gift bag, We put an apple in the bottom of a bag, placed a cardboard circle on top, then the mini apple pie. Tie off with a ribbon and you have a fun baked treat to give. If doing this, let the pies cool completely before placing inside the bags. 
    Mini Apple Pies
    Since we only have 4 custodians, we had 2 pies left to enjoy between 5 people. One child claimed a dislike for pie, so 4 of us split the remaining mini pies. They were oh so yummy, and I was given a few scowls for not having more to share with them. 
    How do you like your apples?
  • Mini S’mores Pies

    Mini S’mores Pies

    Mini S’mores pies are the perfect treat to bring the outdoors in, prep for camping season, and please little hands in the process! 
    Mini S'mores Pies

    Camping season is coming up – actually it’s here! The weather is nice and warm up here too hot if you ask me and the mosquitos are out. It’s time to pack our bags, and head outdoors. We’ve been buying marshmallows for the last couple months, hoping to make s’mores, but somehow the bag keeps emptying before we get that far.

    3 ingredient easy Mini S'mores Pies

    So there I was, dreaming of camping out in Mark’s new 2 room tent, and roasting marshmallows over a warm fire, when I remembered I had mini pie crusts in my cupboard. And a 1/3 bag of mini marshmallows as well. All that was left was a chocolate component, so I ran to the store and picked up some chocolate pudding.

    I love when these easy ideas pop into my brain, don’t you? This was the kids last week of school, so what better way then to celebrate with a twist on a summer treat. Enjoy these easy Mini S’mores Pies!

    Torching mini marshmallows on chocolate pie in a graham cracker crust

    Mini S’mores Pies

    Ingredients
    6 Mini Graham Cracker Pie Crusts
    1 box chocolate pudding mix
    1/3 bag mini marshmallows

    Directions
    Mix up the pudding according to the pkg. Pour into pie crusts, and let set in refrigerator for about 1 hour. Top with mini marshmallows. Use a butane torch to roast your mallows. If you don’t have a torch, your oven broiler will do. Just keep a very close eye on them. They will burn quickly!

    How do you like your S’mores?

  • Strawberry Ice Cream Recipe

    Strawberry Ice Cream Recipe

    Two weeks left in May, which means 2 more Strawberry recipes for National Strawberry month! Today’s is probably going to be my favorite to share, because oh em, you guys! This Strawberry Ice Cream will melt in your mouth and be gone all too quickly. This post contains affiliate links and I will be compensated if you click on and purchase through these links. 

    I only received a complaint from 2 people in the family and that was that it lacked sugar, because guess what?! Yeah, I cut the sugar down for a healthier (no health claims, just less sugar) strawberry ice cream option. I found it delightful, and the perfect afternoon refresher. I’m accidentally in love with this ice cream, and kind of sad I made such a small batch. Baby, I surrender to the Strawberry Ice Cream (bonus points if you can name that tune!)

    Right now I”m seeing some great sales on strawberries as they are currently in season. Stock up and make more than just ice cream. You’ll need at least one jar of this Strawberry Curd to add to the ice cream. It may sound intimidating, but I promise it’s so worth it to make. You’ll be adding it to more than just this Strawberry Ice Cream. 


    Strawberry Ice Cream
    Less sugar makes this treat a superb treat as you transition from spring to summer.
    Write a review
    Print
    Ingredients
    1. 1/2 pint whipping cream
    2. 1/2 cup milk
    3. 1/4 cup sugar
    4. 1/3 cup Strawberry Curd – http://www.homemaidsimple.com/strawberry-jam-and-strawberry-curd/
    Instructions
    1. Mix all ingredients together.
    2. Add to your ice cream maker, and freeze up.
    3. After the ice cream machine does its thing, put it in a bowl, covered with plastic wrap and place in the freezer overnight.
    4. Top with fresh chopped strawberries, and enjoy!
    Home Maid Simple https://www.homemaidsimple.com/
    After you try this Strawberry Ice Cream, why not make one of these other Strawberry Recipes while the prices are prime for the picking. 


    What’s your favorite flavor ice cream?


  • Spring Cupcakes with Strawberry Curd Filling

    Spring Cupcakes with Strawberry Curd Filling

    Let’s continue National Strawberry Month with these beautiful, simple, and tasty spring cupcakes. Fill them with a little strawberry curd, and top with a candy flower that anyone can create.
     
     
    The strawberry curd I shared last week was the inspiration for these, however, the Starburst flowers on top add to the spring look and flavor beautifully. You can find the recipe below, but it is so incredibly simple you can switch it up to fit your fancy.  


    Spring Cupcakes with Strawberry Curd Filling
    A quick cupcake with strawberry curd filling, topped with a starburst flower creates a beautiful spring centerpiece.
    Write a review
    Print
    Ingredients
    1. 1 box White Cake Mix + ingredients to make it
    2. Strawberry Curd
    3. Vanilla Frosting
    4. Starburst flowers
    Instructions
    1. Mix and bake cake mix according to the package directions for cupcakes.
    2. Put the strawberry curd in a piping bag fitted with a filling tip.
    3. Insert into the cupcakes and fill with yummy goodness.
    4. Use another piping bag and fill with the frosting.
    5. Frost your cupcakes, and top with Starburst flowers.
    Home Maid Simple https://www.homemaidsimple.com/
    On to the Starburst flowers! So I was walking around the store grabbing items to make the strawberry curd when these flowers just popped into my head. I’ve been playing with starbursts since I was a kid, but had never made flowers like this before. They are incredibly easy, however, your fingers will get pretty sticky, especially if you’re making a couple dozen. 
     
     
    You’ll need a pair of scissors, starbursts, and candy pearls. Start by unwrapping your starbursts, and then flattening them with your fingers until they’re about half their normal thickness. 
     
     
    Next, you’ll make 2 small cuts towards to the center, without cutting all the way through to the center. After the first two cuts, you’ll shape the corner into your first petal. Then work your way around cutting and making the rest of the petals. 
     
     
    Once your petals are all formed, add a pearl candy to the center, and Voila! Starburst flowers to make any dessert spring worthy. 
     

    Related – Valentine Toppers


  • Chocolate Chip Peanut Butter Ice Cream

    Chocolate Chip Peanut Butter Ice Cream

    Peanut, Peanut Butter! I love the sweet and salty flavor mix of this Peanut Butter Ice Cream. I received Pic’s Really Good Peanut Butter in exchange for this post. All opinions are my honest thoughts. This post contains affiliate links and I will be compensated if you click on and purchase through the links. 
     
    I bought myself an ice cream maker this month. It’s been on my wishlist for pretty much ever, but Mark claimed he doesn’t like home made ice cream. So I put it off. Well one day Mark comes home and is all “I saw an ice cream maker on sale today, you should get it”. You don’t have to tell me twice! Besides I had just gotten some Pic’s Really Good Peanut Butter that I knew would make some flavorful ice cream.
     
    Before I get into the recipe, let me tell you about Pic’s Really Good Peanut Butter. The first thing you should know, it really is Really Good! It also is all natural consisting of Peanuts and Salt (less than 1%). When compared to my regular peanut butter, I was baffled – 7 ingredients vs 2 ingredients. Why do we add sugar to our peanut butter? Pic Picot was also annoyed when sugar was added to his Peanut Butter – so he did what one would, and began making his own. Without all that added stuff.  

    Really Good Chocolate Chip Peanut Butter Ice Cream

     
    Really Good Chocolate Chip Peanut Butter Ice Cream
    A delicious combination of sweet and salty with natural peanut butter
    Write a review
    Print
    Ingredients
    1. 2 cups Heavy Whipping Cream
    2. 1 Cup Milk
    3. 3/4 cup sugar
    4. 1/4 cup Pic’s Really Good Peanut Butter, Crunchy
    5. 1 cup milk chocolate chips
    Instructions
    1. Mix the cream, milk, sugar and peanut butter well.
    2. Add to your ice cream maker and mix according to manufactures directions.
    3. About halfway through the cycle, add chocolate chips, and continue churning.
    4. Store in the freezer.
    Home Maid Simple https://www.homemaidsimple.com/
     
     
    Connect with Pic’s
     
    We also tried my No Bakes with the Pic’s Peanut Butter, and oh my! Better than ever. What will you try Pic’s Peanut Butter on?


  • Weekend Bites #22 Cheesecake

    Weekend Bites #22 Cheesecake

    Weekend Bites
    Weekend Bites


    If you’re new to Weekend Bites, here’s the run down
    Visit my cohost Debi at Practical Parenting
    1. Link up your any food related post below
    2. Browse the linky, visit some new blogs, and share if you feel so inclined. 
    3. Please only link up 3 posts. This lets us visit as many of you as possible.
    4. By linking up you give me permission to feature your photos on Home Maid Simple (always linking back to you of course!)
    5. Each month I send out a newsletter with the most popular links from that month – you may be featured!!  This is a once a month newsletter, every first Friday of the month, no spamming involved. Subscribe!


    Thanks for always coming to party with us! We just love looking through your recipes. Enjoy this weeks Features. 


    Raw Vegan Mango Cheesecake
    from Vie de la Vegan
    I love cheesecake, but this is one version I’ve never seen! 


     24 No Bake Cheesecake Desserts, a round up of easy, no bake cheesecake recipes! Including pies, popsicles, bite sized desserts and more. - ThisSillyGirlsLife.com
    24 No Bake Cheesecake Desserts
    from This Silly Girls Life
    Yes, I really really do love cheesecake! 


    Cherry Key Lime Pie #recipe #keylimepie #keylimepierecipe
    Cherry Key Lime Pie
    from Titi Crafty
    It’s not cheesecake, but pie is a pretty close second in my favorites. 


    Grab a Featured Button!

    Weekend Bites
    Weekend Bites

  • Valentine Cupcakes

    Valentine Cupcakes

    See my 2 favorite methods for topping cupcakes, and then make your own! Candy Cut-Outs and melted chocolate make beautiful toppers for Valentine Cupcakes. This post contains affiliate links and I will be compensated if you click on and purchase through them.

    Originally posted on Your LDS Blog.
    I love Valentines Day! It’s such an optimistic holiday as we share our love with those close to us. Some may argue with me, but I’ll keep loving this holiday, and sharing my love with those around me.

    This weekend our ward put together a Valentines Dinner and Talent Show for the adults. I skipped signing up for a talent, because well, there are some talents that just aren’t shareable for a show. However, I did sign up for a dessert and decided it would count just fine as my talent. The method I’m going to share is actually really simple and can be used in so many other applications to make it your own.

    There are 2 ways I prefer to decorate cupcakes. Well, 3 if you count just topping them with frosting and sprinkles, but let’s get real, we all love having a little more decor on the top right? Method one involves a little melting on the stove, and method 2 you’ll need some cookie cutters.

    Cupcake Topper Ingredients

    Here’s what you’ll need – White Almond Bark and red food coloring (or whatever color you want!), piping bags, and the smallest piping tip you have, a cupcake (I made these heart surprise cupcakes), frosting, and starbursts or tootsie frooties. I usually prefer tootsie frooties, as they just mold better, but since I couldn’t find any at the store, I went with Starbursts.


    Method 1

    On LOW heat melt the almond bark. Add 2-3 drops of food coloring. and stir until well mixed in. Let the almond bark cool slightly, but not too much or it will start to harden back up. Lay out some parchment paper, and begin piping your designs.

    Melt white chocolate and pipe designs for Valentine Cupcakes

    Method 2

    If you are using starbursts, you’ll need to microwave them for about 10 seconds. Tootsie Frooties can skip this step. Use a rolling pin to roll out the candy and then cookie cutters to cut out the shapes. If you want to get a little bigger on your designs, just smoosh a couple candies together. For a more 3D design use your hands and mold the candies into your preferred shape.

    Starburst-Decorations

    Now you can skip the fondant that no one likes anyway, and still have smooth designs to add to your treats. For more inspiration see how I used Tootsie Frooties for Princess Peach Cupcakes.


  • Comfort Food with Peaches and Almond Cream

    Comfort Food with Peaches and Almond Cream

    This shop has been compensated by Collective Bias, Inc. and its advertiser. All opinions are mine alone. #WarmthInACrust #CollectiveBias
    Peaches and Almond Cream pair perfectly with Marie Callenders Pot Pies #WarmthInACrust #ad
     

    We had a nice 2 weeks of warmer weather, but this weekend saw us with snow again, and temps below zero. It was a neat phenomenon watching my hair frost over while shoveling snow this morning, but it also left me craving some home made comfort food. Of course when I think comfort food, I think Marie Callender’s pot pies.

    As much as I love baking from scratch, pot pies can be time consuming, and you all know how much I love going simple! We had been to Walmart the other day as a family, and let the kids all pick their own pot pie. I figured this way, no one could complain about dinner – sneaky sneaky. I may have also been sick of the immense whining heard this week over my choice of dinners.

    The kids definitely thought this was cool – and dinner was met with very little complaints, other than “Wait, I want to try hers!” So we passed plates and forks around the table until everyone was satisfied they really did pick their favorite pot pie. It might not be home made by me, but one of the things I love about Marie Callender’s pies is that the gravy is home made and it’s got a golden flaky crust. That kind of crust is important!

    To help remember who had what pie, I used the tip of a knife to carve everyone’s intitials into their pie. My kids love being able to claim ownership over things (as the penned names on the back of doors will prove…), so adding their initials was not only useful, but fun as well.


    While we were hanging out at Walmart, I noticed some peaches out. It’s not really peach season, and these peaches could tell – but since I was already thinking about comfort food, peaches and cream came to mind. Is there a better pairing of comfort foods then pot pie and peaches and cream? I don’t think so. While the taste like home made pies baked, I whipped up some Almond Cream to go with the peaches. 


    Peaches and Almond Cream

     
    Peaches and Almond Cream
    Write a review
    Print
    Ingredients
    1. 1 pint Heavy Whipping Cream
    2. 1 tsp almond extract
    3. 2 TBS confectioners sugar
    4. 1 vanilla bean
    5. 4-5 fresh peaches or 2 cans of sliced peaches
    Instructions
    1. Cut open the vanilla bean, and scrape out the seeds.
    2. Combine the seeds with the rest of the ingredients in a large bowl.
    3. Beat on high until stiff peaks form.
    4. Place peaches in individual serving bowls, and add a dollop of Almond Cream.
    Home Maid Simple https://www.homemaidsimple.com/
     
    *The vanilla bean is more for look than flavor. It gives a nice speckled look to the cream.
     
     
    Marie Callender’s Pot Pies know comfort food. That’s why they’ve started the Comforts From Home program. For every code submitted, Marie Callender’s will make a donation to USO2GO, a group that provides electronics, sports games, books, and more to our troops in remote locations. 
     
    Get more recipes at Pot Pie Please
    Stay up to date with Marie Callender’s on Facebook
     
    What’s your comfort food of choice?