
Tag: design
-

One Room Challenge: The Everything Room
I’m so excited to be sharing my One Room Challenge with you all this month. Each week I’ll give you a little peek into what I’ve been doing to make our Family Room/Everything Room the best place it can be.
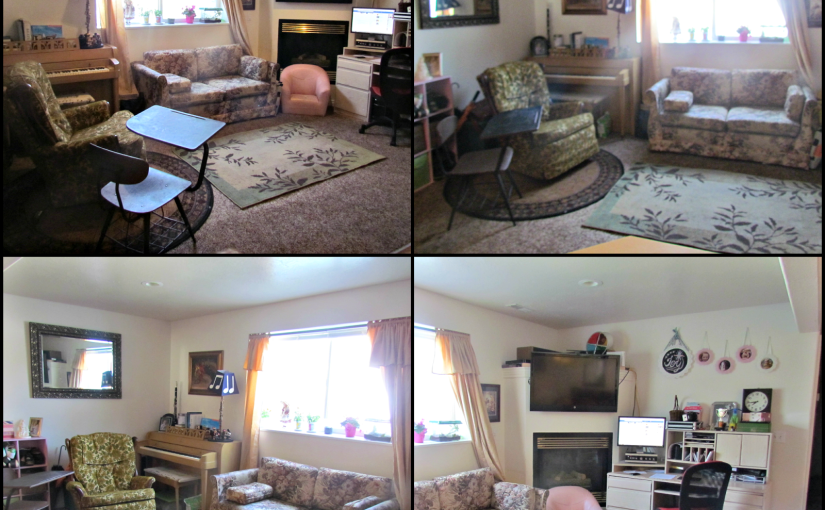
There’s 6 of us in this house, and I’ve come to realize that 3 bedrooms, a kitchen/dining room and 1 family/living space is a bit cramped. We use this space for family relaxing, chatting with visitors, and folding laundry.As much as I would love just one extra room to split those activities apart, I don’t have it. So it’s time to work with what I have, and really make it a fun place, right? The following pictures may be overwhelming…but by November 12th it’s going to be a world of difference!
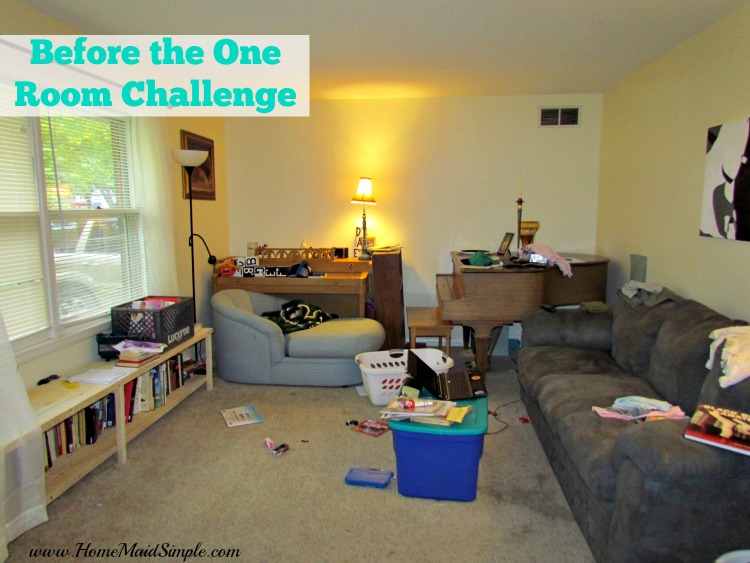
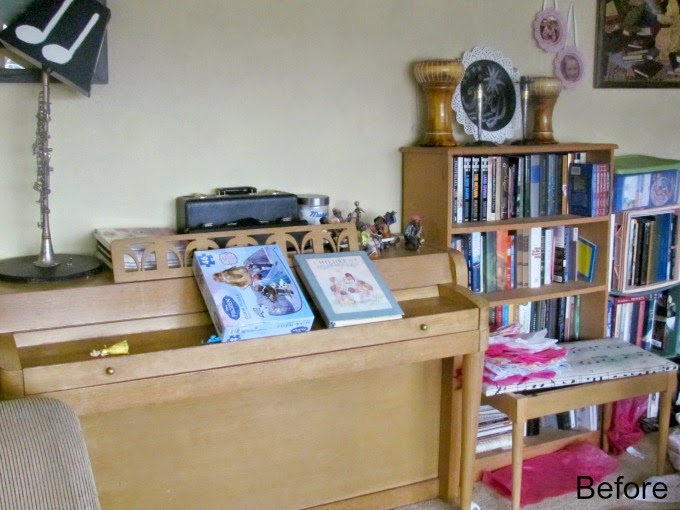
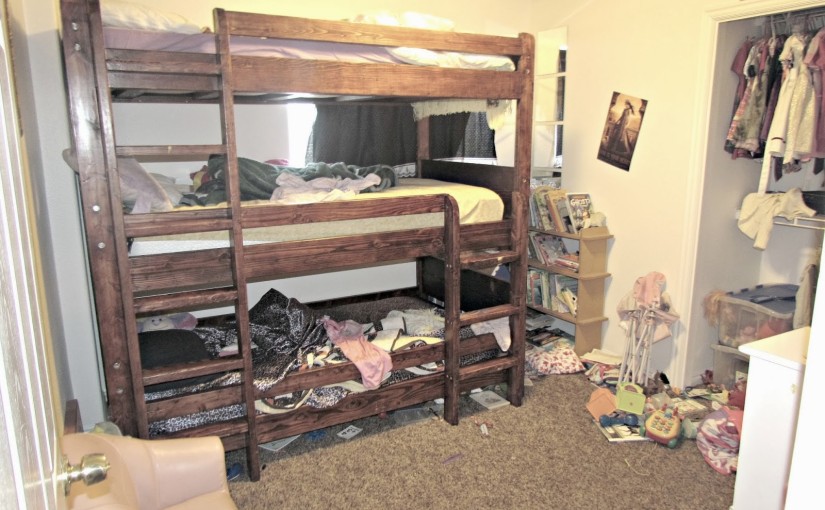
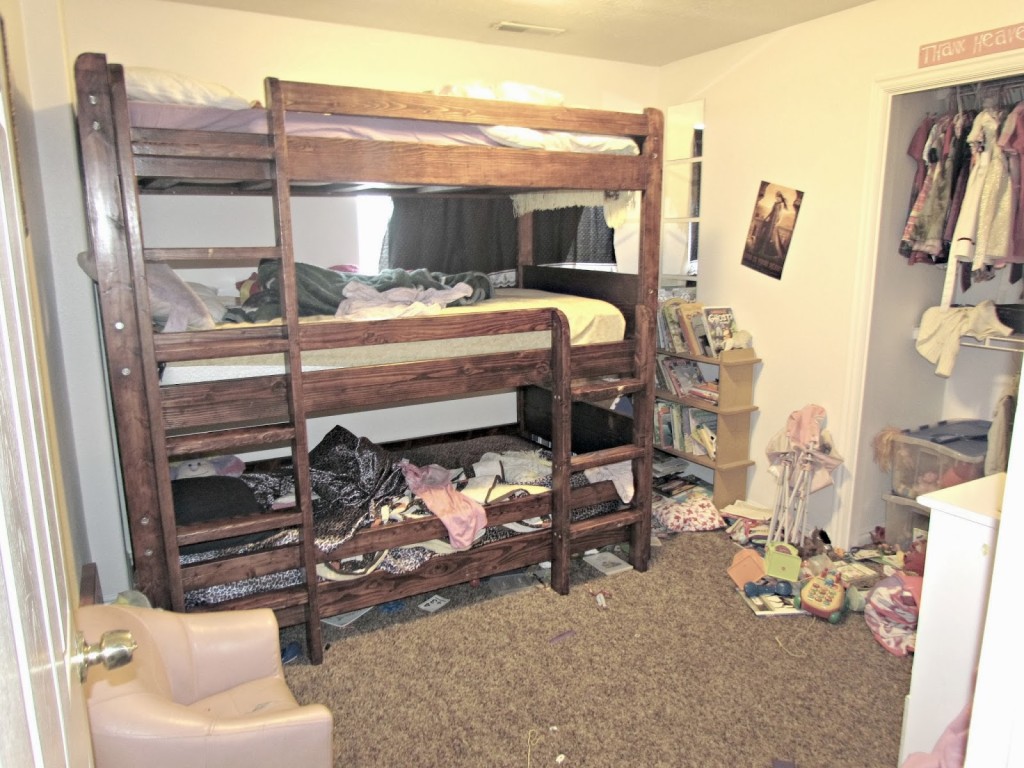
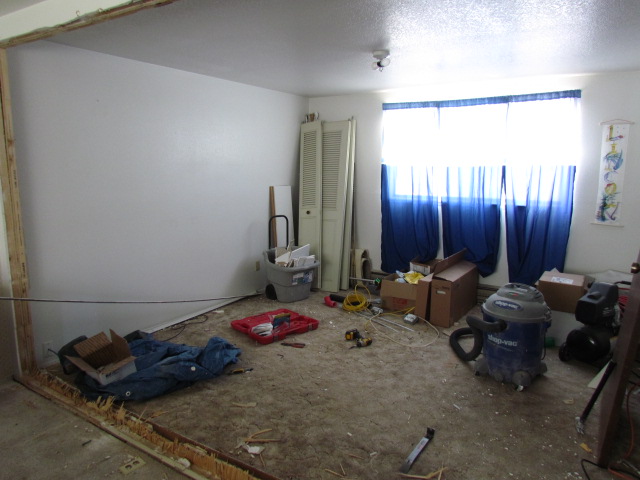
Yeah, that makes me feel almost too exposed! This is the first room people see coming into my home, and I need it to look better than this! We’ve already started redoing this room, but it has a ways to go still – obviously!
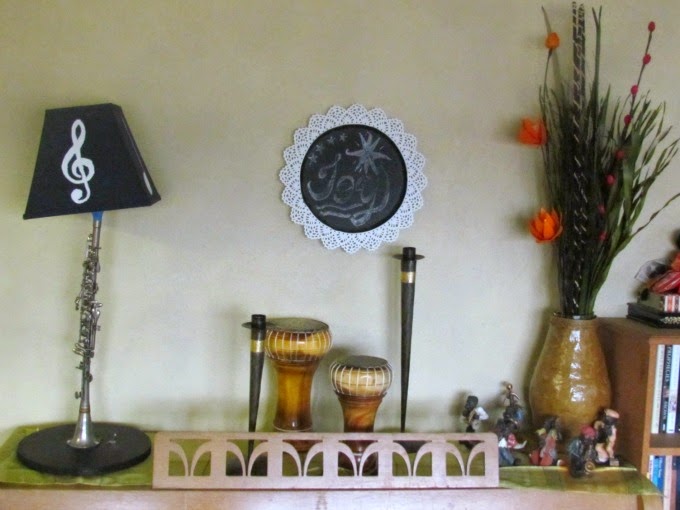
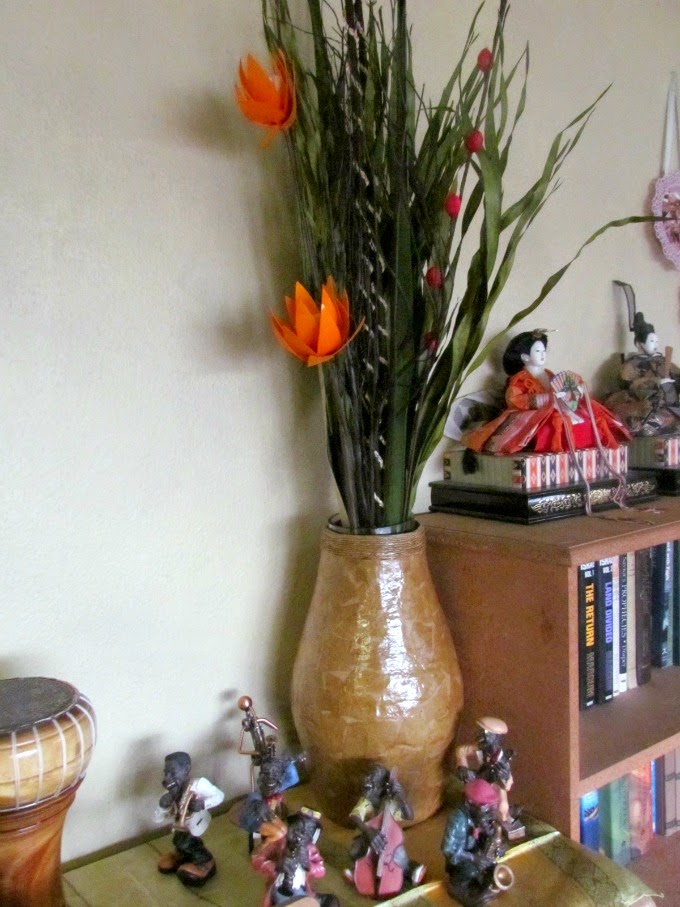
A week ago that was my bookshelf – eeee! Frightening really. As my dear sister in law described it, the “college styled” bookshelf had to go! Mark built me a fantastic wooden window seat/bookshelf. It holds all the books plus some more, and provides extra seating in the room. I’ll be making a cushion to go on top this month, for a little more color and comfort.
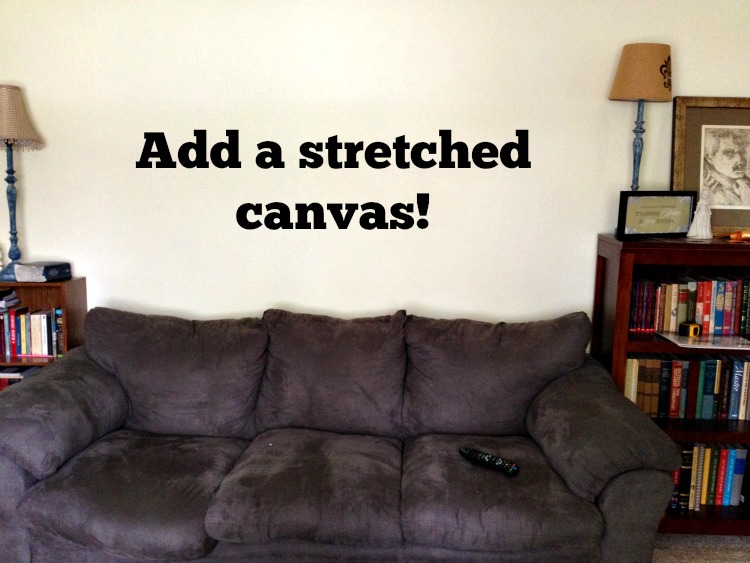
It’s been a long time since we’ve owned a new couch. When we moved here I decided it was high time we had a nice couch that actually fit in the space we had. I fell in love with this charcoal piece, and it fit so perfectly. Everyone loves sitting here. The space above needed some art though. I’ve got an old painting from my college art days that I’ll be use to teach you how to stretch your own canvas painting for hanging.
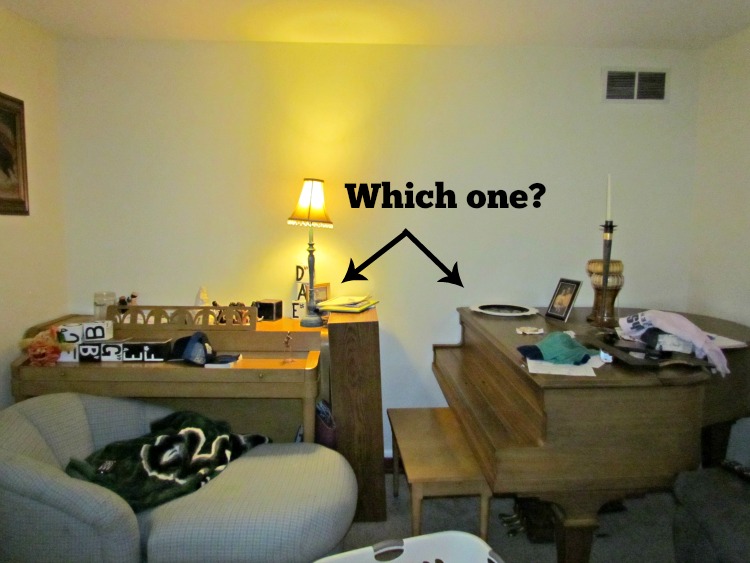
Finally, the big elephant in the room – we have 2 pianos! Very recently we paid off our used upright. It was our Christmas present to ourselves 3 years ago. Recently Mark had an idea to turn an old baby ground piano into a bookshelf. So we managed to acquire one for absolutely FREE!The problem? While the company was going to throw out this baby grand, there’s really not that much wrong with it – so instead of turning it into a bookshelf, we’re toying with the idea of having it tuned and fixed up. Until that happens though, we’re hanging onto both pianos! AHH!Thanks to Calling It Home for hosting this One Room Challenge!Check out the linky to see what other bloggers are working on. -

Family Room Makeover with Bassett Furniture
*This is a sponsored postHave you ever looked at your house and wondered, where do I start? How do I make this reflect my family, without just becoming a cluttered mess? I’ve been feeling that way a lot over the past year. Especially after we moved back into an apartment, where adding your own style can be harder than when you own a home. The lack of space has also been difficult to manage.What am I supposed to do with this room, where we do EVERYTHING! One side is for visitors, family time, television, homework, computer, work, and well…you get the idea. We literally do everything in this one room. On the other side is our kitchen/dining area. Most days it feels like it’s all combined and there is no good distinction between the two. .So what do you do? You call Bassett Furniture of course. Did you know that Bassett has design specialists that will come to your home and help you design and decorate to fit your needs and style? It’s so much fun – and a great way to take a break from life.So how does it work? I’ll walk you through my experience with the lovely Katie.2nd – Pick up a catalog, or browse the online collection.As you go through the catalog, mark it up. Circle what you like, make notes, bend the pages. This gives your consultant a good idea of everything you like.3rd – Meet with your consultant and enjoy a nice chat while measuring your room.Seriously couldn’t have asked for a better consultant than Katie. She came into my home, and I felt like we were best friends who just hadn’t seen each other forever. We talked design, family, dreams, etc. I may hop over to Bassett more frequently just to chat with her.
4th – Head into Bassett and see what awesome design your consultant has come up with just for you!Katie was great! She took the “Coastal” theme and colors I want to incorporate into this room and showed me some great fabrics that would work. Since we are on a limited budget, she also showed how I can incorporate a lot of these on my own by painting furniture I have, recovering the couch versus buying a brand new one, and changing up the curtains to lighten things up.Don’t live near a Bassett? Check them out online and play around with the design tools available on there. If possible though, I do suggest visiting the store – unlike online they often have special sales going on all the time! I don’t think I’ve ever not seen a sale sign outside their doors (and since they’re next to Hobby Lobby, I kind of drive past them a lot!).Have any suggestions for my room? -

Doing Good with Warby Parker
This post is sponsored by Warby Parker, however no compensation has been received. I believe in doing good and sharing companies that feel the same.I’m going to just jump right in here with a video about Architecture for Humanity–I love the idea of a more sustainable future for communities in need around the world.To celebrate Architecture for Humanities 15 years of design, Warby Parker has released 2 new collaborative frames – the Aslin and Fowler. These frames, like Architecture for Humanity, are designed with built to last materials and streamlined angles for elegance and sustainability.Why is Warby Parker celebrating Architecture for Humanity? Simple really, Warby Parker is committed to making the world a better place for everyone. Their employees, their customers, and the world at large.Did you know for every pair of glasses purchased at Warby Parker they give a pair to someone in need? They call it their Buy a Pair, Give a Pair program. It’s companies like these that remind me how blessed I am, and how much good there is in the world.Currently Princess V likes to tell me that she needs glasses “This eye is blurry mom! I can’t see. When are we getting me glasses?”Glasses can give so much comfort to people with poor eyesight – but they aren’t always attractive. I am personally digging the new Aslin glasses. The natural look combined with a little pop of color in the corners speaks to me.However, since I don’t currently need glasses to see, I do enjoy a good pair of sunglasses. The Fowler is a sleek pair that is not overly bulky like the ones Mark enjoys, but still seems to afford proper coverage for the eye’s protection.Looking for ways to help give back to communities in need?See if their is a local chapter of Architecture for Humanity near you. -

Dreaming of Kids Rooms
I decided to start my new year off with a room makeover for the kids. I haven’t actually tackled anything in there yet, but it is the first home project I’ll be doing this year. It seems every time we move, we have to completely revamp our toy storage and organization system.
I’ve spent a lot of time just staring at the girls room, and trying to figure out what I can do to make it work for all of us. The kids get so overwhelmed when it’s time to clean up, because in order to get something out, they usually have to pull out every toy to find what they want.
I have some idea of how the room is going to look when I am done, but that’s just
Just a quick sketch of the layout I’m planning.I’ve been browsing online for more ideas of room setups, and toy storage. Here’s a couple I’m going to try and recreate.I love this Stuffed Animals on Velcro idea! I found it on Pinterest, and haven’t been able to find a direct source for it (if this is your photo, please let me know!) If I put a strip above each mattress the kids can sleep with their stuffed animals, and keep them off the floor. It will make bed making easier too.On my sketch the doll house is sitting right inside the door to the room. I found this doll storage again on pinterest (no credit again), to hang over the door. Giving them quick and easy access to play with and pick them up.I’ve had this lazy suzan shelf on my pinterest board for awhile now. I think the girls would really love having this in their reading area. The cork board provides a place to hang all their art, and school projects.In my email early this week, I got these fun tips from (affiliate) Zulily that I also loved. Tip #1 is my biggest need! Easy access of the most used toys!I can’t wait to get started in the girls room! Of course we’ll have to go through all the toys and clothes first, and get rid of any old/broken/unused items first, then we’ll have fun putting the room back together.What are your tips for kids rooms? -
Big Tiles in Small Bathrooms #GuestPost
Big Tile Designs for Small BathroomsIt’s fairly common for houses to have smaller bathroom as many homeowners allot more space to other parts of the house such as the living area, kitchens and bedrooms as these are what guests usually see. Decorating these areas is also much easier as compared to the bathroom which usually requires simple tiling and some DIY tools.However, the bathroom should also be treated as essential parts of the house as this is one of the places in the home where we spend time the most. If you’re frustrated over the relatively small size of your bathroom don’t worry! There are redecorating tricks you can use to give the illusion of a bigger space.One of the easiest ways of making bathrooms look more spacious is using neutral, bright and light colors. Using straight line designs and put up mirrors to make the rook appear larger. It would also be helpful to install ample light fixtures and add an extra window to allow more light to come in. Having a large mirror is also an effective way to create the illusion of a larger bathroom. But aside from these basic techniques, you can also use tile designs to make your bathroom appear bigger.Tile Designs for Bigger-Looking BathroomsGenerally, about 75% of a bathroom’s surface is covered with tiles. That is why it is important to choose the right type of tiles and design that works for your bathroom style and size. This way you can maximize both the functional and aesthetic elements of your bathroom tile design.Laying square tiles on the bathroom floor in a diagonal pattern can certainly make the room seem larger. You should also consider going with lighter tile colors which easily reflect light. White is commonly used for bathrooms as it provides a clean and pristine effect especially if the tiles are well-maintained.However, white tiles can also make a bathroom look dull or even clinical-looking. That is why it would be better to stick to shades of gray or beige to at least give a bit more texture to the area. You may stick to white tiles but it would be best to mix in another set of tiles with a different color. Popular tile colors for bathrooms include palettes of blue, green, orange, and red. You may use these colored tiles for borders or as accents to make the design look more interesting.As always, make sure the tiles you install in your bathroom are water-resistant to minimize slippage risks and dirt buildup which can damage the tiles. The most commonly chosen material used for bathrooms are glazed ceramic tiles but you may also go for metal tiles for a more contemporary look. If you do decide to use metal tiles, be careful not to overdo it as the room may resemble a metal chamber instead of a stylish bathroom. Add a couple of potted plants and floral designs to add a punch of color to the general space of the bathroom.Another material you can use is glass tiles. They come in a wide array of sizes, colors, and shapes so you can find one which will best match the décor of your bathroom. When it comes to ceramic tiles, you can apply this to any part of the bathroom. However, when it comes to glass and metal tiles, most interior designers only use them for backsplashes.As for the countertops, ceramic or glass tiles work best. They are easier to clean which means they require minimum maintenance. You can go for a unique look by using custom shaped tiles. By following these tips, you can make your small bathroom look bigger and give it a beautiful design at the same time.Roberta Madison hopes to have her own family someday. For now, she is happy to be the marketing manager of GlasTileStore which offers stone tiles, subway tiles, metal tiles and exotic tiles. Follow Roberta Madison on G+. -

Peek Into Our Master Suite Remodel
*This is not a sponsored post. However it does contain some affiliate links. When clicking on some of these links and purchasing through the site, you are supporting Home Maid Simple. Thank you*If you’ve been following along for awhile now, you are probably aware of the Master Suite remodel we have undertaken. It began as a simple bathroom remodel, but as with most remodels, it escalated into the whole Master Suite. Today I thought I would take you on a little tour, and share some of the really classy designs we’ve got going on.
To celebrate my birthday on Tuesday, I took charge of knocking out the wall between our bedroom and the extra room to create the large master suite, and allow us access to a closet again. Our original closet has become the shower…I’ll show you that down a bit further.
So down came the wall. One thing we were not expecting was sheets of plywood between the two sides of the wall. Since this is a manufactured home though, it does make sense. While I did this, Mark spent his time in the attic rewiring the lights. We now have one light switch controlling the 2 sides of the room. Coupled with the 2 large windows, I am really in love with the light in this space.
Let’s take a look around now, at just how awesome this space is going to be.
It’s a little hard to see in this photo but the bathroom entry is not the doorway you see, but rather just on the other side of it, where the piece of sheet rock is leaning up against (have to keep the kids off the shower floor until the mud sets). It will not be your average sized doorway at 24″, but when working in older homes, you do what you have to. We actually debated leaving the entry in the hallway, and making the other side linen storage, but decided a Jack and Jill entry was our preferred style.
The door into our bedroom will be walled up, and we’ll keep entry into the Master Suite on the extra rooms side.
Can you picture a nice little sitting area under that window? I sure can!Let’s move onto the bathroom shall we?
This photo is from between the 2 entryways into the bathroom. You get kind of angled feel first walking in, but there is so much space once inside, it will really be beautiful. Of course the toilet and vanity are still waiting on the floor to be added, but you can see the general idea. The vanity will be on the wall facing the bath, affording a more room like design instead of everything in a row.We’ll be putting the original toilet back in, but the vanity was too outdated, and falling apart. So we of course visited our favorite home design store, IKEA, and purchased this vanityimage courtesy of IKEAFor better lighting and ventilation, we decided to upgrade those as well with this fancy (and seriously I swoon every time I think about getting this light installed!) hanging light and vent combination from Home Depot
image courtesy of Home DepotIt’s a lot of white, I admit, but I think bathroom fixtures should mostly be white, and then add the color in the walls, and accessories. For example, I went out and purchased us some new blue and yellow Martha Stewart bath towels from Macey’s (I may have jumped the gun a little), and some beautiful soap from Layla and GraceLet’s head back for one last look at our current DIY project, the walk in shower.This area you are looking at, use to be the closet for our bedroom. It is obviously now turning into a walk in shower. A plus for any home! Mark can take his showers, and I can relax in my bathtub. A win for all involved. It has been exciting learning how to put a shower together, but I am really mostly excited for the shower fixtures to go in! As a Friends of Pfister Blogger, I received this Kenzo Raincan Shower Head and handheld shower to put into our new shower. I am just itching to get them installed, but there’s still the floor and walls to get finished up first.image courtesy of PfisterHave you ever Remodeled a bathroom?What do you think of our design?*This post contains affiliate links. All thoughts and opinions are my own. Thank you for supporting Home Maid Simple

-

Under Construction
the blog that is! I learned about The Individuality through my dear friends blog Giveaway Corner. I fell in love with the design Megean created for Giveaway Corner, and decided it was high time I do something nice for Home Maid Simple. I used some birthday money, and got in touch with Megean to create a design I had floating around in my head. I got the images today!! Such a happy mail day!
So enough said, here’s a little sneak peak…I will be spending the day playing around with the new design and getting things looking good! Aren’t you so excited, soon you can put my button on your blog!! -

Birthday Winner!
CONGRATULATIONS TOBECKY F.Thank you everyone for the Birthday Wishes this year. I ran the 5k in under 40minutes and had a very enjoyable day with friends and family. Part of my birthday gift to me is a blog redesign. The Individuality is working on a logo. So don’t panic when things start to look different this week. She’s shown me a preview and I am severely excited!!


