Tag: tuesday tips

  • Tuesday Tips – Valentines Day

    Tuesday Tips – Valentines Day

    Love Cartoons
    photo credit

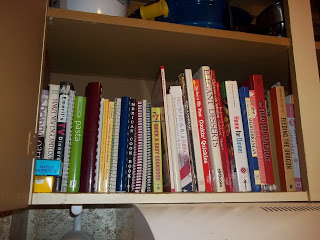
    As I “meet” people online, I am continually surprised by the number of people who dislike Valentines day. I’ve heard it called a pointless holiday. I’d like to try and change that thinking.  Use today to bring Love back into your home.

    Now granted, I am a romantic. I love showing and receiving love. Do we need a special holiday just to show our special someone we care? As women do we need a special holiday to feel loved? I hope not. BUT by putting aside one day of the year to spread some extra love, we can do great things.
    Today I’d like to challenge you to go above and beyond to show your family, co-workers, and friends that you care. It will make their day, and I will be surprised if it doesn’t put a smile on your own face as well.
     
    Over the weekend, I was starting to fall into a little depression. Nothing severe, but I just wasn’t as happy as I usually feel I am. I’m a positive person, I like to see the glass overflowing, but I hit a funk. We all do at some point. So today, I woke up and made a conscious decision to get out of it (those who suffer depression on a deeper level, I know that’s not as easy for you. I do understand and I hope you can get something from my words today as well).
     
    I actually had a pretty awful night, between a massive headache that felt like either a sledgehammer hit the insides of my brain, or a bomb went off in there, and an almost 2-year-old who just needed some mommy love all night long, I didn’t get a lot of sleep. I could have gotten up this morning, and complained to Mark (OK I did a little), or even just stayed in bed, but instead, I got up early put a smile on. I actually got to sit down and eat breakfast with Mark. A very rare occasion indeed.
     
    Today, I plan on letting the kids get messy. We’ll pull out paints, maybe have a bubble bath. Do some more crafts, and enjoy the day. If they want to do something today, I plan on saying YES (within safety reasons). 
     
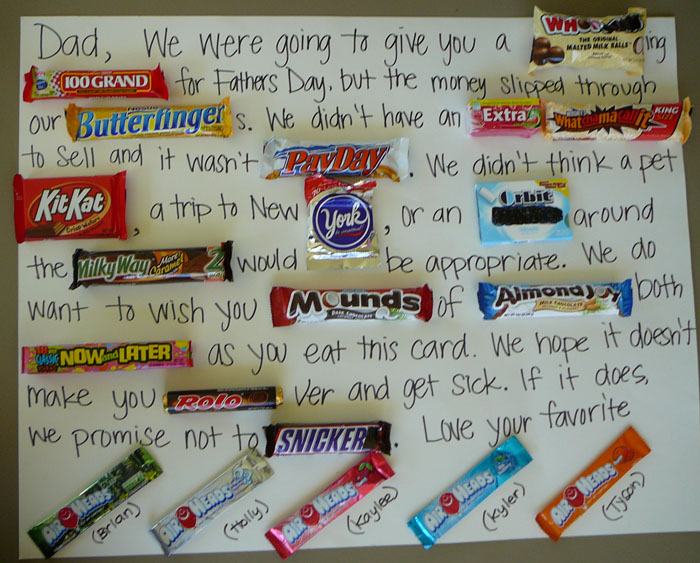
    We’re also going to make a special candy bar card for Mark, and deliver it during his lunch. We’ll even stay and eat lunch with him! It’s not something we ever do because it just doesn’t fit that great into my schedule. Today, though, I’m going above and beyond. I’ll go a little out of my way, to let Mark know I love him. 


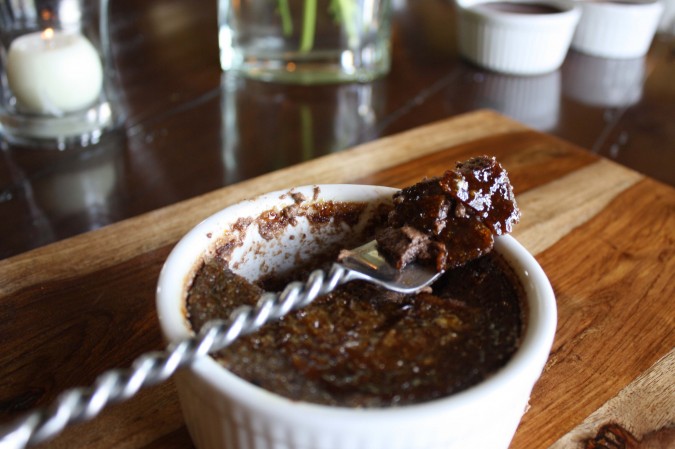
    I also plan on making this yummy Cocoa Creme Brulee. Mark loves creme brulee. I hardly ever make it because it takes a fair portion of time, time that I don’t always feel like I have. Today, though, I will make the time.  (hopefully, Mark does not read this blog today!)
     
     
    We all show our love in different ways. Some may be romantic throughout the year. But I think the majority of us easily get caught up in the day to day tasks to really focus on those around us. To me, that is why Valentines Day is not a pointless holiday. It’s a good reminder to step back from our daily grind and show a little extra love to those around us.  Celebrating a day like today, can bring peace, joy, and love back into your home. Make today count!
  • Tuesday Tip – Cleaning the bathrooms

    Tuesday Tips
    I dread cleaning the bathrooms. I don’t know why, it’s probably one of the quickest rooms in the house to clean. It also has the potential to stay cleaner longer then say the playroom, but I still dread cleaning it.
    Ideally I would give it a thorough cleaning once a week, in reality, it’s a lot less than that.
    So when I came across this article through pinterest, I was ecstatic!

    Yes, I  just said ecstatic in association with cleaning the bathrooms!! 
    I grabbed my notepad, and wrote down the simple step by step instructions and headed to the bathroom.  I’ve never used microfiber towels in my bathroom, or paper towels. In the past I’ve used a myriad of different cleaners for the different surfaces as well.
    Comet for the toilet, tub and sink.
    Windex for the mirror.
    Ammonia for the floor.
    And then of course, tougher grime, I pulled out the tougher cleaners. Needless to say, you could easily get poisoned with the different cleaners I would use in one cleaning session.  According to this professional cleaner, all you need is one. I decided to use a vinegar and water mixture, and was pleased with the results. By following the step by step guide, I think I cut the time I usually spend cleaning the bathroom in half. 

    Now I don’t know about you, but my shower doors get all covered in that white soap and hard water scum. Not even vinegar and water will clean that off! I was pretty sure I’d tried it all, short of replacing the doors, but decided to do one more pinterest search.
    Let me just tell you how desperate I was getting –
    Goo-Be-Gone – works but takes a whole lot of elbow grease and would take 48hours to completely clean (estimated time, but I spent a good afternoon and got maybe a 1/4 to a 1/2 of one door clean)
    Steam Mop – Oh yeah, I even tried steam mopping it off!! I have to laugh at myself for this one, but it was sure worth the try. No it didn’t work.

    But guess what! I found it! The KEY to cleaning your shower doors!

    Lemon Dusting Spray. 
    You’re joking right? That was my first thought when I came across this tip. But hey, I’d just attempted to steam mop it off, why not try the Lemon Duster? I had some, and it wasn’t getting any other use in my house.
    Wow! Mothers, housekeepers, stay at home dads – rejoice! When Mark got home last night, I couldn’t stop talking about the amazingly clear shower doors. I sprayed it on, and left it for about an hour. When I came back, I already saw the difference. It was like soap scum was something I had made up, a fantasy.
    Here’s my little advice and what I learned though.
    – Don’t spray the floor of your shower, it will get very slippery. Perhaps lay a towel down inside to catch any drips.
     – If it dries on, it will look like it cleaned itself and you may think you got out of any scrubbing. Sorry, you’ll see the lemon spray next time you shower. Just get a damp rag and rinse off the doors after you’ve let it work it’s magic.
    – Lastly, textured showered doors clean much better than clear. The clear doors are going to take a little more elbow grease than the textured doors.
    I’m linking up to Learning the Frugal Life. Head over there for more Frugal living tips

  • Tuesday Tip – Crayon on Walls

    Tuesday Tip – Crayon on Walls

    Have you ever stopped and looked around your house, specifically at your walls, and went “WHOA!, what happened there?”  You suddenly find that just about every wall from 2 feet down is covered in crayon.
    Yeah, that happened to me this week. I couldn’t believe I let it go that long. I’m sure I could blame it on the dining room remodel, being pregnant, trying to get kids to actually sleep at night, etc. But in reality, 5 minutes with each wall and I could’ve had them cleaned ages ago. We’ve all got 5 minutes!  Granted, if you’ve let yours go as long as mine, to get it all clean, may take your whole day. That’s the price of procrastination.
    I recently read that WD-40 will remove crayon from walls. I had a can in the cleaning cupboard, so I figured I’d give it a try. The worst possible outcome would be that it did nothing.  To my joy, it actually worked. Sadly, it only takes off crayon; no pen, pencil, marker, or little dirty handprints.

    Nice right! It even wiped off pretty easy. 
     
    This here’s my favorite though
    See if you look right near the top center to the left of the face, you’ll see CTR. CTR stands for Choose The Right. I’m so glad my kids thought to write CTR on the wall, they must be learning something, right?
    As you can see, the crayon came off, the pencil stayed. I also learned that if the crayon is under something else, say like lotion smeared on the wall, the WD-40 will do nothing. Sigh.
     
    If you know of any way to remove pencil, pen and marker, I’d sure love to hear it!

    Leave me a comment with your best wall cleaning tips!

  • Tuesday Tips – Cleaning the Vents

    Last night Mark went to the store and bought some new filters for the heater. We’ve lived in this home for 9 months, and hadn’t bothered to check the filters since moving in.  After doing a little research, I find there is a disagreement on how often the furnace filters should be changed.  Some say every month, some every 3 months, and some every 6 months. I personally was thinking that every 6 months is the norm, and so was Mark. This also probably depends on how old your furnace is and how often you use it.  Our plan is to change it every 6 months, but we’ll probably check them every couple of months to make sure they are not clogged.
    Now on to today’s tip. Don’t you hate it when your vents are all covered in dust? I know I do. I like to take the brush attachment on my vaccuum and go over the vents as I vaccuum. This can get pretty tedious every time I vaccuum though, and when the Princesses play with the attachments, I don’t always know where the brush part is.
    Instead of vaccuuming them, use Car Wax! I found this once again by browsing pinterest.  To read a full tutorial on how to clean your vents with car wax, visit Ask Anna. 
    Basically though, you want to wash your vents, let them dry, and then apply the car wax.  Then sit back, relax and enjoy sparkly clean vents!
    I’m linking up to Confessions of a Frugal Mind

  • Tuesday Tip – Battery Storage.

    With the recent holidays, many of us will find our counters spilling over with batteries.  The problem we always seem to run into is finding the right size battery, and then wondering whether it has enough juice or not. I know we have a bad habit of taking out old batteries but never disposing of them. 
    In my recent attempts to get a variety of holiday pictures, I went through many batteries. Some worked for a few minutes, others wouldn’t even turn my camera on. It was extremely frustrating, so I just bought more batteries. This time I decided to store them better.

    Source: bhg.com via Adelina on Pinterest

    I love bhg’s idea of a tackle box. Having the separate compartments for each size makes that look so nice! I took a cheaper route though, and used a pencil box I already had on hand. It doesn’t have the separate compartments, but it closes, and keeps the batteries contained.   Now whenever I need a battery I know just where to look.  And if it’s not in there, I know I need to buy more.

    While I’m on the topic of batteries, with a New Year drawing close, may I suggest you check your smoke detectors and carbon monoxide detectors. Starting the new year with fresh batteries will help keep your home and family safe. Once I’ve hit post here, I’m off to add some brand new 9volts to our smoke detectors. 

    I’m linking up with Confessions of a Frugal Mind

  • Tuesday Tips – Recipe Organization

    Tuesday Tips – Recipe Organization

    I love to cook! I love to bake!  Most especially, I love finding and trying out new recipes.  It’s really rare for us to ever eat the same meal, even if it was pretty amazing!  Mark has told me before, and I think he gave up, to please make something we’ve had before!  One of my goals for 2012 is to organize and minimize my recipe collection so that we have at least few tried and true recipes to eat again and again. 

    The left side of my recipe cupboard (above the stove) is full of cookbooks. From classics like Betty Crockers Baking to exotic from Vienna, and from Breakfast to Desserts, I have plenty of cookbooks.

    So why wouldn’t I add on to them, by piling up recipes from magazines, like Taste of Home and Better Homes and Gardens? 
    Here’s my problem! I have so many recipes, and places to look, that some never get touched!  This past year I added a new system to my cooking. As I chose a recipe out of a cookbook I kept a pencil nearby.  After eating, I tried to get a consensus of how well it was liked. If everyone enjoyed it, a penciled in a smiley face next to the recipe.
    If it was ok, or not even touched by the kids, a frowny face was penciled in.
    Eventually I will be able to go through each cookbook, and tally up the smiley’s and frowny’s.  If there are more frowny’s then that cookbook will not be kept. If there is a specific recipe in it that was truly amazing, I can write it down on a recipe card, and add it to my handy recipe box. 
    By the end of next year, I’m hoping my recipe cupboard has a few less books.  Of course new ones wouldn’t hurt, but I think I need to get rid of some first.
    Another way to organize your recipes, is to go paperless!  My new favorite website, and where I spend a fair amount of time, Pinterest!  If you haven’t heard of pinterest yet, I warn you, it is amazing, and thoroughly enjoyable!  Here is a sampling of some of the recipes I’ve pinned to my food board
    I’m linking up with Confessions of a Frugal Mind

  • Tuesday Tips – Paper Organization

    organizing your home
    Paper piles up. It seems to be it’s favorite thing to do. Everything from mail, kids schoolwork, receipts and then the general papers that you wonder where they came from. 
    Organizing papers was probably the first thing I started doing when I decided to declutter our home. The rest of the house could be clean, but with the piles of paper everywhere, it never looked it. Here are just some of my tips on where to start and what you can do with those stacks of papers floating around your house.
    Mail: The best place to start is what time you get the mail. Only pick up your mail if you have time to go through it right then! This will save you from a mail filled table or desk.  As you go through your mail, sort it. Junk mail rip up, and toss in the garbage. The rest sort as needed. There are many tools out there to help with mail sorting. I use 2.  The first thing I use is a 2 drawer filing cabinet.
    I have folders inside for bank statements, taxes, student loans, car insurance, and photos to name a few. These are papers that I need to hold on to usually for a couple years by recommended standards.  The photos are ones we get from friends and family for weddings, birthdays, and Christmas. I don’t want to throw them out, but I also can’t display every picture I ever get. Having a folder for them keeps them safe, and accessable.
    The second item I use is specifically for mail sorting.  I picked it up at a yard sale over the summer, and it has been wonderful to use!
    The top is labeled letters, then bills, then misc. I personally use the top for coupons, stamps, and outgoing mail. I put all our bills in the middle pocket, and go through them each month. The bottom is my misc. mail that I need to still sort and file into the filing cabinet (things end up here usually when I get the mail at a time that I don’t have time to go through it).
    Bills: The next big thing. The papers no one wants to talk about, or see. The problem is we all have them, and they aren’t going to go away no matter how many times we click our heels.  One great way to minimize the bill papers is to go paperless. The majority of companies have a paperless option, where you do all your bill pay online. You get your statements through emails, and never have to see another paper. I do most of my bills this way, but there are some that I still like to have in hand to go through. With this being our first home, I really like to get our mortgage statement in the mail. I pay it online, but having it hand to see, and remind me that I’m a grown up is kind of cool (yeah go ahead, call me weird).  As I get all my bills, I place them in the mail holder. At the beginning of each month I go through them. I throw out the bills from the previous month, and then pay all the bills for the new month. I still hold onto those bills to the end of the month though. That way in case anything happens to a check in the mail, or an online payment isn’t processed, I can look at the actual paper to make sure things are lining up. 
    Coupons: I personally don’t use a whole lot of coupons. I’ve tried but the cost to get them, hasn’t made up the difference for me, of what they save. There are a few staples that I do pull out and try to use. Like I mentioned before, I put most of my coupons in the top of my mail sorter. There are a few that I keep in a basket by the door though, so I can grab them on my way to the store. More coupon savvy people will use binders. Here’s some great sites if you’re into couponing or looking to start couponing. They can help you organize your coupons much better than I can.
    Klippin Krazy is the first that comes to my mind. She has a Newbie Know How, and a daily coupon contact.
    Coupon Frenzy Mom also has a coupons 101 guide, a page devoted to freebies, and drug store, grocery, and retail coupons!
    School Papers: You pick up your kid from school, get home, and they  proceed to empty their backpack showing you everything they did that day.  There’s artwork, stories, and report cards. Each day there is a new paper to add to their pile. You love it all, and are so proud of their hardwork, but you start to feel buried. The fridge is filled to the brim, and even if you wanted to buy more magnets, there’s no place left for another picture.
    What do you do? You need a box. A shoe box could work, but eventually you may need a larger bin. As your child goes through their papers, help them decide what you should keep and what you should toss. All things keep, but in the box. Then, at the end of the school year, go through the whole box. They may not remember a lot of the papers in there, and if that’s the case, toss them. There will be a few more special pieces though, that you and they will want to hold on to. I call this a Special box. I had one growing up, and it still contains some very precious things to me. Throughout the years as my life has continued to change, I still go through it, and toss some things, and add others that have more meaning to who I’ve become. 
    Christmas Cards: We all get them, though they are starting to get more sparse. I like to recycle mine. After displaying the ones I get each year, I put them in a box. The next year, I pull them out and reuse. Some I make into gift tags, others I just cut off the front of the card and use it as it’s own card.  Here’s a fun way I found to display the cards each year.
    I hope these tips will help you as you try to live paper clutter free!  I’m linking up to

  • Tuesday Tips – The Amazing Bread Slice

    Welcome to Tuesday Tips!
    Have you ever taken a good hard look at your bread? Wonder what you can do with it other than eat it? No? Or do you throw away the heel because no one in your family likes it, especially the kids?
    Ok, I know kind of random questions there, I mean who really wonders what they can do with food besides eat it. Bread is pretty amazing though!
    For instance, if I place a slice of bread in a container of brown sugar, my brown sugar will stay soft! I hate going to use brown sugar (especially during this baking season) and find that I have to pull out a pick ax to get a few grains. 
    While browsing pinterest I came across another way to use a slice of bread!

    If you bake a cake the night before you want to use it, and leave it on the counter overnight. You probably worry about it going stale. If you just put a slice of bread on top of it, it will keep the staleness away.  Apparently it works on muffins and cupcakes too, but I’m guessing you’d need to use a couple slices to cover a whole batch of those.
    I haven’t tried this yet, but I just bought some round cake pans from pampered chef, so a cake is in our near future. The science behind it though, makes perfect sense to me. The cake, like the brown sugar, draws on the moisture from the bread. I don’t recommend eating the bread after using it for these tips, as it will be stale! It would probably make some great French Toast though!
     
    link up your tips with Confessions of a Frugal Mind

  • Tuesday Tips – Pots Boiling Over?

    Welcome to Tuesday Tips!  If you haven’t noticed from the past few posts, I’ve fallen in love with Pinterest (follow me, I’ll follow you!).  I’ve even created a pin board dedicated to all kinds of tips that I’ll be sharing with you on Tuesday Tips!
    I felt this particular tip would come in the most handy this week, as many of us will be spending lots of time in the kitchen, hoping not to burn anything. 
    Did you know that if you put a wooden spoon over a boiling pot, it won’t boil over?
    Although I found this on pinterest, it was pinned from another fun blog A Small Snippet.
    I have yet to try this, but I plan on using it the next time I’m boiling something.  My question is, will a bamboo spoon work? Many of my spoons are bamboo. 

    We’re linking up to Confessions of a Frugal Mind

  • Tuesday Tips – Plastic pie lids

    It’s time for another Tuesday Tip! I’m thrilled to have found Tip Junkies Tip Me Tuesday to link up with! So if you’re visiting from Tip Junkie, thanks for stopping by! 
    Tip Junkie handmade projects

    I’ve been wanting to get this tip out to you guys for awhile, but somehow everytime Tuesday popped around, I kept forgetting. I blame it on my scrambled pregnancy brain.
    I personally, love french toast! I would eat it for breakfast every morning, if I could. My biggest struggle with making French toast, is finding the right sized bowl, to soak the bread in. All my bowls curved too soon, or were enormously huge.  I remember my mom using pie tins growing up. They really are the perfect size. I just don’t own any pie tins (I do have a deep dish stone pie plate).  I love those premade graham cracker pie crusts though, and around the holidays, I have an abundance of them. One year, I tried using the empty foil pie tin for my french toast, only to realize a little too late, when I cut the pie, I also cut little holes in the foil. 
    This year, it dawned on me though! The pies come with a plastic lid! Normally, I open the pie shell, toss the plastic lid, and usually have no leftover pie. This year, I had some leftover pie, and so I had kept the lid. And then, voila! I realized it was the right size (obviously since it’s the same size as the pie tin itself) for French Toast! 
    So this year, don’t throw those plastic pie lids away during your holiday baking. Hold on to them, and you’ve got instant French Toast soaking bowls. If you make a lot of pies, like me, you could even dispose after each use, saving the washing time. Or you could continue to use forever (which is what I’ll be doing).


    Now go enjoy some pie and French toast! Together if you really feel like it.  I might add here, that apple pie spice makes a great substitution for cinnamon when making French Toast!

    I’m also linking up over at