Tag: diy

  • Furniture Make-Overs

    Furniture Make-Overs

    I’ve decided this will be known as the Year of Furniture Make Overs. With the aid of pinterest and of course a new house to decorate, I’ve started seeing ideas for furniture make-overs all over the place. 

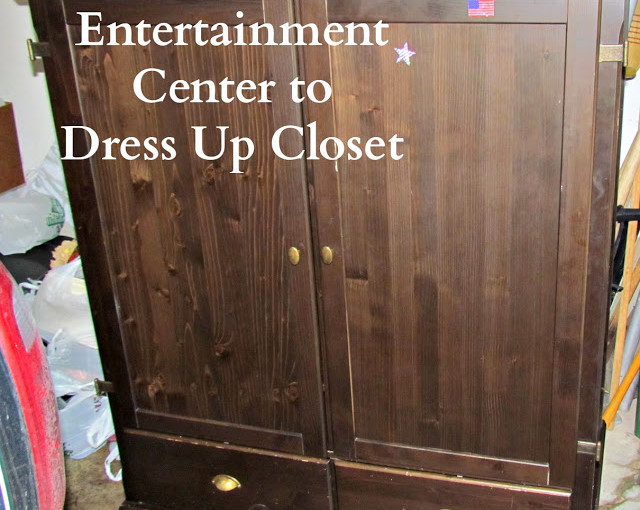
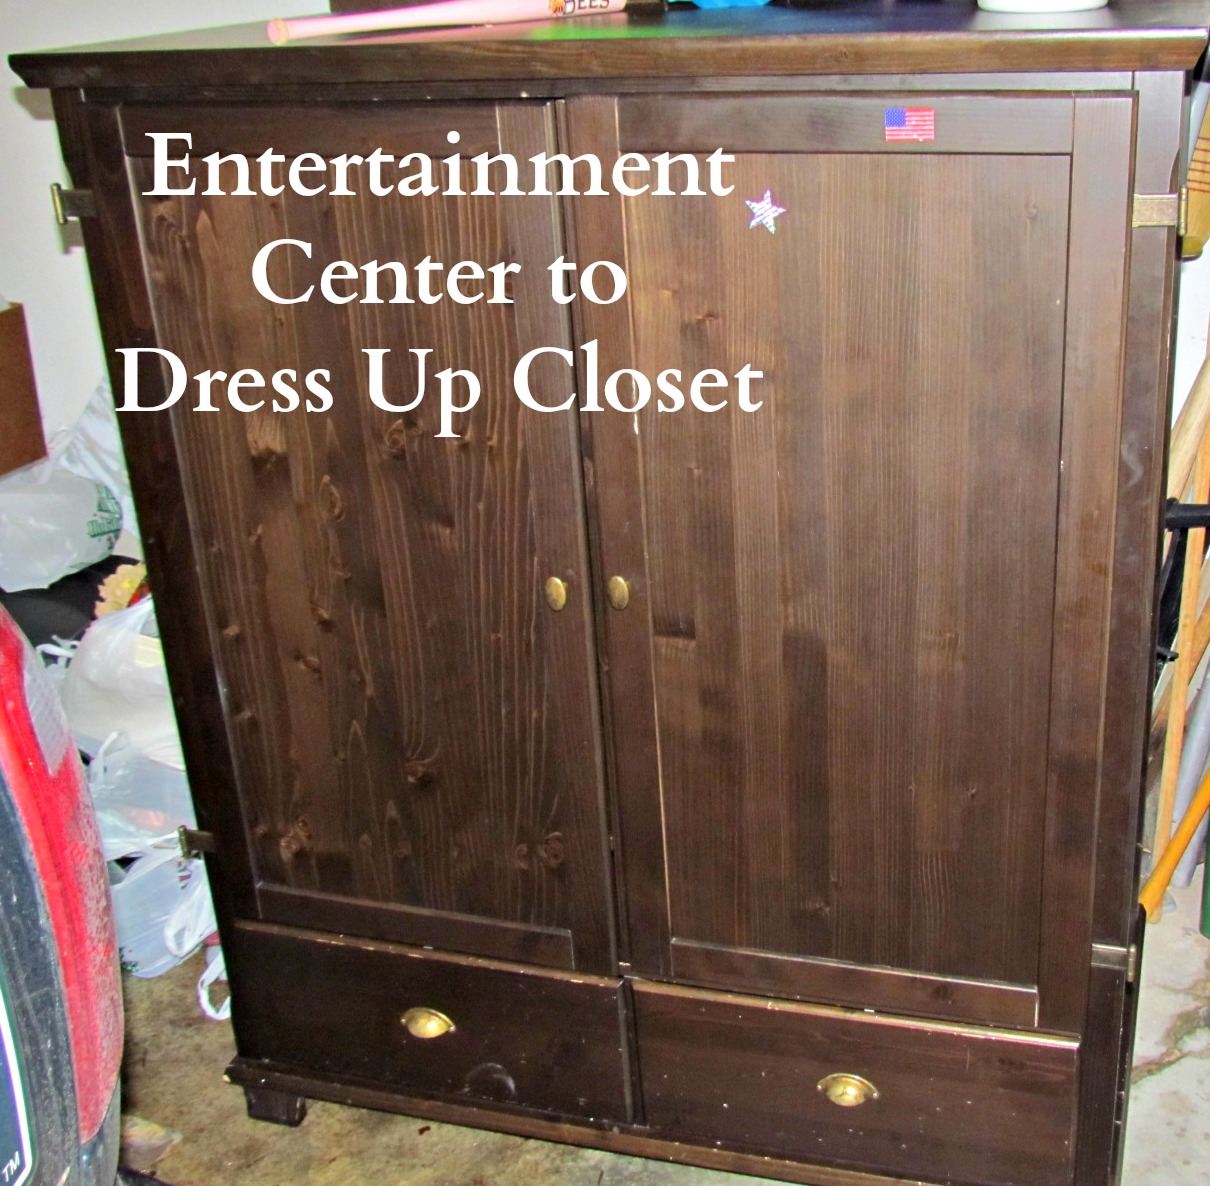
    The first one being our Entertainment Center. We got this from friends before they moved to Alaska last year. When we bought a flat screen for Christmas, we no longer had use of this.  I had ideas though. I’ve finally decided on turning it into a Dress-Up Closet for the kids. It will stay so much more organized than the box they are currently in.

     This is my entertainment center
    below is my inspiration
     

    My next project will be an outdoor bench we have. We redid it a few years ago, but it has since warped again. I’d like to remake it this time into an inside bench. Instead of a lift top, I want to remove the front and add baskets.  Something like this –

    And lastly, for now, is a dresser make-over.  I’ve been itching to do this for a few months now to Prince L’s dresser. Only problem was he didn’t have a dresser. Until now that is. Isn’t it beautiful?

    Source: flor.com via Adelina on Pinterest

    Now I just need to get warmer weather so I can start these projects.

  • The Best of 2012

    Yesterday I shared with you a review of our life in 2012. Today I’d like to share some of the favorite blog posts. I’ll start with the reader favorites. These are the posts that were visited most frequently in 2012 (minus any giveaway posts).

    1. After (sort of) Kitchen We started our year with a kitchen remodel. 257 of you came by to check out the almost finished result.
    2. Should Kids Share a Room? In a new meme we started this year, Think About It Thursday, I told 151 readers my thoughts on whether kids should share a room.
    3. Why I Wear A Dress to Church  This has been my personal favorite post all year.  In an attempt to share some deep personal feelings on my religion, and a stand against a movement that I disagree with. 151 readers stopped by to hear my thoughts. 
    4. Halloween Costumes  In October 148 readers came by to read my ramblings on Halloween Costumes. 
    5. Upcycled Receiving Blankets  In one of my few and far between sewing tutorials, I shared how I turned our old receiving blankets into a quilt.  142 readers have read, and hopefully found inspiration for making their own quilt.
    6. Cleaning Microfiber Couches  Periodically I’ll throw out some tips on Tuesdays. I pulled 136 of you in to learn how I clean my microfiber couch.
    7. You Never Lose Review  135 people were interested in my review of the new auction site You Never Lose, where you truly can never lose.
    8. DIY Drum Light  As part of our Kitchen/Dining Remodel, I made our own Drum Light. 114 readers came to see how I made it.
    9. Making a House a Home: All About the Attitude  In March 90 of you came by and read my epiphany over something my then 5 year old said.  
    10. Over the Sink Light  Finally 81 readers stopped by to see the light we added above our sink during the kitchen remodel.

    Number 3 and 9 on this list were my absolute favorite posts to write this last year. I felt strongly about them both, and really let my feelings show.

    There were a few other memorable moments this past year.

    We enjoyed a new Link Party co-hosted with Diane from Simple Living and Eating – Foodie Friday! We plan on continuing this party through 2013 as we share more recipes, and enjoy all the food you’ve shared with us.
    I attempted another party – Think About It Thursday – that didn’t really take off. For now, we’re going to put this one on hold.
    Finally, my most memorable moment of 2012, was purchasing my own domain. Mark surprised me on Black Friday with www.homemaidsimple.com  Our new online home.  Within the coming weeks, we’ll be switching out of blogger and finding a new server and blog platform.

    Happy New Year
    Thank you all for making 2012 a great year! 

  • DIY Drum Light

    DIY Drum Light

    DIY Drum Light


    We felt our dining room needed different lighting. The dome light just didn’t give adequate light. In fact, I kept it off more often than on, because it made so little difference, and I saved the money. Since we were remodeling already, I figure a new light was in order as well. 
    While browsing Pinterest, I came across this DIY Drum light tutorial over at From Gardners 2 Bergers.  Although I really liked how she made her drum light, she also linked over to another tutorial at The Keylor Family.  I felt my talent for craftiness was best suited with The Keylor Family’s tutorial. 
    With the dining room remodel accomplished I decided to add my finishing touch with a drum light, in pure hopes we’d get much more light in the room than the current fixture gave.  A trip to the thrift store for a hanging chandelier, then to Hobby Lobby for the biggest Embroidery Hoops (23 inches)available, plexiglass, and some muslin and I was ready to begin.


    DIY Drum Light

    The materials:
    2 Large Embroidery hoops
    Plexi Glass – long enough to fit around the hoops. I used 3 sheets
    Fabric
    Chandelier
     
    Lay your plexi glass down and tape together. Carefully wrap the glass in between the hoops inner and outer hoops. Tighten the hoop, and flip it over. Attach the glass hoop to the 2nd embroidery hoop. 
    Lay out your fabric, and carefully glue it over the edges to the inside of the embroidery hoop. Having 2 hands helps to hold the fabric tight and straight. 
     
    The real hard part came next. Figuring out how to hang the light inside.  Through a collaborative effort with Mark, we got this.
    A piece of wood sandwiched between a section of the light, and resting under the embroidery hoops. Our first attempt was wire hangers, but they weren’t sturdy enough.
    And finally the light was hung! In my personal opinion, it’s pretty awesome!  Mark thinks it’s a little too big, and in truth it could be smaller, but hey it gives us a lot more light now!
     
    I don’t want to leave you just hanging there so here’s a grand look at our finished dining room, complete with a DIY drum light!
     
  • What am I up to?

    What am I up to?

    I bet you’re wondering what exactly I’m up to.  I’ve spent a good portion of the last few days getting our kitchen and dining room reorganized. I’ve got a whole cupboard and one shelf in another cupboard that are empty. I don’t know what to do with them.  I’m sure I’ll find something and things will continue to get moved around until I’m comfortable with where it’s all at.  But for the most part the reorganizing is done. The last thing I have to do is decorate. Since the walls are brand new, I’m leaving the hanging of things to Mark. I’d hate to mess up his hard work, so I’m letting him put the holes in it. Nice of me huh?
    So I am now in the process of creating our new lighting. This was a pinterest inspired idea, with a diy tutorial from another blogger.

    What you’re seeing is the mid process of my own drum pendant light. Using 23″ embroidery hoops, sheets of plexiglass, fabric and a pendant light from the DI.  This light when done will have cost us less than $30!  To buy one of these, this size would have cost upwards of $100.
    I just hope I can have the patience to get that fabric on nicely, without messing it up. 
  • Dining Room Overhaul

    Dining Room Overhaul

    Today felt like we were on one of those HGTV shows with how many people were in our dining room working. Many things got accomplished at once, and I’m seeing more of an end (while wishing the end was already here). Here’s a look at what got accomplished this week.

    Continuation of the wallpaper stripping and washing of walls

    My sister in law, her fiance and his kids came by to help. This is E doing some cauling in the pantry. She was an awesome help!
    Mark and Jeff got the ceiling and wall sheetrocked, taped and mudded in the family room.

    And with lots of help the dining room got taped and mudded. 
    Now we wait for it to dry….sigh. It may be worse than stripping the wallpaper, at least my hands were busy then.
    Linking up to

    Shine Your Light

  • Dining Room Remodel day 2

    Dining Room Remodel day 2

    I took the Princesses to the mall to search for a last minute gift and to get some play time in, while Mark stayed home and got some work done undistracted.  After yesterday, today was much more calm, as we had more of a plan of what needed to be done. 

    First on the list – Check under the kitchen flooring for termite damage.

    As far as we can tell, none! The support beam however goes all the way to the ground so the buggers must have climbed straight up it.
    Second on the list – Remove ceiling and add temporary support beams so we can safely remove current support beam.

    Check and Check!
    Third on the list, await help from other men to safely remove beams and put up new ones. Sadly, plans fell through, and no help came. Thankfully there will be 3 extra men over tomorrow (yes on Christmas eve) to lend some hands and get this part done! 
    Then it’s on to the flooring. We’re looking at bamboo.  Any advice, experience, or preference, I would love to hear it!
  • Day 1 – Basement Remodel

    Day 1 – Basement Remodel

    I’ve mentioned our basement remodeling ideas before, shown some pictures of tearing out the cold storage that was there. We have finally commenced on the actual remodeling part! Mark decided to take a day off from school prep, and work on the basement instead.

    This is what it used to look like:
    Here is what it looked like throughout the day yesterday:
     Wall torn down
     Door removed
    And finally, the framing has begun!
    This is going to be a long process. We are on a budget (who isn’t) and so will be doing a little each month. We had originally thought we would wait for tax season, but with the impending arrival of a new little one, we really wanted this project completed and out of the way. Plus, we are going to be rearranging bedrooms, and we didn’t want the Princess’ sleeping downstairs by such a mess (although they both ended up on our floor last night anyways!).

  • Upcycled Card Table

    Upcycled Card Table

    Due to my design impasse yesterday, I found another outlet for creativity.  My card table.  It was ugly, but I wanted to be able to use it wthout having to throw on a table cloth.  The mind sparked, and I grabbed the rolls of contact paper my sister in law gave me last summer (I knew they’d come in handy someday!)
    

    Before
    As you can tell, we’ve used our card table for some painting. 
    After

    I am just loving this new table top!  It was so easy too! I originally thought what I had was wall paper, but it wasn’t, it was contact paper.  You need to clean and dry the surface first, or it won’t stick. Measure and cut your paper to the desired length.  I had to use two sheets to cover the whole table, but they blended nicely.  I cut mine about 2inches longer than the table’s top so I could wrap it around the edges.  Peel off the backing and stick! The directions suggest using a straight edge to push any bubbles out and to get it all to stick.  I just used my hand and it worked nicely.  And Voila! this is my new craft and puzzle table!