Tag: Recipe

  • Easy Meals for Busy Nights with #KraftRecipeMakers

    Easy Meals for Busy Nights with #KraftRecipeMakers


    Ever have those nights where you’re running around, picking kids up from school, dropping them off for sports, music, and other extra activities. Then you’ve got a movie date with your spouse, and still need to get quick family meals on the table. I recently came across Kraft Recipe Makers thanks to another blogger, and had to pick up a couple. These are the BEST easy meals I’ve ever come across, that I still feel good about serving up.
     
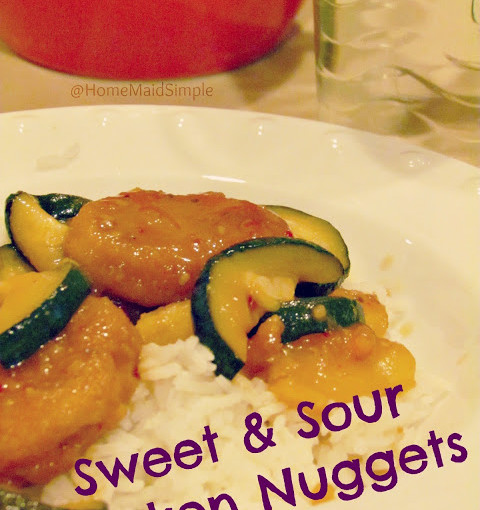
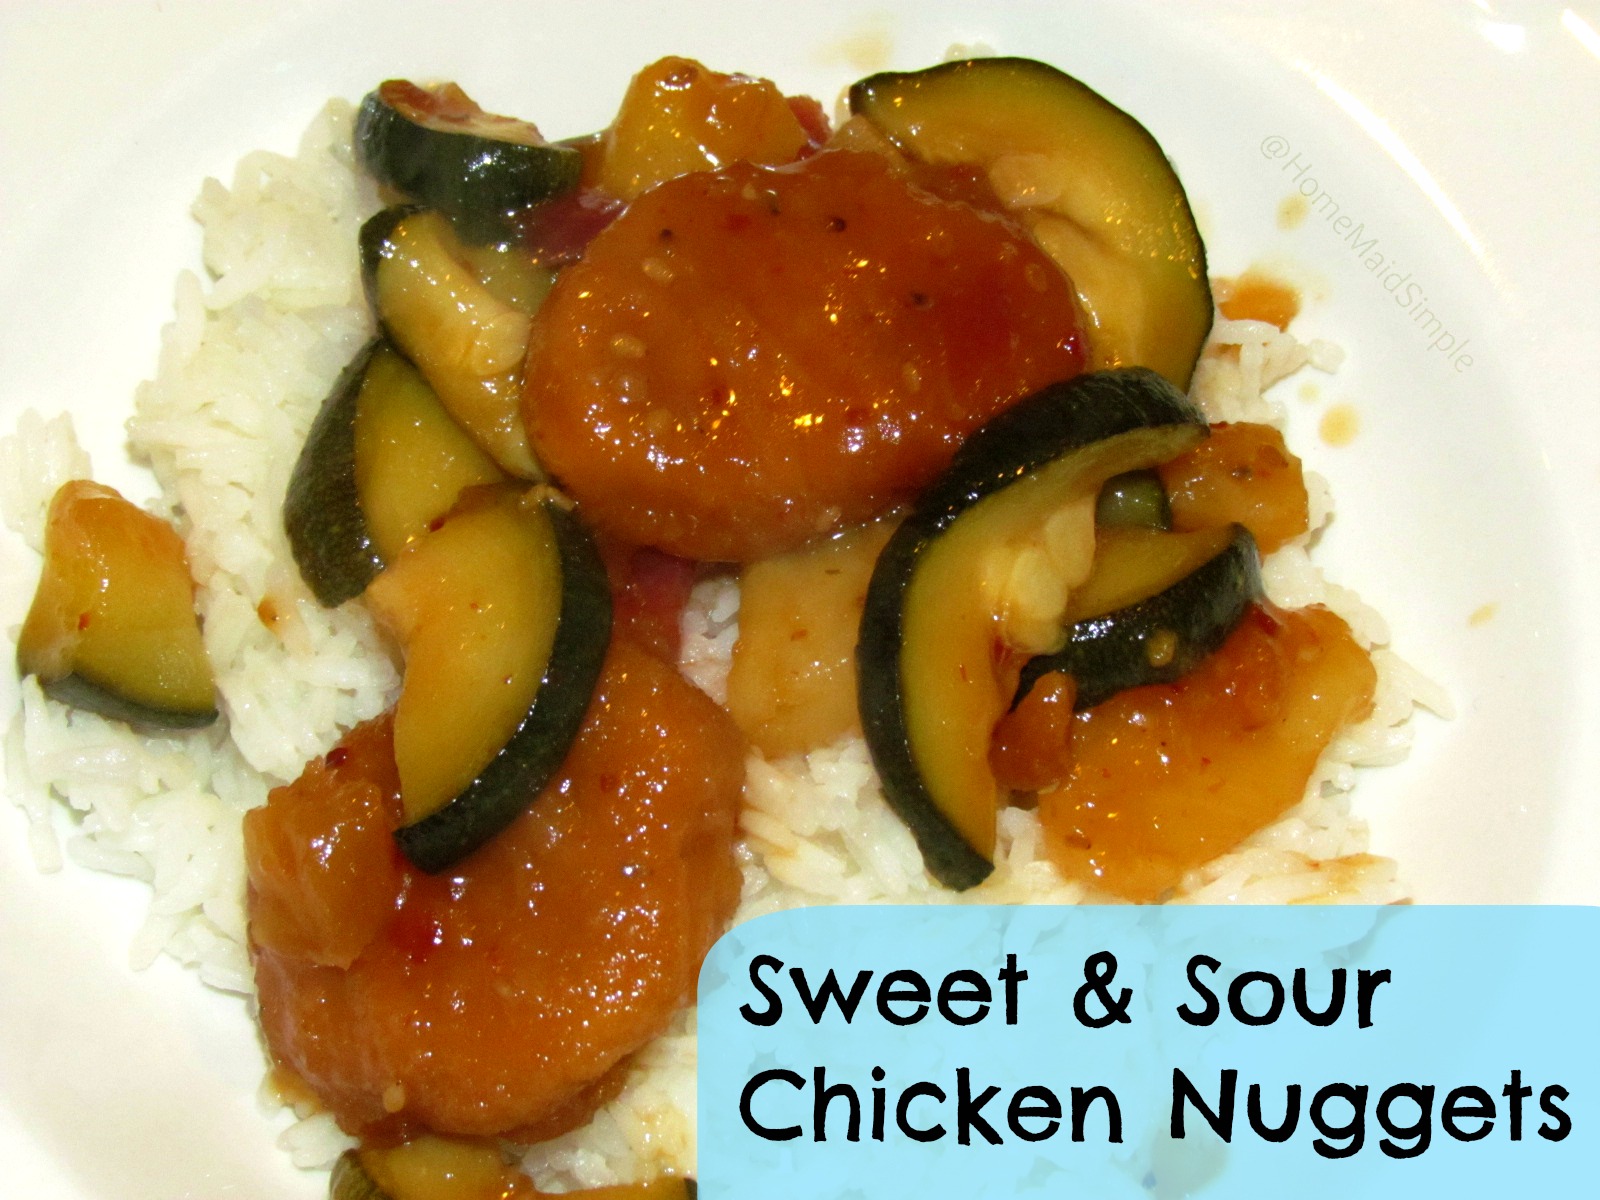
    It was about a month ago I came across a recipe using the Kraft Recipe Makers. I had never heard of this before and wasn’t even sure what I was looking for when I went to the store the first time. When I found them though, I got pretty excited about the variety of flavors. That first time I picked up a couple different varieties and used the Sweet and Sour Chicken that night to create a kid favorite!
     
     
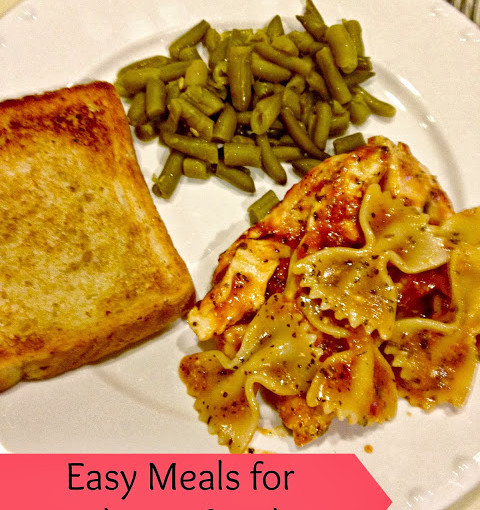
    The other night Mark sent me a message about a fun family activity going on that night at the library. It looked fun, but left little time to put dinner together. I was so glad I had the Chicken Bruschetta Pasta on hand.  This meal kit was absolutely delicious, and fit right into the time frame I had. 
     
     
    I loved the easy to follow directions and photo’s on the back of the package. Have you ever actually measured your pasta before?  Normally I dump the whole bag into some water, but decided to follow measurements this time.
     
     
    My family are big pasta eaters, so I was worried it wouldn’t be quite enough, but it was plenty. Once I had the pasta going, I moved onto the chicken.
     
     
    Next time I make this (because we will be making it again!), I’ll make sure to cut the chicken into a bit smaller pieces. Simmering the chicken in the Basil Garlic sauce, made our house smell divine!
     
     
    Once the chicken and pasta are cooked, you combine them add the finishing sauce and some Parmesan cheese. Voila, dinner served!  I didn’t time it exactly but I’d say it was close to a total 30 minutes from start to finish. Quick easy meal served!


    The only thing I wish I’d done different was seen this tip while still at the store. We were out of croutons, but I have a feeling they would have been the perfect addition to this pasta!  Since I missed grabbing some croutons I tossed some garlic toast in the oven to add to the canned green beans on the side. A perfectly balanced meal in my book.
     
     
    Not only was this an easy meal to prepare, but the kids loved it too – especially Prince L. Just check out the smiles he gave as the pasta was shoved in his mouth.  
     
     
    We had just enough leftover for my lunch today (my lunch, not the kids..). I should have expected it, but Prince L’s sandwich was tossed on the floor and I found him on my lap stealing pasta. He knows where the good stuff is. 
     
    The debate is on now – Asian Fish Tacos next, or Verde Chicken Enchiladas?  We don’t have many crazy busy nights yet, but I know they’re going to start creeping up on us. I’ll be keeping a couple Kraft Recipe Makers in the pantry for an easy meal maker.
     
    Keep up to date with new Kraft products by visiting their Facebook page.
     
     
  • Foodie Friday: Featuring Be It Ever So Humble

    Foodie Friday: Featuring Be It Ever So Humble

    Welcome back to another Foodie Friday
    I would love it if you took a moment to visit my co-host Diane at Simple Living and Eating
    If you’re new to Foodie Friday, here’s the run down
    1. Link up your recipe or any food related post below
    2. Browse the linky, visit some new blogs, and share if you feel so inclined. 
    3. Please only link up 3 posts. This lets us visit as many of you as possible. 
    This week I am excited to share another semi-regular party goer – Dianna from Be It Ever So Humble.  I remember the first time Dianna commented here on Home Maid Simple, she told me she knew my husband from high school. That was a fun discovery, and I have looked forward to her linking up each week, as her recipes have been consistently practical and yummy.  
    Dianna is a homemaker and mother of 2, and holds a BA in English.  Read more about Dianna.   
    Last week she shared 3 delicious and versatile recipes. I hope you enjoy!
    I have to say, I’m not a fan of sauerkraut myself, but I think it’s wonderful Dianna is learning new ways of preserving food for her family!
    This looks interesting, but the ingredients sound absolutely yummy! Especially with an egg on top.
    I wish there was a picture to go with this. I have a feeling just looking at it would warm me up on this rainy day. It is soup season, and having a basic soup recipe that you can change up each time you make it is really nice. 
    Thank you Dianna for being a part of Foodie Friday for the past 2 years!

  • Polish Plum Butter

    Polish Plum Butter

     
    We headed to Nana and Opah’s house this weekend, and the first thing I noticed when we walked in was the abundance of plums. They were everywhere. Buckets, bowls – you could hardly see their table due to the plums. Throughout the weekend, my mom had neighbors stop by, and she’d send them back home with a bucket. By the time we left Sunday, there was one bowl left, so we took a bag full with us.  What to do with all these plums? My mom mentioned seeing a recipe for plum cake so I started looking into that when I came across Polish Plum Butter or Powidla Sliwkowe. 
     
    After my peach honey, I knew I needed to try polish plum butter. What I love about this recipe, is it uses very few ingredients…as in exactly 2 ingredients. That’s it. Plums and Sugar.  There are some recipes I came across that use a few more, but really you don’t have to, the plum becomes extremely sweet when cooked down, and thickens itself very nicely as well. 
     
     
    As I started chopping up my plums, I realized this would make a nice substitution to the plum sauce I use when making Plum Pork. Can you guess what I’m making for dinner tonight? Mmmhmm. 
     
    At one point I wished I had an immersion blender, but made do with my regular blender. It just means I’ve got a few more dishes in the sink (which by the way is having plumbing issues…blah).  I hope you enjoy this as much as I am. You can use it on bread, meat, or as the Polish like it, in Hunters Stew. 
    Polish Plum Butter or Powidla Sliwkowe
    Write a review
    Print
    Ingredients
    1. 2 lbs plums, any variety
    2. 1/4 cup vanilla sugar
    Instructions
    1. Slice and pit plums.
    2. Place the sliced plums in a medium to large pot, and heat over medium/low heat for 30 minutes, stirring occasionally.
    3. Add the sugar and continue heating for another 30 minutes.
    4. Keep an eye on it, and stir frequently to keep it from sticking and burning to the bottom of the pan.
    5. Remove from heat and blend to make a more smooth butter.
    6. Place plum butter back in pan and heat for another 20-30 minutes, stirring frequently.
    7. Once the “butter” sticks to the spoon, it’s ready to either can or freeze.
    Notes
    1. You can skip the blending, but you’ll have good sized chunks of the plum peel. I prefer mine a little more smooth.
    2. I used my 8 oz Ball Freezer cups, and filled three, then put a small gravy pitcher in the fridge for immediate use.
    Home Maid Simple https://www.homemaidsimple.com/


    This post is part of Simple Living and Eating’s Food of the World Party. Browse different dishes from Poland on the linky below. Next month we’re visiting Malaysia!
     
    May also be linked up  to these FUN PARTIES!


    [inlinkz_linkup id=309255 mode=1]

  • Foodie Friday Party: Featuring Cooking with Curls

    Foodie Friday Party: Featuring Cooking with Curls

    Welcome back to another Foodie Friday
    I would love it if you took a moment to visit my co-host Diane at Simple Living and Eating
    If you’re new to Foodie Friday, here’s the run down
    1. Link up your recipe or any food related post below
    2. Browse the linky, visit some new blogs, and share if you feel so inclined. 
    3. Please only link up 3 posts. This lets us visit as many of you as possible. 
    In lieu of sharing my recipes each week, I’ve decided I’d really like to focus more on each of you who link up. So with that in mind, I’d like to feature one of our regular party goers this week. 
    I look forward every week to what Lisa is going to share with us.  Just be prepared to spend a lot of time on her site browsing recipes, and drooling…I mean it you’re going to love it over there!
    Last week Lisa did not disappoint when she shared an Apple Streusel Pizza, Classic Diner Burger, and Margaritas
    Apple Streusel Pizza by cookingwithcurls.com
    This just looks amazing! I love streusel, I love Pizza. This is a winning combination in my book.
    Classic Diner Burger by cookingwithcurls.com
    Diners are so nostalgic. I love looking for out of the way, small mom and pop diners to eat at. Something about the food is always good. Quite frankly though, I’d love it if she told us what the shake is in the background here. You can’t have a good diner burger without a good shake as well.
    Margaritas cookingwithcurls.com
    I personally don’t drink. I never have and never will, but these look very pretty.   I’ll just have to use a similar method and make me some frozen limeades.

  • Cherry Broiled Grapefruit

    Cherry Broiled Grapefruit

    Juicy, tart, and a sprinkle of sweetness are all found in this cherry broiled grapefruit. How do you like your grapefruit?
     

    Best breakfast ever! Cherry Broiled Grapefruit

    I just love grapefruits!  Sometimes I go in little spurts, and won’t buy any for awhile, and then I fill the fruit drawer in the fridge and eat them daily for a couple weeks. I remember as a kid, this was one of my absolute favorite breakfasts my Mom would make. It was quick, easy and fairly inexpensive as well. Most of my siblings dreaded the grapefruit, but I loved it. I recall watching my mom eat hers, and because she couldn’t waste any of this goodness she would squeeze all the juice out at the end into her spoon and sip it up. I still do it that way. It can get a little sticky, but that juice at the end is so full of flavor.

    When you add the cherry to the middle you can get a nice red color throughout the fruit after it’s done broiling, as well as an extra flavor booster. Do not skip the cherry, I promise it’s worth it.  My mom always added a Maraschino cherry and sometimes a little juice. I didn’t have any on hand, but I did have some sour cherries from my mom’s cherry tree.

    Cherry Broiled Grapefruit
    Broiled Grapefruit with a cherry on top.
    Write a review
    Print
    Ingredients
    1. 1 grapefruit
    2. 2-4 tsp sugar
    3. 2 cherries (maraschino work best, but sour cherries are also good)
    Instructions
    1. Slice your grapefruit in half.
    2. Carefully cut around the edge of the fruit and then between each slice to separate the fruit from the peel and skin.
    3. Sprinkle 1-2 tsp of sugar onto each half of the grapefruit.
    4. Top with a cherry.
    5. Place the grapefruit on a cookie sheet, and set it under your broiler for 3-5 minutes.
    6. Keep a close eye on it. You want the sugar to dissolve into the fruit, but it will also burn fast.
    7. Pull it out, and let it cool just slightly
    Home Maid Simple https://www.homemaidsimple.com/


    Enjoy as a healthy breakfast, a midday snack, or really whenever you’re craving something fantastic!


    Welcome back to Foodie Friday! I am so excited to have you here at Home Maid Simple. 
    Please check out my co-host Diane at Simple Living and Eating. 
     
    NEWSFLASH!!
    This will be the last week I post a recipe with my Foodie Friday post. I’d really like to spend a little more time each week featuring your recipes!  It will also give me just a little more freedom in when I create my recipes, as I share them throughout the week. I hope you’ll enjoy the new layout of Foodie Friday here next week. 
    Now on to the Features!
     
    Mango Slushies
    It’s truly amazing what we can get our kids to eat when in slushy form, right?! I hide a little zucchini in mine, and the kids down it!
     
    Ribbon Salad | Cooking on the Front Burner #salad
    Tri-Color Ribbon Salad
    How pretty is this?! I can easily skip over the fact that it’s raw veggies just because of how beautiful this salad looks.
     
    Chocolate Baklava.JPG
    Little Chocolate Baklava Bites
    These are darling! I’ve never seen baklava covered in chocolate before, and I love it. Hmm, I even have a phyllo still in the freezer.
     
    Let’s Eat!


  • Cherry Almond Cheesecake #FoodieFriday

    Cherry Almond Cheesecake #FoodieFriday

    I really want to stop writing this post and go eat more cheesecake, but then you’d all be wondering where the party is. And I think my kids might like dinner at some point tonight as well, so I’ll finish this up, and then you can bet I’ll be watching some sappy show like Robin Hood (BBC television series) while eating another slice of this.

    It all started a month ago when I kept looking at my cherry pie filling, thinking I really ought to use it up. Mmm, cheesecake sounds good. And then I just never made the time for it. Plus, I’ve never made cheesecake from scratch before either. So then Saturday rolls around and my Dad calls and invites us over for Sunday dinner. Great! What can I bring? Anything. OK let’s do that cheesecake.

    Then a search for a recipe ensued. I’m not a fan of sour cream cheesecakes, so I passed all those up, and landed on this one from Taste of Home.  Of course as I go to grab the vanilla extract, I glance at the almond extract and decide what the hey, I love almond extract. So the exchange was made. This is what I brought to my parents….

    I won’t lie to you. It was good! I know you’re wondering, but where’s the cherries? I saw all this fresh fruit at the store, so I bought it, and on the cheesecake it went. My only complaint with this particular cheesecake was it was too deep. Way too deep. I could barely finish my one slice.
    So then I sat and stewed on it all week, and decided I was going to play around with the recipe (IE cut it in half) and see what happens. It’s really hard to cut 3 eggs in half though, so the following is a Home Maid Simple original (inspired from Taste of Home).

    Cherry Almond Cheesecake
    Almonds and Cherries are the perfect pairing with this cheesecake
    Write a review
    Print
    Cook Time
    56 min
    Cook Time
    56 min
    Ingredients
    1. 1 package or 10 Honey Graham Crackers, crushed
    2. 1 1/2 TBS Almonds, crushed/chopped finely
    3. 1 TBS Sugar
    4. 3 TBS butter
    5. 2 packages Philadelphia Cream Cheese, softened
    6. 3/4 cups sugar
    7. 1 1/2 tsp lemon juice
    8. 1 tsp Rodelle Almond Extract
    9. 1 egg, lightly beaten
    10. 500 ML Cherry Pie Filling (or about 17oz)
    Instructions
    1. Preheat over to 350 F.
    2. Combine graham crackers, almonds, and sugar.
    3. Use a pastry cutter or fork to cut the butter in, until evenly mixed and crumbly.
    4. Press into a 9 inch pie plate.
    5. Bake for 11 minutes. Cool on a wire rack.
    6. Leave the oven at 350 for the cheesecake
    7. Beat together cream cheese and sugar until smooth.
    8. Add lemon juice and almond extract.
    9. Lightly beat your egg, and then beat it into the cream cheese mixture.
    10. Pour into your crust, and smooth out the top.
    11. Bake for 45 minutes.
    12. Let the cheesecake cool for 30 or so minutes on a wire rack, and then cool in the fridge for at least 2 hours, or over night.
    13. Top with cherry pie filling, and serve.
    Notes
    1. I used a knife to chop my almonds small, but if you have a food processor it would come in handy for the almonds and graham crackers.
    2. To avoid brown edges you can cover the edge with foil. Or just let it brown, you’ll be covering it in cherries soon enough.
    Home Maid Simple https://www.homemaidsimple.com/


    This recipe is linked up to these Fun Parties!
     
    Welcome back to Foodie Friday at Home Maid Simple and Simple Living and Eating
    We are so excited to see what you’ve been cooking up this week!
    Please remember to only share food related posts. All others will be deleted. Thanks!
     
     
    ~Features from Last Week~
    Zucchini Muffin
    Honey and Zucchini Muffins
     
    Mexican Restaurant White Sauce
    Mexican Restaurant White Sauce
     
    Caprese Bites | Cooking on the Front Burner
    Cheese Bites and other fun Appetizers


  • Sweet and Sour Chicken Nuggets #FoodieFriday

    Sweet and Sour Chicken Nuggets #FoodieFriday

    What a crazy week it has been! School and homework are in full swing here. My poor kindergartner loves going to school, but she really struggles with the homework. Not because she can’t, but I believe she’s just exhausted by the end of the day, and the thought of writing the same letter over and over again can be tiring for a 5 year old. 
    So I’ve resorted to making meals that are kid friendly, still healthy, but are especially FAST! I just don’t have the same time to spend making meals completely from scratch every night anymore.  Thanks to Success Rice, Tyson Chicken, and Kraft Recipe Makers, I found a great solution that was incredibly simple to whip up. 
    *I was provided with a box of Success Rice for review. All thoughts, opinions, and recipe are my own*

    What kid doesn’t like chicken nuggets right? My kids also are pretty fond of rice – surprising because as a kid, I couldn’t stand it. So I thought to myself one night while the kids were whining over their homework and Prince L was screaming because dinner wasn’t on the table – Self, I said, What can you make fast that everyone will love, but is also a nicely balanced meal?  
    I opened the cupboard, fridge and freezer, and realized I had recently purchased some pretty quick foods – Kraft’s Sweet and Sour Recipe Maker – Tyson Chicken Nuggets – Boil-in-a-Bag Success Rice – and of course a freezer overflowing with zucchini. Yep, sounds good to me. Sounds amazing to me actually!
    I was pleasantly surprised at how well Success Rice Boil In Bag turned out. I struggle cooking rice. Half of it is still hard, it’s too mushy, and always always the pan is left with a layer of rice stuck to it.  The boil in a bag method kept my pan much cleaner, and it turned out quite fluffy. 

    Ingredients
    4 bags Success Jasmine Rice
    1 box Kraft Recipe Makers Sweet and Sour Chicken
    15-20 Tyson Chicken Nuggets
    1 cup chopped Zucchini
    14oz can sliced pineapple

    Directions
    Cook the chicken nuggets according to the package direction.
    Meanwhile, boil the rice according to package directions.
    While the rice and chicken are cooking, open the Sweet and Sour sauces. Follow the directions here as well, with the recipe included, but omit the chicken completely in the first few steps. Also instead of adding peppers, you’ll be adding zucchini; and instead of pineapple chunks I used sliced pineapple, which I chunked myself.
    Finally, add the chicken to the sauces, and serve over Rice.

    Seriously oh so good. The kids couldn’t get enough of the chicken nuggets and rice, though did a good job at avoiding that zucchini (it just keeps showing up in dishes…).

    ~FEATURES~
    Chili Cheese Dog Mac N' Cheese
    Chili Cheese Dog Mac N’ Cheese
    Another kid friendly and quick school night meal!

    Avocado Crostini 8
    Avocado Crostini
    This would be my kind of lunch, or quick snack between running the kids to and from school. Prince L will probably steal all the avocado though. 

    Chocolate Chocolate Chip Cookies
    I made these this week. YUM. But don’t leave out the extra chocolate chips. Even if it means running to the store last minute, put in the chips. The texture of these is so perfect!


    Foodie Friday happens every Thursday night.
    Join Simple Living and Eating and I each week as we share a new recipe, and browse all of yours!
    This is a FOOD PARTY, please only link up food related posts.

  • Garden Quiche #FoodieFriday

    Garden Quiche #FoodieFriday

    So Mark came home one day and said he heard someone on the radio talking about quiche, and hey maybe we could have some. Hey, sounds good to me. I love quiche, and we had plenty of our garden produce on hand still. all I needed was the eggs, cheese and crust. I had actually quit making quiche because I couldn’t get the crust right, so this time I caved and bought a pre-made crust from the store. This was good! Like, really really good!  I hope you enjoy
    Ingredients
    Refrigerated Pie Crust
    10 eggs
    4 oz shredded swiss cheese
    1 large tomato, chopped
    2 oz canned mushrooms
    2 TBS chopped white onion
    1/4 cup shredded Zucchini
    Directions
    Preheat oven to 350 F. 
    In a large mixing bowl, whisk eggs until yolk and white are completely mixed together. Add in the cheese and veggies and mix well. 
    Roll the pie crust out, and press into the bottom of a 9 inch pie pan. Pour in the egg mixture. Bake for 45 minutes or until top is golden brown and eggs are set. 
    ~FEATURES~

    First off, let me tell you about this awesome “adventure” going on over at Holly’s Helpings. Ever been afraid to cook something, or maybe you need help making something like pie crusts?  For the next year Holly has picked one thing a month to make. Starting in September we’re doing Souffle’s! So head over to Holly’s and join the challenge. 
    Vegetable Egg Rolls
    Vegetable Egg Rolls
    I am now craving egg rolls. Crispy outside, and packed full of veggies. 

    Asiago Soft Pretzel Buns | Bakewell Junction
    Asiago Soft Pretzel Buns
    Asiago anything has my attention. Make them pretzel buns, and I’m definitely adding them to the menu. 

    CoHosted by Diane at Simple Living and Eating
    This is a Food Party. 
    Please link up only Food related posts. 
    Hop around and enjoy some new recipes, meet some new chefs, and enjoy the food.
  • Enchilada Casserole #FoodieFriday

    Enchilada Casserole #FoodieFriday

    I’m back and oh how I’ve missed sharing with you all! We are finally moved into our new little apartment.  The unpacking has commenced, as well as the purging. If you recall we just moved from a 2600 square foot house to a 1600 square foot condo. It’s really not too bad, but it does mean we have to dejunk, and re-prioritize our things to what is really important to us. 
    So while I go do that, enjoy this casserole I whipped up one day last week. It was yummy, though a bit saucy.

    Enchilada Casserole
    Ingredients
    1 lb ground beef
    21oz mild enchilada sauce – approx. 1 1/2 14oz cans (I used 28oz, way too much!)
    12 corn tortillas
    6oz cream cheese
    4oz hot green chiles*
    2oz can pieces and stems mushrooms
    14oz can corn
    14oz can pinto beans
    1 1/2 cups zucchini (mine was from leftovers and was steamed. raw will work fine though)
    1 cup shredded cheddar cheese
    Preheat oven to 375 F. 
    In a medium saucepan cook meat until brown; drain grease. Add the cream cheese, green chiles and mushrooms. Let it simmer for a few minutes until all the cheese is melted. Stir occasionally.
    Spread 1/2 cup enchilada sauce in the bottom of a 9×13 baking dish. Spread 6 tortillas on top of the sauce. 
    Spread meat mixture over the tortillas. Layer the last 6 tortillas on top. Cover with remaining enchilada sauce. Top with cheddar cheese. Cover with foil and bake for 30 minutes.  Enjoy!
    *The cream cheese counteracts the hot chiles, so they aren’t too bad. My very picky to spice and heat kids had no problem eating this.
    ~FEATURES~
    Trim Healthy Tuesday – Cracker Salad (S)
    Cracker Salad
    Mark has decided to try and lose weight with me – this salad looks like a perfect transition into more veggies around here.
     
    Spicy Zucchini Stix
    I still have so much zucchini! This popped out as one I’ll have to try as a snack, or appetizer to use up my abundance.

    Edible Dessert Cups
    I about died when I saw these. I could fill them with fresh fruit and my kids would probably eat more good stuff just because it looks amazing!
    Now it’s your turn!
    Cohosted by Diane at Simple Living and Eating
    Link up to 3 new recipes
    Hop around and find some new meal, dessert, snack inspiration!
    FOOD RELATED POSTS ONLY! All others will be deleted. This is a food hop. 
  • Kids In the Kitchen: Apple Pie French Toast #FoodieFriday

    Kids In the Kitchen: Apple Pie French Toast #FoodieFriday

    A few weeks ago I told you how I have the kids separated to help with each meal during the day. In that post I told you how I let Princess V smell the spices and pick some out to make Venice’s Chicken.  Today I’m excited to share an extremely easy, but very tasty French Toast recipe.

    I created the Apple Pie French Toast one day when I realized too late we were out of cinnamon. I started going through the spice cupboard (yes I have a cupboard dedicated to spices), to see what in the world I could substitute, because of course I already had most of the mixture whipped up. It needed something!  I’ve tried a few different spices, but this recipe is by far my favorite on French Toast!

    Of course here I’ll show you just how easy it is to get kids involved in the kitchen as well. Above you see my breakfast helper, Princess C flipping pancakes. A few pointers before you let your 5 year old near the stove

    • Talk to them about how hot the pan will be. Make sure they are aware of where their hands are at all times on the spatula so they don’t get too close to the hot stove.
    • If a slice of bread flops off the spatula onto the counter, or stove top, or half on half off, don’t let your child adjust it. 
    • Parental supervision should be used at all time when cooking with kids in the kitchen
     

    Apple Pie French Toast

    Ingredients
    6-8 slices whole wheat bread
    2 eggs
    1/2 cup milk
    1 tsp vanilla extract
    1/2 tsp sugar
    1 tsp Apple Pie Spice*
     
    Directions
    In a shallow pan (we use our round cake pans), mix eggs and milk together until eggs are broken and well mixed with the milk. Add vanilla and stir some more. Last add the sugar and Apple Pie Spice. Stir some more, until the sugar and spice are mixed in. The spice will mostly stick to the top of the liquid, that is just fine. 
     
    Heat a griddle, or frying pan to medium heat. Depending on your pan, you can use some Pam spray, or melt a little butter on the pan to help avoid the toast from sticking. 
     
    Dip a slice of bread in the egg mixture, and turn coating both sides. Place on the hot griddle, and repeat with the rest of the bread until the griddle is filled. Cook approximately 3-5 minutes per side, or until bread is nicely browned and toasted on both sides. 
     
    Enjoy with a little butter and maple syrup for a nice treat.
     
    *Some spice substitutions we’ve tried and enjoyed are cinnamon, allspice, or pumpkin pie spice. Have fun mixing up your french toast!


    ~FEATURES~
    We tend to hit a breakfast rut pretty frequently around here. Check out these fun and delicious breakfast recipes from last week’s party.
     
    Click for Recipe for Gluten Free Strawberry Sage Muffins
    Strawberry Sage Muffins
    What a combination of flavors. These muffins look like the perfect morning treat. 
     
    Sausage & Corn Bread Pudding #Southern #classic #sausage #corn #breadpudding
    Sausage and Corn Bread Pudding
    I’ve never seen bread pudding as a breakfast before, but this combination of corn bread and sausage has me sold!
     
    pancake
    2 Ingredient Pancakes
    Now this is a kid friendly, easy to make breakfast recipe. Plus, it’s Gluten Free!
     

    Welcome to Foodie Friday!
    Please stop by and say Hi to my cohost Diane at Simple Living and Eating.Link up any Food Related posts below, then browse around, and enjoy getting some wonderful meal ideas around the web!
    *By linking up you give us permission to share images as features on our blogs (always linking back to you of course!). We also pin many of your recipes. You can follow my Foodie Friday pinterest board, where I pin all the features, and my personal favorites each week.