Tag: dining room

  • Fall Tablescape and Giveaway

    Fall Tablescape and Giveaway

    *This post sponsored by LTD Commodities. All thoughts are 100% my own.

    I’m trying not to apologize too much, but I feel I must here. I’m so sorry, I sort of skipped fall and jumped right into winter here. You know with posts like sharing the Christmas Experience. Admittedly back in September I did share some personal insights onto why I love fall. Unfortunately, the beautiful fall season just didn’t last very long here in North Dakota.

    Our landlord mentioned raking up the leaves one day, and the next thing I knew they were completely covered in snow. With Thanksgiving this week, it brings back some good fall memories and scents. My aunt always hosted Thanksgiving growing up, and she made sure her tables looked nice for all our guests. This year, although I’m not hosting, I still thought it would be nice to dress our table up a bit more.

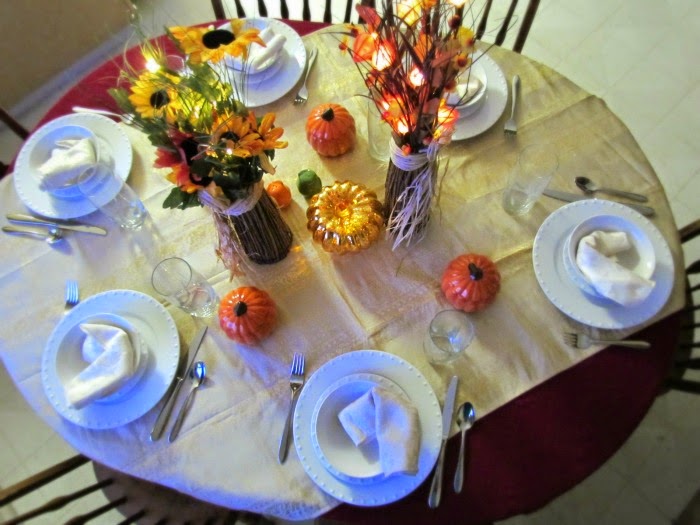
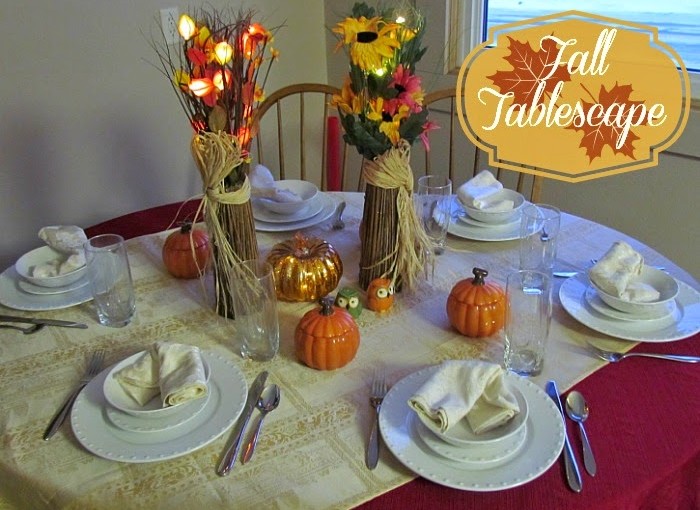
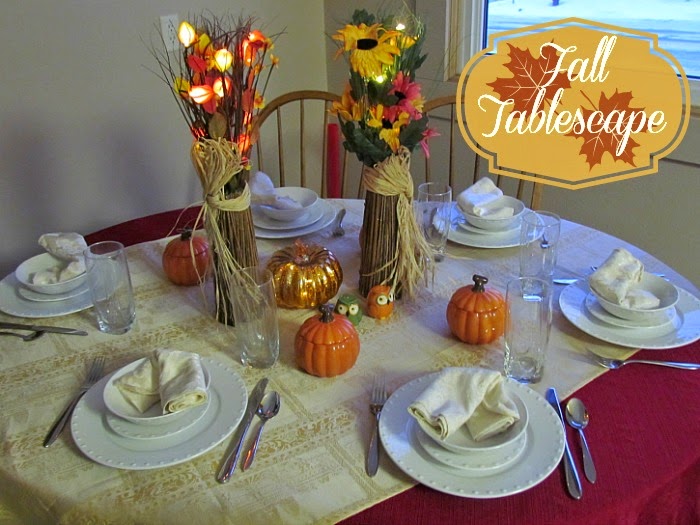
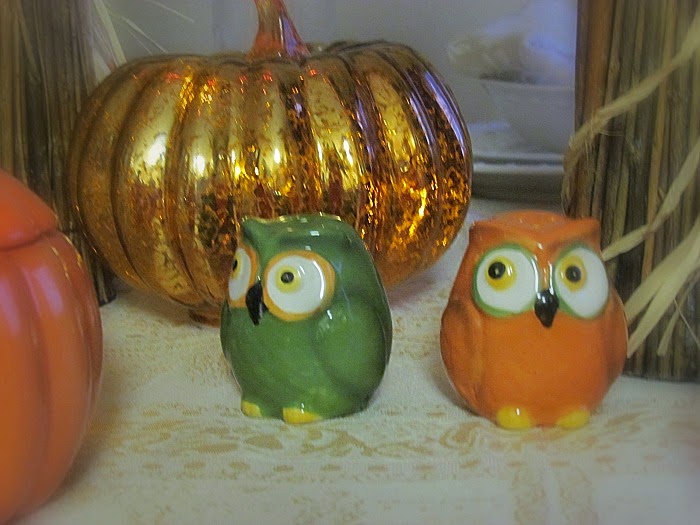
    I just love the decor I found at LTD Commodities. These flowers with the lights make having a formal dinner, without candles safe and fun for the kids. I also could not get over the glass light up pumpkins. Sadly, we had two, but one was ahem, knocked off the counter by a small child. Sad day indeed! The kids have been great at leaving the second pumpkin alone though – looks like they learned a valuable lesson.

    I’m also in love with these owl salt and pepper shakers, that match a spoon rest for the stove. My mom has a collection of S&P shakers, so I’m always on the lookout for new ones. The colors on these are just perfect to go with the pumpkins.

    The mini pumpkin dishes will be perfect for serving soup in, or dips/sauces so they don’t have to be constantly passed around the table. I love these! A small squeal may have passed my lips as I opened them up. So perfectly fall, and perfectly useful.

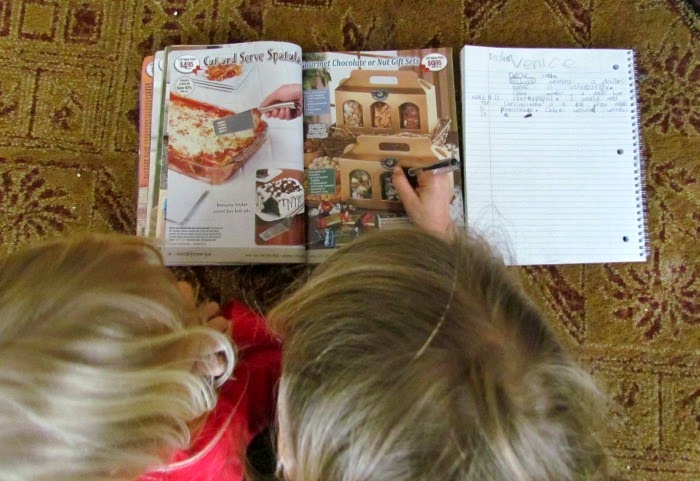
    Along with our package came a new LTD Commodities catalog, which my kids confiscated, and began planning their Christmas wish list from.

    GIVEAWAY

    My friends over at LTD Commodities would like to share the same Fall Decor items I received with one of you!
  • Dining Room Recap

    Dining Room Recap

    I wanted to pull our Dining Room remodel into one recap post. It’s so neat to see the before and after shots next to each other!  For me, it just doesn’t even look like the same room anymore. I love our new Dining Room!
    It started out as a simple floor to ceiling pantry project.  Building this half wall up and into a pantry.
    It soon took over the whole Dining Room when Termites were found. Keep in mind I consider this lucky, since we found them before our roof caved in!
    Our simple project became a massive one. But we learned some cool things a long the way – like how to add temporary support beams to your ceiling.
    and how to remove layers of wallpaper and paint
    and how to tape and mud.
    Since I was mostly told to stay out of the kitchen at the end, due to all the chemicals from primer and paint, I got inspired by pinterest to make a hanging drum light.
    We took a special family trip to pick out this artwork. We wanted a Venetian feel, and I feel like we got that with the wall color, and this photo.
    And finally we were done! If I haven’t said it enough yet, I’ll say it again, I love our new Dining Room! I love the pantry that allows me to see what we actually have! I love that we can all fit around the table, and there’s enough light to see by!
  • DIY Drum Light

    DIY Drum Light

    DIY Drum Light


    We felt our dining room needed different lighting. The dome light just didn’t give adequate light. In fact, I kept it off more often than on, because it made so little difference, and I saved the money. Since we were remodeling already, I figure a new light was in order as well. 
    While browsing Pinterest, I came across this DIY Drum light tutorial over at From Gardners 2 Bergers.  Although I really liked how she made her drum light, she also linked over to another tutorial at The Keylor Family.  I felt my talent for craftiness was best suited with The Keylor Family’s tutorial. 
    With the dining room remodel accomplished I decided to add my finishing touch with a drum light, in pure hopes we’d get much more light in the room than the current fixture gave.  A trip to the thrift store for a hanging chandelier, then to Hobby Lobby for the biggest Embroidery Hoops (23 inches)available, plexiglass, and some muslin and I was ready to begin.


    DIY Drum Light

    The materials:
    2 Large Embroidery hoops
    Plexi Glass – long enough to fit around the hoops. I used 3 sheets
    Fabric
    Chandelier
     
    Lay your plexi glass down and tape together. Carefully wrap the glass in between the hoops inner and outer hoops. Tighten the hoop, and flip it over. Attach the glass hoop to the 2nd embroidery hoop. 
    Lay out your fabric, and carefully glue it over the edges to the inside of the embroidery hoop. Having 2 hands helps to hold the fabric tight and straight. 
     
    The real hard part came next. Figuring out how to hang the light inside.  Through a collaborative effort with Mark, we got this.
    A piece of wood sandwiched between a section of the light, and resting under the embroidery hoops. Our first attempt was wire hangers, but they weren’t sturdy enough.
    And finally the light was hung! In my personal opinion, it’s pretty awesome!  Mark thinks it’s a little too big, and in truth it could be smaller, but hey it gives us a lot more light now!
     
    I don’t want to leave you just hanging there so here’s a grand look at our finished dining room, complete with a DIY drum light!
     
  • What am I up to?

    What am I up to?

    I bet you’re wondering what exactly I’m up to.  I’ve spent a good portion of the last few days getting our kitchen and dining room reorganized. I’ve got a whole cupboard and one shelf in another cupboard that are empty. I don’t know what to do with them.  I’m sure I’ll find something and things will continue to get moved around until I’m comfortable with where it’s all at.  But for the most part the reorganizing is done. The last thing I have to do is decorate. Since the walls are brand new, I’m leaving the hanging of things to Mark. I’d hate to mess up his hard work, so I’m letting him put the holes in it. Nice of me huh?
    So I am now in the process of creating our new lighting. This was a pinterest inspired idea, with a diy tutorial from another blogger.

    What you’re seeing is the mid process of my own drum pendant light. Using 23″ embroidery hoops, sheets of plexiglass, fabric and a pendant light from the DI.  This light when done will have cost us less than $30!  To buy one of these, this size would have cost upwards of $100.
    I just hope I can have the patience to get that fabric on nicely, without messing it up. 
  • Remodel update

    Remodel update

    I know you’ve all just been dying to see wha’s going on in the Dining Room!  Gosh it’s been awhile since I last shared our progress with you. Last I left you, we had the wallpaper removed, and the sheetrock up.  Since then we’ve plastered, painted, put the pantry shelves in and hung the pantry doors. Check it out!

    Hmm, I think someone prefers I leave him out of the pictures, lol. But since I can’t paint (remember baby in the tummy), he’s stuck being showcased.

    Sorry for the dark pictures. The flash on the camera went out, and I’m not sure if it’s fixable yet.
    Today I mopped the floor, which has already made a big difference in what this room looks like. I believe Mark’s plan for the evening is to put up the trim, and perhaps fix the floor (did I tell you about that? Hot iron on a vinyl floor don’t mix).
    If all goes as planned, I should be able to spend tomorrow rearranging dishes and food, and making the room all pretty. I may head to the craft store to get the items for the pendant light as well!

    Shine Your Light

  • Dining Room Overhaul

    Dining Room Overhaul

    Today felt like we were on one of those HGTV shows with how many people were in our dining room working. Many things got accomplished at once, and I’m seeing more of an end (while wishing the end was already here). Here’s a look at what got accomplished this week.

    Continuation of the wallpaper stripping and washing of walls

    My sister in law, her fiance and his kids came by to help. This is E doing some cauling in the pantry. She was an awesome help!
    Mark and Jeff got the ceiling and wall sheetrocked, taped and mudded in the family room.

    And with lots of help the dining room got taped and mudded. 
    Now we wait for it to dry….sigh. It may be worse than stripping the wallpaper, at least my hands were busy then.
    Linking up to

    Shine Your Light

  • Wallpaper Stripping (WW)

    Wallpaper Stripping (WW)

    2 Days of Stripping Wallpaper, and I’ve got almost 1 wall down. We had some friends come by last night to help, which was wonderful! The plan (hope) is to have the wallpaper/paint off the walls by saturday so we can start the painting process.
    Being pregnant, we’re trying to find ways that I can help safely.  Instead of getting heavy duty wallpaper stripper, I’m using equal parts mix of white vinegar and water.  Spray it on, and start scraping!
  • Kitchen Remodeling Update

    Kitchen Remodeling Update

    Mark has been working hard on our kitchen remodel, and has gotten quite a bit done. Saturday my dad and brother came up and leant a hand.  Sunday, Mark took a break for Christmas, but he has hardly left the kitchen since. Here’s some pictures to update you on our progress!

    Mark putting the new support beam in

    Dad and Uncle C ripping the old support beams out.  They were attached pretty darn good.

    When Mark dropped a piece of the Shop Vac under the kitchen floor, Princess V made a very brave attempt to recover it. She made it just under the floor, before fear won over. We were very proud of her attempt. Mark had to cut more of the floor out, and shimmy himself and a broom under there.

    Starting to lay the new flooring so the pantry could be framed.

    Pantry framed, and putting up sheetrock

    Tearing up the rest of the top layer of flooring, so we can lay down the new stuff!
    I’m headed off now to offer assistance in laying the new stuff down.  We opted out of bamboo flooring for a number of reasons. It required additional layers underneath, and there was none in stock at the stores.  I let Mark make the decision, and he chose a vinyl flooring styled to look like bamboo. It’s not the normal big sheets of vinyl, but rather interlocking panels.  I’m quite excited to help with this part of the remodel! I’ll have new pictures tomorrow! 
  • Dining Room Remodel day 2

    Dining Room Remodel day 2

    I took the Princesses to the mall to search for a last minute gift and to get some play time in, while Mark stayed home and got some work done undistracted.  After yesterday, today was much more calm, as we had more of a plan of what needed to be done. 

    First on the list – Check under the kitchen flooring for termite damage.

    As far as we can tell, none! The support beam however goes all the way to the ground so the buggers must have climbed straight up it.
    Second on the list – Remove ceiling and add temporary support beams so we can safely remove current support beam.

    Check and Check!
    Third on the list, await help from other men to safely remove beams and put up new ones. Sadly, plans fell through, and no help came. Thankfully there will be 3 extra men over tomorrow (yes on Christmas eve) to lend some hands and get this part done! 
    Then it’s on to the flooring. We’re looking at bamboo.  Any advice, experience, or preference, I would love to hear it!
  • Pantry Remodel and Termites?!

    Pantry Remodel and Termites?!

    Yeah you read that right! We’re redoing the “pantry” and turning it into a real pantry with lots of shelves and doors! 
    Oh the second part? Yeah you read that right too! We found termites, and turns out we’ll be getting a whole new dining room, not just a pantry!!  I’m pooped, and exhausted so enjoy the pics. 

    Original “pantry”, before demolition.
    Beginning demolition, with Daddy’s little helper.

    Old pantry removed, ready to start on the wall.

    Termites found, construction came to a quick halt.