Category: Home

  • $1 Cash Bask with Ortho® Animal B Gon® Animal Repellent and Checkout 51

    $1 Cash Bask with Ortho® Animal B Gon® Animal Repellent and Checkout 51

    This shop has been compensated by Collective Bias, Inc. and its advertiser. All opinions are mine alone. #OrthoProtects #CollectiveBias.

    Do you love your yard, but hate seeing your hard work get eaten up by garden pests? Maybe you are planning your garden and want to keep the rabbits, groundhogs, squirrels and other small animals from eating all your carrots and nibbling on your tomatoes. Ortho® Animal B Gon® Animal Repellent has a great no stink formula product that uses essential oils and delivers long lasting, rain resistant performance. These essential oils provide an effective way to keep small animals away from your lawn and garden. What smells nice to people actually confuses animals with a “wrong” scent, so they’ll go somewhere else to find a place to eat.

    Earn $1 cash back on Ortho® Animal B Gon® with Checkout 51. #OrthoProtects ad

    Whether you choose the Granules or the Spray, you can rest easy knowing that Ortho® Animal B Gon® Animal Repellent is safe for people, pets and plants.

    How does it work?

    Not only is this a great product, but you can also save $1.00 by using Checkout 51 when you purchase Ortho® Animal B Gon® Animal Repellent at Walmart. Checkout 51 is a grocery savings app that gives you new offers weekly, and lets you earn cash back on your purchase by taking a photo of your receipt.

  • Spring Clean the Tools that Clean for You

    Spring Clean the Tools that Clean for You

    #SpringtimeCleantime  #CleanFreakClean

    You probably all know how much I love Spring Cleaning. It’s probably one of the topics I talk about most, at least during this time of year. Have you ever thought about Spring Cleaning your appliances? They work hard all year long to clean for you, it’s time to give back and spring clean the tools that clean for you. 

    Spring Clean the tools that clean for you with Lemi Shine. ad

    Get a Lemi Shine Coupon

    I recently came across Lem Shine products and knew I was going to love them. Citric Acid is a fantastic natural cleaner, but I have a hard time cutting up a lemon and using it to clean instead of eating it in say, a nice tall glass of Lemonade. Lemi Shine is powered by 100% natural citric extracts, making their products both effective and safe to use. 

    Lemi Shine products are Clean Freak Approved! ad #CleanFreakClean #SpringTimeCleanTime

    See, in my house, I have a lot of spring cleaning helpers. There’s my kids of course – 4 of them. They are fantastic little cleaners….well, I like to believe they are at least. We’re working on it. For sure they can help with the dishes, so they often get put in charge of rinsing the dishes and filling the dishwasher. They are OK with this chore as long as I let them put in the soap. 

    Clean your dishes with Lemi Shine Detergent. ad #CleanFreakClean #SpringtimeCleantime

    Find Lemi Shine near you

    Truth is, with Lemi Shine products I could put the kids completely in charge of spring cleaning the whole house and I wouldn’t have a single worry. I could sit back with that glass of Lemonade and really enjoy myself! I’m a Mom that leads by example, though, and have a tendency to be a bit of a clean freak when it comes to the deep spring cleaning. I want everything done just right so I can leave it alone until next year. 

    Clean the appliances that clean for you. ad #SpringtimeCleantime #CleanFreakClean

    I get down and gritty with cleaning the grease spots on the undersides of cupboards, the window screens and tracks that have picked up all that winter grime, and it’s the perfect time to make sure my appliances are in tip-top shape. Lemi Shine Dishwasher Cleaner and Disposal Cleaner are my go-to kitchen appliance cleaners. They get in the spots that I can’t reach to make sure my everyday cleaning is actually clean.  

    Have you tried Lemi Shine yet? Tell me about your #SpringtimeCleantime in a comment.

  • 8 Ideas for Recycling Milk Jugs

    8 Ideas for Recycling Milk Jugs

    Gone are the days of milk men and glass milk bottles that were used over and over and over again. Now a days many milk jugs end up in the trash and landfills, some may make it to your recycling plant, but they don’t have to! Did you know you can reuse them at home in a myriad of ways? 

    8 simple ideas for recycling Milk Jugs and celebrating Earth Day

    A few years ago when I wanted to start planting but the weather wasn’t quite right, I decided to help the kids plant inside. We could have gone to the store and bought little pots for each of them, but why do that when we had a trash can with a couple empty milk jugs sitting in it? You can leave the milk jugs plain, or let the kids decorate them with paint, stickers, jewels, leaves, etc. This upcycling project will easily entertain the kids for a whole afternoon. What will you plant in your Milk Jug Planter?

    Milk Jug Planter

    If you don’t want to plant in the Milk Jug, One Creative Mommy turned one into a watering can. Again another SIMPLE craft the kids can help with. My kids are always fighting over who gets to water the plants, so I can easily keep 4 jugs out of the landfill by turning them into personalized watering jugs for my kids. Put them to work decorating again, and everyone will be happy this spring!

    DIY Watering Can from One Creative Mommy

    Dream Garden 101 teaches you how to turn a Milk Jug into an Upside Down Tomato planter. We love tomatoes, and growing our own, but when we rent there’s not always the space to grow a garden. This is a great space saver while still growing your own food, and teaching the kids about agriculture. Of course a little paint wouldn’t hurt to bring the planter more to life. She also shows how to turn a milk jug into a slow drip watering system.

    Milk Jug Upside down Tomato Planter from Dream Garden 101

    If you’re like me, perhaps you planted your garden a little early because you got too anxious waiting for the weather to warm up enough. That or maybe you did wait, and mother nature decided the weather should be weird this year! If that’s the case, Family Food Secure has a quick tutorial to turn Milk Jugs into a hot cap – or basically a little home for all your sprouts when the weather threatens a late frost. 

    Milk Jug Hot Caps from Family Food Secure

    Milk Jugs aren’t only good for reusing in the garden, though. Oh now! Check out these other really awesome ways to reuse your milk cartons. We all have a tupperware drawer (whether you use that brand or not…it’s just what I call those plastic food containers). Instead of losing lids, losing containers, or getting fed up with never having bottom and top match, just turn your Milk Jugs into a sandwich box! I found this idea over on Curbly.

    Milk Jug Lunch at Curbly

    If you have more of an inclination to dress up versus heading out to the garden, then this Storm Trooper Mask from Filth Wizardry is probably a better use of your empty milk jugs. 1 helmet uses 2 jugs! Imagine a whole family of Storm Troopers saving the planet 2 milk jugs at a time. 

    Milk Jug Storm Trooper at Filth Wizardry

    Finally, if you really want to get ambitious and save those milk jugs from the landfills, start asking your neighbors for their empty bottles, or plan on drinking a TON of milk for this one! A couple hands, and a few hours, and you can have a Milk Jug Reading Igloo just like the one Replay Report made. I’d personally be lost inside for the rest of my life. Toss me a book a pillow and a blanket, and I might consider living in it. 

    Milk Jug Igloo from Replay Report

    How are you reusing Milk Jugs?

  • Plant a Container Veggie Garden and Enter to Win $1000 Walmart Gift Card

    Plant a Container Veggie Garden and Enter to Win $1000 Walmart Gift Card

    This shop has been compensated by Collective Bias, Inc. and its advertiser. All opinions are mine alone. #LoveYourLawn #CollectiveBias

    When I don’t have a lot of time to take care of a vegetable garden but still want to enjoy the fruits of my labor in a gorgeous looking yard, I turn to Scotts® EZ Seed® Sun and Shade. Here you’ll find how I simultaneously planted an easy to care for container veggie garden while repairing a bare spot in the lawn all in one morning!

    Plant a Container Veggie Garden and repair patches in your lawn all in one morning! #LoveYourLawn #ad

    It’s been a good 3 years since the last time I got to plan and prepare our spring garden. Unfortunately, while I now have space for a garden, I just don’t have the time to care for it the way I would like. The kids really wanted to plant something, though. I thought if we got the right kind of veggies we could attempt a container veggie garden. I talked to my mom and we decided peas, lettuce, and carrots should do pretty well. 

    With kids in tow, we went to Walmart to find our seeds. While there, I saw Scotts® EZ Seed® and knew I needed to grab it too. After a season of apples falling by the bucketload, our lawn had some bare spots that needed repairing. From a distance, it didn’t look too bad, but up close you realized all the green was a moss covering that was spreading and eating away the gorgeous lawn.

    Find Scotts® EZ Seed® Sun and Shade at Walmart #LoveYourLawn #ad

    Thankfully EZ Seed® really is easy. 3 simple steps illustrated on the back of the bottle, told me this was a project I could do before lunch and all by myself too. I set the boys to work filling our pot for the container veggie garden and went to work on the lawn. A couple passes with the rake over the dead spots, some seed spreading, a little water, and I was set to check on the boys.

    Kids love helping in the garden #LoveYourLawn #ad

    It took me all of 5 minutes to begin the repair process to our lawn with the EZ Seed®. I spent a little time being fascinated by the expanding seeds, but then I was able to head back and help the boys plant their veggie garden. They had filled our pot about halfway with good dirt from the garden bed, and then we topped it with some top soil we picked up along with the seeds. 

    Scotts® EZ Seed® Sun and Shade repairs bare spots in your lawn. #LoveYourLawn #ad

    Gardening with kids is so much fun because you get to explain every little step of the process. Why are we using a trellis? What is a trellis? I grabbed this cute red one for a pop of color next to our green lawn. The boys helped plant the pea seeds, and we talked about their favorite veggies. The lettuce came next and adds a nice look since it’s already sprouted. I tried to show the boys the roots, but they were more interested in prepping their watering cans. 

    Help kids plant a veggie garden #LoveYourLawn #ad

    While they got the water ready, I quickly added the carrot seeds to the front of the pot. I may not be great at layering my fashion, but I can layer a garden! 


    Layer a veggie garden in a container is easier than you might think. #LoveYourLawn #ad

    Ready to layer your own container veggie garden? Here are the keys to remember 

    • Pick a plant that will grow up, like peas, or green beans. Add a trellis to the back of your container to encourage upward growth.
    • Avoid bushy plants like tomatoes. Tomatoes can grow in a container, but would be best by themselves. 
    • Choose a smaller upward growing plant, like lettuce, spinach, or herbs. Plant these in the center of the container.
    • Finally, a root vegetable, like onions, and carrots, can be added to the containers front end.
    • Use a nutrient-rich top soil, and make sure the container you use has good drainage.

    What would you plant in a container veggie garden?

    Check out more ways to Love Your Lawn with Scotts® EZ Seed®.

    Take the morning and plant a Container Veggie Garden, and repair any bare spots in your lawn with Scotts® EZ Seed® #LoveYourLawn #ad Looking for specific information for how Scotts® EZ Seed® Sun and Shade can help solve your lawn problems? Click here to sign up for the Scotts’ email reminder service to receive specific tips and information for your area!

    Enter the sweepstakes for the chance to win Walmart gift cards and Scotts® Spreaders!

    Scotts® #LoveYourLawn Sweepstakes

  • Spring Clean your Closet

    Spring Clean your Closet

    Spring is here, and in this home it means spring cleaning of all kinds! Today I want to talk about spring cleaning your closet.

    I’ve been slowly working my way through Marie Kondo’s The life-changing Magic of Tidying UpOne of the key messages I’ve taken from it, is that things we own should spark joy. If it doesn’t bring us joy, and it doesn’t serve a useful purpose, we should get rid of it!

    I decided the best place for me to start applying this would be my closet. It wasn’t quite spring, but the weather around here has been pretty nice. So the windows came open, and I started pulling all my clothes out and stacking them on the bed. Unlike a lot of people I know, I don’t really own a lot of clothes already, but the ones I do own were not sparking joy. Very little joy was sparked when opening my drawers actually. 

    Awesome tips to help spring clean your closet.

    Spring Clean Your Closet

    Wash everything. 

    Start by washing everything! The worst thing to do when spring cleaning anything is doing it in shifts. You don’t want to go through your clothes and then add items back in that you haven’t had a chance to go through. I know it’s easy to say you’ll just do it as you wash them, but I’ve been there, done that. It doesn’t work nearly as effectively. 

    Pull it all out. 

    Once everything is clean, pull it all out! Lay it on your bed, couch, middle of the floor – as long as it’s clean – so you can see it all. Go ahead and grab your shoes as well! You know you’ve got some you don’t really love. 

    One at a time. 

    Don’t worry about sorting the clothes into tops, bottoms, dresses, jackets, socks, etc. Just dive right in! Pick up one item. Hold it up. Inspect every inch of it. Try it on if you need. Then ask – does this spark joy? Does it make you feel like you, the real you when you wear it? Does it fit? Are you holding on to it for memory sake, or because maybe one day it might fit again? 

    Separate.

    After asking yourself all these questions, you have one last question to make. Do I keep it, or get rid of it? Then separate it into it’s respective pile. Have a box or bag handy so the “get rid of” pile, as we call it here, can be taken out as soon as you are done. The more it hangs around the house, the more likely you’ll have a hard time really letting go of it. 

    Clean out your closet with ThredUP

    I had ordered a Clean-Out Bag from ThredUP, so once I was done I nicely folded my clothes, placed them inside the bag, and sent them off to ThredUP. Out of about 20 items I sent, they were able to resell 4. Not too shabby, and I knew that would probably be the case. What I love is that the rest of the clothes I sent will be given to textile recycling companies so nothing will end up in landfills. 

    Try ThredUP on me! Sign up and get an automatic $10 to spend! It will also give me $10 to spend, so you know, help a girl that’s lacking in cute clothes out. 

    Now that your closet is cleaned out, you can buy a few new pieces that DO spark joy! What will you buy? Are you inspired by the flowers in bloom, or does you closet contain more neutrals?


    This post is part of a blog hop from Blogs & Business: Moms Who Do It All. Check out some of the other awesome blogs participating:

    Daily Momtivity | The Art of Better Blogging | The Jessie K | Fighting for Fitness | Building Butterflies | Forty by Forty Fitness | A Kreative Whim | Women Winning Online | Hometown Betty | Champagne and Cheerios | B is for Bookworm | Aileen Cooks | A Cotton Kandi Life | Beyond Mommying | Home Maid Simple | Tot Tot Goose | Thrifty Guardian | Diary of a New Mommy | Mrs and Momma | Blue Eyed Babies | The Little Tourist | From Designer to Diapers | Mommy, Memories and Mouse Ears | Redmond Kids | Cheer and Cherry

  • Stop House Fires Before They Start with FireAvert

    Stop House Fires Before They Start with FireAvert

    * I received a Fire Avert product as a member of the Social Butterfly Co. community. Thoughts are 100% my own true feelings. This post contains affiliate links and I will be compensated if you click through and make a purchase.* 

    Have you ever had a fire in your home? What if I told you there was a way to help stop oven fires before they ever start? Most house fires occur because of a lack of attention. Simple changes can help prevent you from the devastating effect of a house fire. 

    Stop house fires before they start

    Mark and I LOVE watching Shark Tank. With my interest in marketing and Mark’s interest in new ideas, it’s a fun show that we can both get into. Some products make us shake our heads, some make us hungry, and others have us looking at the product website to see if we can fit it in our budget. We’ll sit there and guess which Shark might give the entrepreneur a deal and whether they’ll follow through after the show. 

    One deal we were thrilled to see go through was FireAvert. A simple plug-in for your stove that will auto shut-off your stove in case of fire. 

    Stop house fires before they start with FireAvert

    How does it work? Simple really! When your smoke alarm goes off, the FireAvert responds by cutting power to your stove. In case of a fire, you won’t be worrying about turning the stove off because it’s already off. More likely, though, because smoke comes before a fire, your stove will shut off before the fire ever starts. 

    Having experienced a few house fires myself, this product is golden! When I saw it on Shark Tank, I knew it had to get a deal. Stove Fires are the #1 cause of house fires in the US! Who wouldn’t invest in a product that would benefit every home in America? 

    Easy to install FireAvert. Prevent house fires before they ever start

    While fairly simple to install, being familiar with your home’s electrical breakers will be beneficial. You’ll need to cut power, for your safety, to the stove before plugging it in. Once plugged in, follow the easy to understand directions for syncing your FireAvert with the smoke detectors you already have. Now would be a great time to check the battery in your smoke detectors as well. 

    While a bit of an initial investment on AmazonI believe it’s a peace of mind money can buy! The only downside I currently see to FireAvert is that they only work on electrical stoves. As a gas stove loving girl, I hope to see a future product for gas stoves. I’ve been told they’re working on it and hope to eventually have something for gas stoves. 

    Follow FireAvert 

    Facebook  *  Twitter  *  Google+

    Would you feel safer knowing your stove had an auto shutoff?


  • Meet Your Neighbors Before an Emergency Strikes

    Meet Your Neighbors Before an Emergency Strikes

    You never know when an emergency could strike close to home. Get out and meet your neighbors today.

    Tips for meeting your neighbors before an emergency strikes

    When you see emergency vehicles at your neighbors house, what do you do? You don’t actually know them. You wish you did because you want to be the kind of neighbor that knows everyone and is there to help. Whether it be borrowing a cup of sugar, or running them to the hospital. I want to know my neighbors, and I want them to know me. 

    That happened here last week. Mark was home and outside playing in the snow with Lincoln. He saw the ambulances come and thought it was at our one neighbor’s home who we do know pretty well. The two homes look very similar, which on our street of old homes is unique. He yelled for me to come out. Thinking I should run over and see what happened. 

    When we realized it wasn’t the neighbor we knew, we just kind of stood there. Now what? Should we still check on them? See if there was anything we could do as a neighbor? We knew absolutely nothing about this neighbor, yet we felt compelled to do something. So I called our friend who lives right next door and asked if she knew anything. She did, but not much. She’s an older single woman. Her kids all live out of the state. She was sitting up and talking to the Medics. 

    Since she left in the ambulance there really wasn’t anything we could do. Except wait, and wonder if I could have been a better neighbor. So I turned to my awesome friends, who haven’t moved around as often as I, and asked if they knew their neighbors and what their best tips were for getting to know their neighbors.

    Be the first to make contact. When you see someone moving in, don’t wait for them to introduce themselves, go say hi! Offer to help unload the truck, or bring by some dinner. If you are the one moving in, don’t wait for your neighbors to stay hi first. Once the move in has settled, head on over and introduce yourself!

    Service. Service is my favorite way to meet new people, but it never has to be a big production. Helping rake leaves, shovel snow, or running their newspaper up to the porch are just a few simple tips we can all do, and will help you meet those neighbors. One day we noticed our neighbor who we’ve not actually met, but know lives alone – yes it would appear most of our neighbors are single women – had newspapers collecting at the bottom of her drive. I sent the kids over to carry them up to her porch. She didn’t answer the door, possibly they didn’t knock either, but now we feel a slight connection to her. 

    Neighborhood Party! This is probably my favorite idea ever! Once we get warmer temps I think we’ll plan a neighborhood party. We have the backyard for it. It’s a great reason to go knocking on your neighbors doors too!

    Welcome new neighbors with a heart attack!

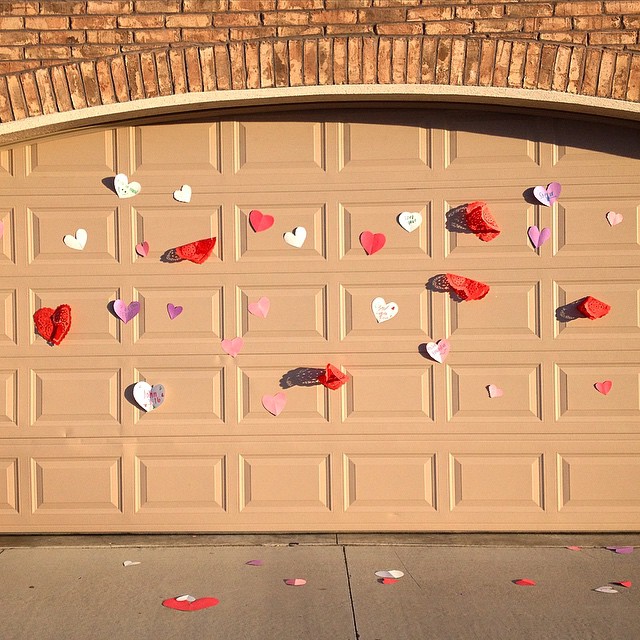
    HeartAttack. Similar to t.p.’ing, but more likely received with more joy on both ends. I love this idea Amber from Busy Creating Memories shared with me. Write nice notes to your neighbor and tape them all over their garage, front door, etc. It could be a welcome to the neighborhood, or “hey we’d love to get to know you more and these are the things we’ve noticed about you”!

    Get Outside and Be Seen. This was the 2nd most frequent answer from my friends. Spend time outdoors. Let your neighbors see you. Say hi whenever you can. If your neighbor has kids invite them to play with yours. I know I need to be better with this one!

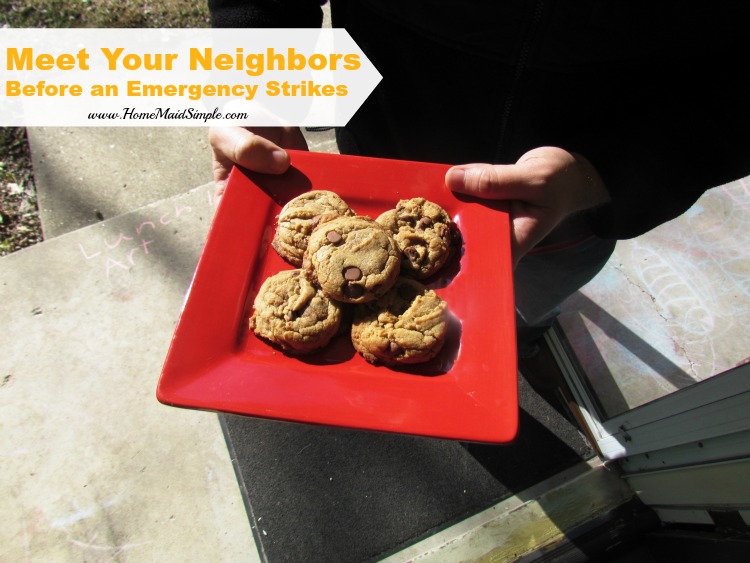
    Bring Cookies. The number one answer given by friends online was to bring cookies! No one turns down a plate of cookies, and you really need no excuse to bring them over. So bake up some cookies, and take them over. Maybe whip up a little “Neighbor Card”, to include your phone number and house number so if they ever want to call or stop by but can’t remember which house you said you lived in – I can’t tell you how many times people tell me where they live, and have it not stick in my brain – they have it handy!

    When leaving for book club last night I saw a car parked and lights on at the “ambulance home”, so I think I’ll bake up some cookies and go introduce myself.

    Do you know your neighbors?

  • Word of the Year for 2016: Tidy

    Word of the Year for 2016: Tidy

    This years one word motto is to create a more Tidy life for myself and those in my home. Tidy house. Tidy clothes. Tidy schedules. If I can tidy it up, I will make an effort to this year. I want to enjoy doing things this year that I feel we can’t because of the chaos we surround ourselves with. 

    2016 Word of the Year -Tidy. The why behind my word

    Every year we move, and each time I get rid of more stuff. In fact I get rid of so much, that my husband probably wonders how we even have stuff in our house these days! I wonder myself frequently how we can get rid of so much but still have so. much. stuff. The cleaning and purging is followed up with trying to make a home work out of a modge podge of stuff that really doesn’t go together. So the result is a house filled with chaos, that doesn’t entice any of us to want to keep it tidy.

    I want to go to bed knowing this feeling. Truth be told I have before, but I’d like it to not take all my energy to make it that way every night. I want to wake up in the morning with a Tidy house, because nothing energizes you more than knowing there aren’t leftover chores from yesterday, or the day before, or even the week before!

    Shortly before Christmas I was gifted the book (affiliate link) The Life Changing Magic of Tidying Up by Marie Kondo. I haven’t actually read it yet, but I knew as soon as I read the introduction my word for 2016 would be Tidy. Shortly after Christmas I rejoined the Mess to Success facebook group, and then a friend shared a Konmari Challenge group (based of The Life Changing Magic of Tidying Up) with me. If you’d like to join any of these groups, just let me know!

    My plan for the year is to not purge, or minimalize what we have. This year, it’s about tidying up. Finding systems that truly work for our home and lifestyle. I’ll share my progress with you, and invite you to share any tips and/or progress with me!


    Looking for more inspiration on your word of the year? Read about last years word Marriage, and my first word of the year Joy.


  • Candy Cane Reindeer with Reindeer Tags + More Reindeer Treats

    Candy Cane Reindeer with Reindeer Tags + More Reindeer Treats

    Add these Reindeer Tags to a fun treat like Candy Cane Reindeer on Christmas Eve, and watch your kids light up with the Christmas magic as they find a treat left by Santa’s Reindeer. 

    GRAB YOUR CANDY CANE REINDEER TAGS HERE

    Leave a treat for Santa's Reindeer and enjoy the Candy Cane Reindeer Santa's Reindeer leave behind

    Last year it was a few nights before Christmas eve when I had the fun thought to leave treats in the kid’s stockings from Santa’s Reindeer. It was a last minute thing, and while fun to do, I wasn’t able to take pictures that truly showed how fun it was. This year I gave myself a bit more time to get it together, and as I thought about it I knew I had to get my sister involved! So I called her up and asked if she would design some Reindeer Tags for my Candy Cane Reindeer. 

    Santa's Reindeer Gift Tags

    Didn’t she do a fabulous job? I play at art sometimes, but my sister is a true artist. She whipped this drawing out a day after we talked. I love how proud the Reindeer looks, I pretend because he knows what an important job he has pulling Santa’s sleigh. 

    Having just the 3-year-old at home these days meant I could actually make the Reindeer and take the pictures with him hanging around. After all, he can’t read yet and was fairly entertained with the extra Candy Canes I passed his way (he made a full garage out of them to park all his cars). So I spent my afternoon making some cute reindeer to attach the beautiful tags my dear sister made, and which you can purchase a download of from her Etsy store AlgaeArtandCrafts.

    All you need to make Candy Cane Reindeer

    All you need to make Candy Cane Reindeer are Candy Canes, googly eyes, pipe cleaners and a little hot glue. I’ll let the pictures do the rest of the talking here. A little ribbon is all you need to add the touch of the gift tag. 

    Candy Cane Reindeer from Santa's Reindeer

    I saw this really cute idea over on A Day In Motherhood for Reindeer Food. You could leave it out with the milk and cookies for Santa, in hopes for the Reindeer to leave a little goodie. Or you could make Reindeer Chow Muddy Buddies found on This Silly Girl’s LifeWhile these are great for the kids to help make on Christmas Eve, you may want to check some of these other Reindeer ideas out to leave for the kids attached with the Reindeer Tags. 

    Reindeer Noses from The Thankful House

    Reindeer Candy Cane Pudding Cups from Snack Pack

    Reindeer Chuppa Chups from Brisbane Kids

    Nutter Butter Reindeer from Cook Crave Inspire

    Reindeer Hot Chocolate from Thrifty Jinxy

    Gingerbread Reindeer Cookies from Jelly Bean Trail

    If you’re not into leaving more treats, because we all know the sugar overload will be ever present already, Santa’s Reindeer could also leave a fun game or hat to wear. Like this Rolla-Reindeer from Seven Thirty Three or this simple Reindeer Hat from Education.com.

    Santa's Reindeer Gift Tags

    What would you attach these Candy Cane Reindeer Gift Tags to? 

  • One Room Challenge: Frame Your Own Canvas DIY

    One Room Challenge: Frame Your Own Canvas DIY

    In this easy tutorial you’ll learn how to stretch your own canvas print over a frame so you can hang a bit of yourself on the wall. 


    When I started imagining what to hang over our couch, I knew it needed to be something besides a family picture. I wanted something new and fresh, that we hadn’t hung up before. I figured we’d probably check out the thrift stores and see what we could find. 
     
    But then I did something else – I started browsing my old college art folder. I’ve got a number of really cool pieces I had forgotten about, like the hanging skeleton, and Alexander Graham Bell – but it was my abstract black and white that caught my eye. Rolled up in the bottom I knew it was the piece I was looking for. 
     
    I even got a pretty good grade on it! I mean 19/20 for someone who had never gone beyond middle school art class must mean the art gene didn’t completely skip me over right?
     
     
    The big question I had to ask myself at this point though, was why didn’t we frame it in class? I had no idea what I was doing here, so reached out to a couple art friends – all who also had never actually stretched canvas before. Feeling a bit better about that I headed to Pinterest where I learned of these nifty things called Stretcher Bars.  
     
     
    I made a couple phone calls and found Hobby Lobby sold them in all different sizes, but you can also get them on Amazon. If it hadn’t been for pinterest, I would have attempted to build my own wooden frame, and also would have gone about it completely wrong!
     
    See for canvas, apparently you don’t want the canvas to lay directly on the frame. These premade stretcher bars are slightly raised right on the ends to keep the rest of your painting off the boards. Plus, no need to figure out those corner angles because it’s all done for you. 
     
    First things first here now! You need a painted canvas! If you don’t have one laying around from an old college class….please tell me if you do!….then go buy some canvas and paint it! It will be a lot of fun! 
     
    Next, measure your painting. Buy your stretcher bars in the right sizes. My painting is 4 feet by 23 inches. So I picked up 2 48″ stretcher bars and 2 23″ bars. Insert the stretcher bars together at the corners, and VOILA! You’ve just build your frame!
     
     
    To stretch your canvas now, you’ll lay your painting upside down. Place your frame on top of the painting, lining it up as best you can to the edges of the actual picture. Hopefully you’ve got a good 3-4 inches to overlap over your frame. 
     
    After the painting, this next part is my favorite! It’s time to pull out the Staple Gun! Following the numbers below staple each side in succession. So 1 staple in side 1. Then side 2, 3, and 4. Then go back to side 1. It will take awhile, but that’s how you get a nice smooth and straight stretched canvas. Depending on how large your canvas is, 2 sets of hands can be very helpful here. 
     
     
    Wasn’t that exciting? Slowly but surely this Everything Room is getting put together! With a nice piece of personal art – that finally grew on Mark – we have a bit of a color pallete to help guide the rest of the room. 
     
     
    Join me again next week to see which piano we decide to keep, and how it will affect the room arrangement!
     
    Linking up with Calling it Home for the One Room Challenge!