Category: DIY

  • DIY Optimus Prime Transforming Costume

    DIY Optimus Prime Transforming Costume

    This post is sponsored by Red Baron but the content and opinions expressed here are my own.

    It’s October!!! That means lots of DIY costumes being put together, and often some last minute changes to what everyone wants to be. This DIY Optimus Prime Transforming Costume is sure to be on any transformer loving little boy’s list of costumes. 

    DIY Optimus Prime Transforming Costume You know in the past I’ve loved doing a family theme, but this year the kids didn’t want to get on board with that. So we’re all doing something a little different, but I still got to be creative! 

    Inside Out Family Costume
    Despicable Me Family Costume

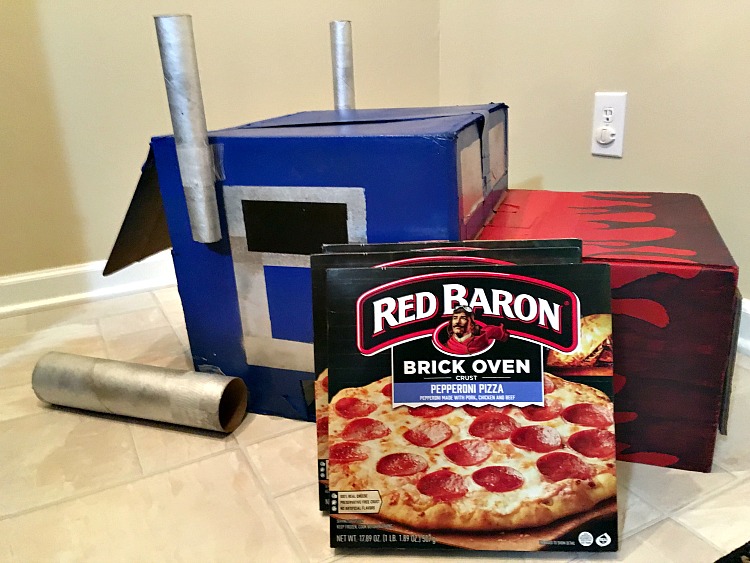
    While some of the kids are going to go through the dress ups we own and create their costumes out of that, I convinced Lincoln to be Optimus Prime for Halloween. It really didn’t take much convincing though. I mean he already has the Autobot costume, but wouldn’t it be more fun if he could actually transform into a truck? Thus, I got the opportunity to build an Optimus Prime Transforming Costume!

    DIY Optimus Prime Transforming Costume

    Oh yes I did! I know there may be a lot of Mom’s out there wondering why I would go to such lengths, but you also all must think I’m pretty cool now too….right? Well, my kids think I’m cool at least. 

    Here’s the thing though, I love Halloween. I love coming up with unique costumes that will really wow, if only for one day of the year. However, my artistic side is a bit lacking. So I called up my sister in law who is better with the art side of things.

    It may have helped that I told her I would bring dinner if she would provide her creative skills. I knew I could do the engineering part, and Red Baron Pizza would take care of dinner, so I just needed her eye for detail. 

    Save those pizza boxes for DIY Costume building

    We did this yesterday. I had my kids ride the bus to her house, where we attempted to have everyone do homework while we worked on the Optimus Prime Transforming costume. 

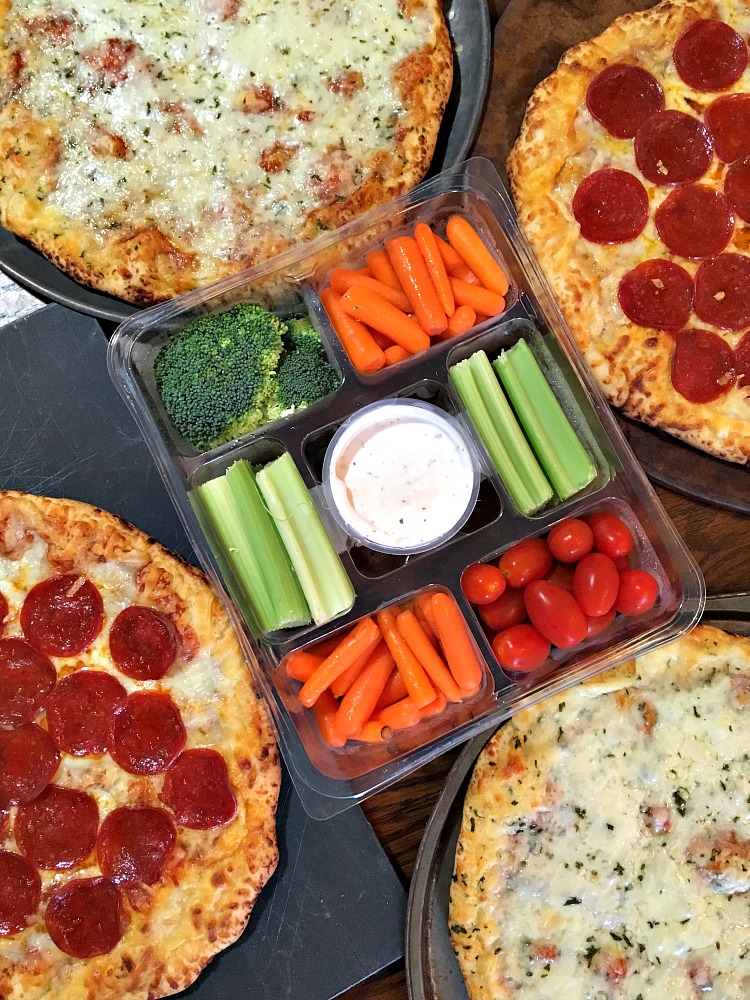
    While Renee and I worked, we sort of lost track of time. It’s easy to do when you’re spray painting boxes and mulling over the best way to add cardboard pipes. The time slipped past, and before I knew it we had definitely missed dinner time. It was OK though because Red Baron pizza cooks in under 20 minutes – one of the reason’s it’s what I brought for dinner. 

    Red Baron for dinner after a day of crafting

    I ran inside and got the pizza’s in the oven, checked on all the kids, and then while dinner cooked worked a bit more on Optimus Prime. When dinner was ready, the paint was all dry, so we brought it inside while we enjoyed our dinner. 

    Similar to our different approach to costume, we all have a different approach to pizza too! I had requests for square cut and triangle. So I did a bit of each, and everyone was pleased. Red Baron’s Brick Oven Pizza has the perfect golden crust for cutting however you please. 

    Red Baron pizza aquares

    After dinner, we finished up, then tried it on before heading home for the night. Yes, it took a full day to create, but it was so very worth it! We got to hang out with family, enjoy some good pizza, and we may have convinced my nephew to go as Starscream – which means another day of DIY transformers building before Halloween hits!

    Optimus Prime Transforming Costume

    Supplies:

    1 large box
    2 medium boxes
    2 paper towel tubes
    1 large packing tube
    1 Oatmeal container
    Red, Blue, and Silver spray paint
    Gorilla Tape
    Elastic
    Exacto Knife
    Hot Glue

    DIY Optimus Prime Transforming Costume

    Instructions: These are just general instructions. If you have any specific questions feel free to reach out via comment, email, or facebook!

    Use the large box to create the cab. Fit around your child, cut head holes and armholes. 
    Use 1 medium box to create the hood. Cut one side off and the flaps. Attach over the head hole on the large box with gorilla tape, so that it can flip up when the child stands. 
    Using the other medium box cut a piece to create the front grill. 
    Measure your child’s legs and cut pieces to cover the back of the legs, creating a flatbed look. Score down the sides, so the cardboard wraps around the side of the legs. 
    Cut the oatmeal container into 6 circles. Spray paint these black for the tires. 
    Cut the packing tube in half. Spray paint the packing tube,  paper towel tubes, and grill silver. 
    Spray paint the cab and hood blue and red to look like Optimus Prime. Add in some silver or black for the windows. 
    Detail the hood with blue flames. 
    Attach the tubes and tires with hot glue.
    Create an Autobot stencil, and spray paint on the front chest. 
    Using elastic and gorilla tape, create attachments for the leg pieces to attach to your child. We put one under the knee and one above the knee. 

    DIY Optimus Prime Transforming Costume

    Don’t forget to save those pizza boxes for your DIY costume build! They are great for cutting into details like the grill, leg attachments, and back flap!

  • DIY Kissing Booth

    DIY Kissing Booth

    Nothing says “I Love You” like puckering up for a kiss with your loved one. This Valentines Day, get the whole family in on the love with a DIY Kissing Booth full of chocolate kisses. This post contains affiliate links and I will be compensated if you click on and make a purchase. Take a guess and win some kisses with this DIY Kissing Booth. Related post: DIY LOVE Blocks
                             Coffee Filter Wreath

    Two years ago, I was asked to help put together a Valentine’s Day dance for the adults in our church ward. I was excited because what parent doesn’t love getting out with their spouse? 

    I took on the charge of making a candy guessing game. We thought it would be fun to make a little kissing booth to set the jars in. I got home from our planning meeting and told him I would need a miniature kissing booth, just big enough to hold 2 mason jars. 

    He went to work in the garage, making my idea come to life, and I went to work counting kisses and filling jars. 

    DIY Kissing Booth game jar

    I’m kind of particular about using my canning lids for things other than actual canning, so I whipped up these cardstock lids on the computer. You can download and print your own here

    DIY Kissing Booth

    To make your own Kissing Booth you will need:

    1 board – 27 1/2″ x 4 7/8″
    1 board – 8 3/8″ x 3 7/8″
    1 piece of wood 16 3/4″x 1″ x 1″
    nails
    wood glue

    Cuts:
    Begin by cutting the 1st board into 4 pieces – 2 measuring at 9 7/8″ long and 2 at 3 7/8″ long.
    Cut the 16 3/4″ piece equally in half to 8 3/8″ long pieces. 

    Assemble:

    Nail the 3 7/8″ long pieces you cut to the outside ends of the 8 3/8″ board, creating a base for your stand.
    Using the wood glue, glue one of the 9 7/8″ boards to the top of the base.
    Next glue the sticks to the back of the 2nd 9 7/8″ board, creating your signage.
    Once the glue has dried, use more wood glue to attach the signage to the base.
    Allow the glue to dry, and then paint.

    DIY Kissing Booth with a twist. The kissing booth has come out every year since as part of our home decor. I try to keep it stocked with a variety of candies for the kids to enjoy as they show love to each other. One year I envision throwing a Valentines themed party with the kids, and letting the winning guess take home a jar of candy.


  • Upcycling an Old Fence Into a Hat Rack

    Upcycling an Old Fence Into a Hat Rack

    Any little boy will love this hat rack upcycled from an old fence. I received product for review. All opinions are my own. This post may contain affiliate links and I will be compensated if you click on and make a purchase through them. 

    Upcycle an old fence into a hat rack. ad Lincoln has started amassing a bit of a hat collection. Around the time Harold was born, my Dad sent him a coon skin hat after a trip to the Davy Crockett Museum. On our family vacation to Illinois we picked him up a stovepipe hat at Lincoln’s home in Springfield. Then of course he has his ball caps, robot head, and Astronaut Helmet. 

    Related: Teaching Kids to Reach for the Stars

    After spending a lot of time trying to organize and clean up his room, it was apparent that he needed a hat rack! I proposed the idea to Mark, who is my go to awesome build anything hubby. 

    Upcycle an old fence into a hat rack. ad With the idea and plan in mind, I then picked some fancy looking hooks from Abodent. Abodent specializes in vintage style hooks and knobs, and while based in Bristol, they ship internationally! The Porch Coat Hook was exactly what I had envisioned. Hats, dress ups, coats, and medals will all look nice hanging from these hooks. 

    Check out the Cupboard knobs and Coat Hooks from Abodent.

    While I was looking for the hardware, Mark got to work on the actual hat rack. We’ve been collecting old fencing from neighbors and family over the past year or so (our dining room table is all old fencing!), so we had all the wood we needed on hand.

    The fence top and old nail holes give this hat rack a vintage style that matches the vintage style hooks. 

    Upcycle an old fence into a hat rack. ad Lincoln and I spent a bit of one on one time whitewashing the hat rack. While it dried, we headed to the hardware store for some hanging supplies. Finally, we got this little project hung up, and put to use. Eventually, I see LEGO creations, and maybe a trophy or two gracing that top shelf. I’m sure the hats will change over the years, but this is a timeless piece that will last a lifetime.

    Upcycle an old fence into a hat rack. ad  


  • DIY Quick Window Defroster and Other Winter Car Tips

    DIY Quick Window Defroster and Other Winter Car Tips

    With winter upon us, and many places covered in snow already, I felt today would be a good time to share a tip on how to keep ice off your car windows, without freezing your hands off. Check out this DIY window defroster I found on Pinterest! This post contains affiliate links and I will receive compensation if you click through and make a purchase.  Defrost your windows in seconds with this homemade spray and other winter car care tips. Related Post: Winter Car Emergency Kit


    I find myself often scraping the car windows, gloveless, because I was in a rush, forgot the gloves, couldn’t find the gloves or wasn’t expecting a frosty car.  My poor fingers on those days really don’t like me, and I don’t blame them. While browsing Pinterest, I came across a photo with a tip below it for de-icing car windows in a rush. Keep reading for more tips on dealing with icy windows.

    DIY Window Defroster

    • 3 parts Vinegar
    • 1 part Water
    • Mix together. Spray on the windshield before nightfall as a pretreatment, or after ice forms. Either way should work.
    I was thrilled and immediately told Mark about it. I always worry about putting anything on the car. Mark takes care of our vehicles, and he knows what is good or bad for the car. I didn’t think vinegar would be bad, especially just on the windows, but had to make sure from the boss. He says it’s ok to use.
    So next I went to the source of the picture – Coffee Break with Liz and Kate.   I’m so glad I did too because they answered my next question, how/why does this work?  In their words: 

    “Vinegar contains acetic acid, which raises the melting point of water – preventing water from freezing.”

    Alternative Window Defrosters

    I’ve been reading up on this tip lately, before winter hits again, and have found many of you tried it over on Pinterest. Some found it worked, others were not impressed. Overall it seems the vinegar can leave your car smelling, well, vinegary. Some found the spray would just refreeze on the windshield. Here are some alternatives to try.

    Replace the vinegar with Isopropyl Alcohol. Mix with water in same proportions.

    Replace the water with Dish Soap. Mix with vinegar in same proportions.

    Replace the vinegar with Isopropyl Alcohol and the water with Dish Soap. Keep the 3:1 ratio. 

    I would also suggest after spraying the mixture turn on the car wipers before anything has a chance to refreeze to the windshield.

    Other Winter Car Tips

    Use this spray on the door handles and key lock to open frozen doors.

    Keep hand warmers in the glove compartment. 

    Check your oil and air filter before the cold hits.

    Keep an ice scraper in the car, however, if it breaks or you’ve left it somewhere, credit cards work wonders on the windshield!

    Store a shovel in the trunk for digging out of a snowbank (hopefully you never need it)

    Did this Window Defroster solution work for you?


  • DIY Snack Bowl For Colorful Snacking

    DIY Snack Bowl For Colorful Snacking


    The kids are almost home, and suddenly you realize you haven’t pulled out a snack! Never forget snack again with this DIY Snack Bowl. 

    With a designated snack bowl, you'll never forget snack time again. ad #PlantYourVote I often find myself scouring the kitchen and pantry for something – anything – to feed my hungry kids when they get home from school. Because I watch neighbor kids after school these days, it’s been extra important to have something on hand and ready. 

    As I was walking through the store one day this week, thinking about snack time, I thought it might be helpful to have one bowl completely dedicated to snacks. I can leave it on the table, reminding me all day long that it needs to be filled. 

    DIY a snack bowl and never forget snack time again. ad #PlantYourVote DIY Snack Bowl

    Materials:

    Sharpies
    White Ceramic Bowl
    Goldfish Colors (or other snacks)

    Using the sharpie color your bowl. Write something fun and related to snack time on the inside. Then add color to the outside. Place your bowl in a cool oven, and then turn on to 350 F. Once the oven is at 350, set a timer for 30 minutes. After 30 minutes, turn the oven off, but leave the bowl inside. Let it cool completely before taking it out. 
    Handwash to preserve the colors from fading over time. 

    Fill with your favorite snack, like Goldfish Colors. 

    Find Snack Recipes Fill your snack bowl with Goldfish Colors and Popcorn for a perfect after school snack. ad #PlantYourVote

    The Colors

    I took inspiration for our snack bowl from Goldfish Colors.  With their fun colors, it reminded me of the garden we grew this year. I was pleasantly surprised to learn that the colorful crackers are naturally dyed from plants! The green color – a favorite in this household – is made using watermelon, Huito, and turmeric. I had to look up Huito. 

    LEARN WHERE GOLDFISH COLORS COME FROM

    Since I’m not the best artist in the home I turned the coloring over to Mark. I told him my idea, how I wanted the bowl to represent the fun colors of a garden, and then let him work his creative genius. 

    Plant Your Vote

    Do you have a favorite Goldfish Color? Right now you can vote on your favorite. The winning color will receive its own limited edition bag! I know a little boy who would love to see a bag full of green Goldfish Crackers. 

    VOTE FOR YOUR FAVORITE COLOR NOW

    Prepare snack time in advance with a designated Snack Bowl. ad #PlantYourVote

  • DIY Snowman Blocks

    DIY Snowman Blocks

    These Snowman Blocks were made possible by Dixie Belle Paints. All opinions are my own. 

    Simple and quick to make, these Snowman Blocks add the perfect decor to your front porch during the winter season. Especially if you’re lacking in the actual snow. 

    DIY Snowman Blocks add the perfect touch to your porch decor.

    I actually made these Snowman blocks five years ago with a friend, but after many moves and different weather extremes, they were looking a little sad. Actually, they were more than sad, they were downright pathetic looking. Most of the buttons had fallen off, and the white paint was no longer a pretty white. 

    Sad Snowman Blocks needed an update with Dixie Belle Paints. ad

    Awe, poor snowman family! I almost didn’t pull these guys out this year, but then I got Dixie Belle Paints and decided to give them a nice update. Well, if I’m being totally honest, I personally didn’t update them. My eye for detail is not always the bet on objects like these. I can add buttons and sew up hats and scarfs, but painting details…not my strongest skill set. So I enlisted Mark’s help.

    Spruce up your winter decor with Dixie Belle Paints. ad

    DIY Wooden Snowman Blocks

    • 4×4 wooden blocks, varying sizes
    • Dixie Belle Paints
    • Santa Hats
    • Plaid Fabric
    • Paintbrush

    To make your snowman blocks we found it handy to already have the Santa hats attached to the snowman. To do this, all you need to do is hot glue around the top of each block, and press on the hat. However, you can also save this step for last. It just made a nice grip for holding the snowman up while painting on various sides. 

    Paint your wooden blocks with white Dixie Belle Paint. This fantastic paint has a fast dry time so that by the time we finished our last block, our first block was dry and ready for the details. Continue adding details with various Dixie Belle Paint colors, to create your snowmen. Each of our snowmen is sporting a fun face, 3 buttons, and 2 gloved hands. Our middle snowman got lucky and received some pockets. 

    Once the Snowmen are painted, cut strips of your plaid fabric to tie around the blocks as scarves. It’s the finishing touch that takes the snowman family from cute decor to a whimsical addition to your home. 

    DIY wooden Snowman Blocks add whimsical fun to your winter porch with Dixie Belle Paints.ad

  • Winter Car Emergency Kit

    Winter Car Emergency Kit

    This winter car emergency kit has been made possible by meori. All thoughts and opinions are 100% my own. 

    With winter, comes the potential for an emergency situation where you are stuck in the car. From minor accidents like fender benders to larger ones such as sliding off a slippery road and getting stuck in a snowdrift. With a winter car emergency kit, you and your passengers will have the comfort needed in any crises. 

    Be prepared this winter with a car emergency kit! Here's everything you need. ad

    Thankfully I’ve never been in a terrible accident, but  I have had my fair share of winter emergencies where this emergency kit would have been extremely handy. I’ve tried to keep things both practical and useful. After all, who wants to carry extra ‘stuff’ in their car all winter long. Not me! Four kids and all their ‘stuff’ that seems to end up in the car is more than enough extras. 

    So I’ve gathered everything you might need in an emergency – whether big or small – and compacted it into the meori foldable box with two compartments. I love that meori has CAR printed on it already, making it easy to see for everyone, including the husband, that this box belongs in the car.

    Prep your winter car emergency kit before bad weather hits. ad

    So what do I have in my winter car emergency kit? Let me tell you. 

    We fit everything but the blankets into a backpack for ease of carrying if we actually have to leave the car somewhere. So far that has not occurred, thank goodness! The backpack itself then fits nicely inside one compartment in the meori box, while the other side fits 4 fleece blankets. Together it all fits snugly in the bag of my Honda Pilot. If you know anything about the pilot, the trunk space is probably the only downfall. Being able to store a fully loaded emergency kit with room leftover is quite impressive. 

    Winter car emergency kit in the meori foldable box. ad

    The meori box has proven to be quite durable. ait’s quality made and holds up well to a large semi-unorganized family. The car box has been fantastic, but that’s not all they have. I’ve used meori to organize inside the house too! Just check out these other uses for inside your home. 

    meori Filing Box

    Organize your work files with meori filing box. ad

    Winter Gear Storage

    Keep hats, gloves, and scarfs organized with meori. ad

  • Candy Cane Reindeer with Reindeer Tags + More Reindeer Treats

    Candy Cane Reindeer with Reindeer Tags + More Reindeer Treats

    Add these Reindeer Tags to a fun treat like Candy Cane Reindeer on Christmas Eve, and watch your kids light up with the Christmas magic as they find a treat left by Santa’s Reindeer. 

    GRAB YOUR CANDY CANE REINDEER TAGS HERE

    Leave a treat for Santa's Reindeer and enjoy the Candy Cane Reindeer Santa's Reindeer leave behind

    Last year it was a few nights before Christmas eve when I had the fun thought to leave treats in the kid’s stockings from Santa’s Reindeer. It was a last minute thing, and while fun to do, I wasn’t able to take pictures that truly showed how fun it was. This year I gave myself a bit more time to get it together, and as I thought about it I knew I had to get my sister involved! So I called her up and asked if she would design some Reindeer Tags for my Candy Cane Reindeer. 

    Santa's Reindeer Gift Tags

    Didn’t she do a fabulous job? I play at art sometimes, but my sister is a true artist. She whipped this drawing out a day after we talked. I love how proud the Reindeer looks, I pretend because he knows what an important job he has pulling Santa’s sleigh. 

    Having just the 3-year-old at home these days meant I could actually make the Reindeer and take the pictures with him hanging around. After all, he can’t read yet and was fairly entertained with the extra Candy Canes I passed his way (he made a full garage out of them to park all his cars). So I spent my afternoon making some cute reindeer to attach the beautiful tags my dear sister made, and which you can purchase a download of from her Etsy store AlgaeArtandCrafts.

    All you need to make Candy Cane Reindeer

    All you need to make Candy Cane Reindeer are Candy Canes, googly eyes, pipe cleaners and a little hot glue. I’ll let the pictures do the rest of the talking here. A little ribbon is all you need to add the touch of the gift tag. 

    Candy Cane Reindeer from Santa's Reindeer

    I saw this really cute idea over on A Day In Motherhood for Reindeer Food. You could leave it out with the milk and cookies for Santa, in hopes for the Reindeer to leave a little goodie. Or you could make Reindeer Chow Muddy Buddies found on This Silly Girl’s LifeWhile these are great for the kids to help make on Christmas Eve, you may want to check some of these other Reindeer ideas out to leave for the kids attached with the Reindeer Tags. 

    Reindeer Noses from The Thankful House

    Reindeer Candy Cane Pudding Cups from Snack Pack

    Reindeer Chuppa Chups from Brisbane Kids

    Nutter Butter Reindeer from Cook Crave Inspire

    Reindeer Hot Chocolate from Thrifty Jinxy

    Gingerbread Reindeer Cookies from Jelly Bean Trail

    If you’re not into leaving more treats, because we all know the sugar overload will be ever present already, Santa’s Reindeer could also leave a fun game or hat to wear. Like this Rolla-Reindeer from Seven Thirty Three or this simple Reindeer Hat from Education.com.

    Santa's Reindeer Gift Tags

    What would you attach these Candy Cane Reindeer Gift Tags to? 

  • One Room Challenge: Frame Your Own Canvas DIY

    One Room Challenge: Frame Your Own Canvas DIY

    In this easy tutorial you’ll learn how to stretch your own canvas print over a frame so you can hang a bit of yourself on the wall. 


    When I started imagining what to hang over our couch, I knew it needed to be something besides a family picture. I wanted something new and fresh, that we hadn’t hung up before. I figured we’d probably check out the thrift stores and see what we could find. 
     
    But then I did something else – I started browsing my old college art folder. I’ve got a number of really cool pieces I had forgotten about, like the hanging skeleton, and Alexander Graham Bell – but it was my abstract black and white that caught my eye. Rolled up in the bottom I knew it was the piece I was looking for. 
     
    I even got a pretty good grade on it! I mean 19/20 for someone who had never gone beyond middle school art class must mean the art gene didn’t completely skip me over right?
     
     
    The big question I had to ask myself at this point though, was why didn’t we frame it in class? I had no idea what I was doing here, so reached out to a couple art friends – all who also had never actually stretched canvas before. Feeling a bit better about that I headed to Pinterest where I learned of these nifty things called Stretcher Bars.  
     
     
    I made a couple phone calls and found Hobby Lobby sold them in all different sizes, but you can also get them on Amazon. If it hadn’t been for pinterest, I would have attempted to build my own wooden frame, and also would have gone about it completely wrong!
     
    See for canvas, apparently you don’t want the canvas to lay directly on the frame. These premade stretcher bars are slightly raised right on the ends to keep the rest of your painting off the boards. Plus, no need to figure out those corner angles because it’s all done for you. 
     
    First things first here now! You need a painted canvas! If you don’t have one laying around from an old college class….please tell me if you do!….then go buy some canvas and paint it! It will be a lot of fun! 
     
    Next, measure your painting. Buy your stretcher bars in the right sizes. My painting is 4 feet by 23 inches. So I picked up 2 48″ stretcher bars and 2 23″ bars. Insert the stretcher bars together at the corners, and VOILA! You’ve just build your frame!
     
     
    To stretch your canvas now, you’ll lay your painting upside down. Place your frame on top of the painting, lining it up as best you can to the edges of the actual picture. Hopefully you’ve got a good 3-4 inches to overlap over your frame. 
     
    After the painting, this next part is my favorite! It’s time to pull out the Staple Gun! Following the numbers below staple each side in succession. So 1 staple in side 1. Then side 2, 3, and 4. Then go back to side 1. It will take awhile, but that’s how you get a nice smooth and straight stretched canvas. Depending on how large your canvas is, 2 sets of hands can be very helpful here. 
     
     
    Wasn’t that exciting? Slowly but surely this Everything Room is getting put together! With a nice piece of personal art – that finally grew on Mark – we have a bit of a color pallete to help guide the rest of the room. 
     
     
    Join me again next week to see which piano we decide to keep, and how it will affect the room arrangement!
     
    Linking up with Calling it Home for the One Room Challenge! 
  • Outdoor Patio Set Redo – Creating a Work Zone near my kids

    Outdoor Patio Set Redo – Creating a Work Zone near my kids

    When we decided to rent this house before actually seeing it in person, one of the biggest sale points for me was the fenced in backyard and attached deck. The vision was real – a workplace outdoors where I could enjoy the sounds of nature and let the kids play in a safe area that wouldn’t make my heart pump with anxiety.

     
    We moved in on July 1st, and I started looking for a good patio set. We happened across a yard sale one saturday and found this 2 seater set for only $18. I had to double check with the owner that I wasn’t reading the price upside down and he really wanted $81. Nope $18 was correct! There was no way I could leave this behind, it was perfect!
     

    The first step in redoing this set was picking out colors. The whole family came with me to our trusty Walmart, and together we picked out a nice Dark Purple spray paint. There’s an excess of bugs around these parts, so we wanted a fun color, but not one that would attract the bees. After the purple was chosen, I found this pretty damask upholstery fabric on sale too! There was just enough left for our seats. 


    While the paint dried on the chairs and table frame, we got to work on the seat cushions. The original seats were so old, there was no salvageable parts. I picked up precut wood rounds from Menards, and the padding from Walmart.

    How to Reupholster patio seats. 

    What you need:
    Wood Rounds
    1-2inch foam padding
    fabric
    hot glue
    staple gun with staples

    Use the wood rounds to trace a circle on the foam padding. Using a razor blade, or sharp knife, carefully cut around the padding. Lay the padding on back side of fabric. I used a permanent marker to measure straight out and leave dots around the seat. I gave myself a good 2 inches extra fabric to attach to the underside.
    Connect the dots, then cut our the fabric. Place padding on the center of fabric, then wood round on top of the padding. At this point it is great to have a second pair of hands helping out. Really push down on the wood as you pull the fabric around, and attach in place with the hot glue. Now the fabric is attached, give it a second go around with the staple gun. Between the two, bugs and inclement weather should be kept out of the seat.

     
    I now have a fantastic colorful work zone outside! It’s also going to be a great place to relax with friends while the kids run around outside. If you’re ever in the area and want to join me on the patio, come on by!
     
     
    When I’m not using the table, I’ve found the kids enjoying it too. This week they were building bubble castles. My vision has come to life, and is now updated to see many many family memories being made around it. 
     
    Do you have an outdoor space to enjoy?