Category: Home

  • Creative Teacher Gifts with Printable Gift Tags

    Creative Teacher Gifts with Printable Gift Tags

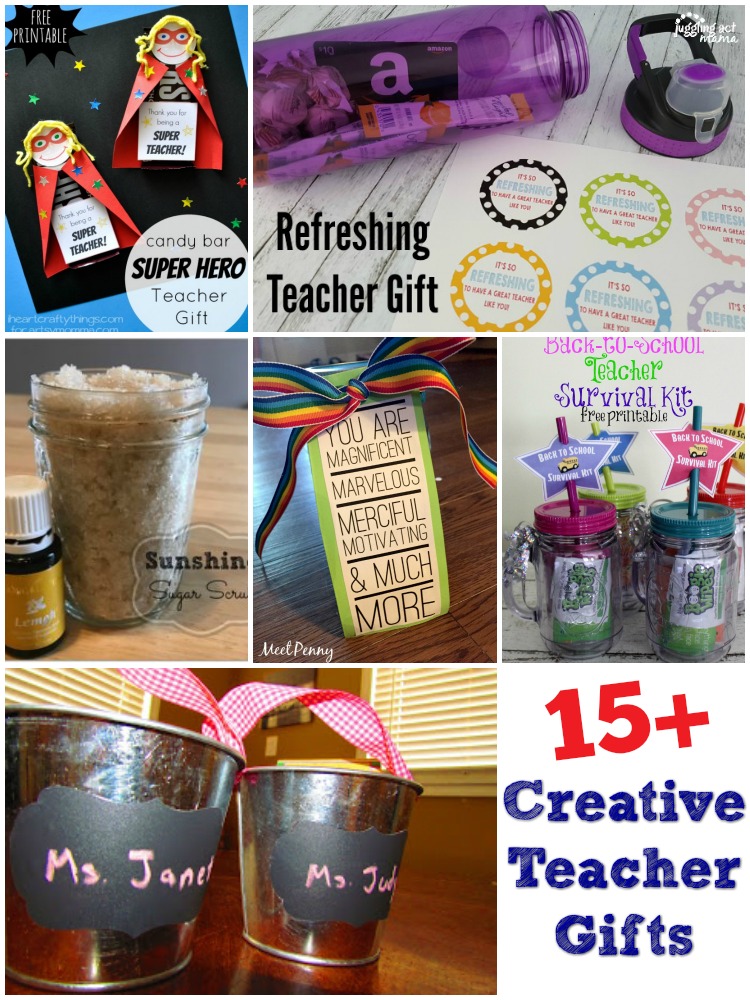
    The end of the school year is coming. Teachers have worked hard, and you’ve seen your child progress in their knowledge. It’s time to say Thank You for all the teacher has done during the year. Check out this list of Creative Teacher Gifts and you’re sure to find something for the greatest teacher ever.

    15+ of the most Creative Teacher Gifts

    I found this practical idea of gifts that teachers can use in the classroom. I think it’s common knowledge that many teachers use their own money to buy supplies for the classroom, so every little bit helps them out. Paper clips, pens, pencils, highlighters, and of course a treat as well. I created my own printable for you to use with the paperclips, but I Saw That Going Differently In My Mind has cute sayings for each of these gifts. 

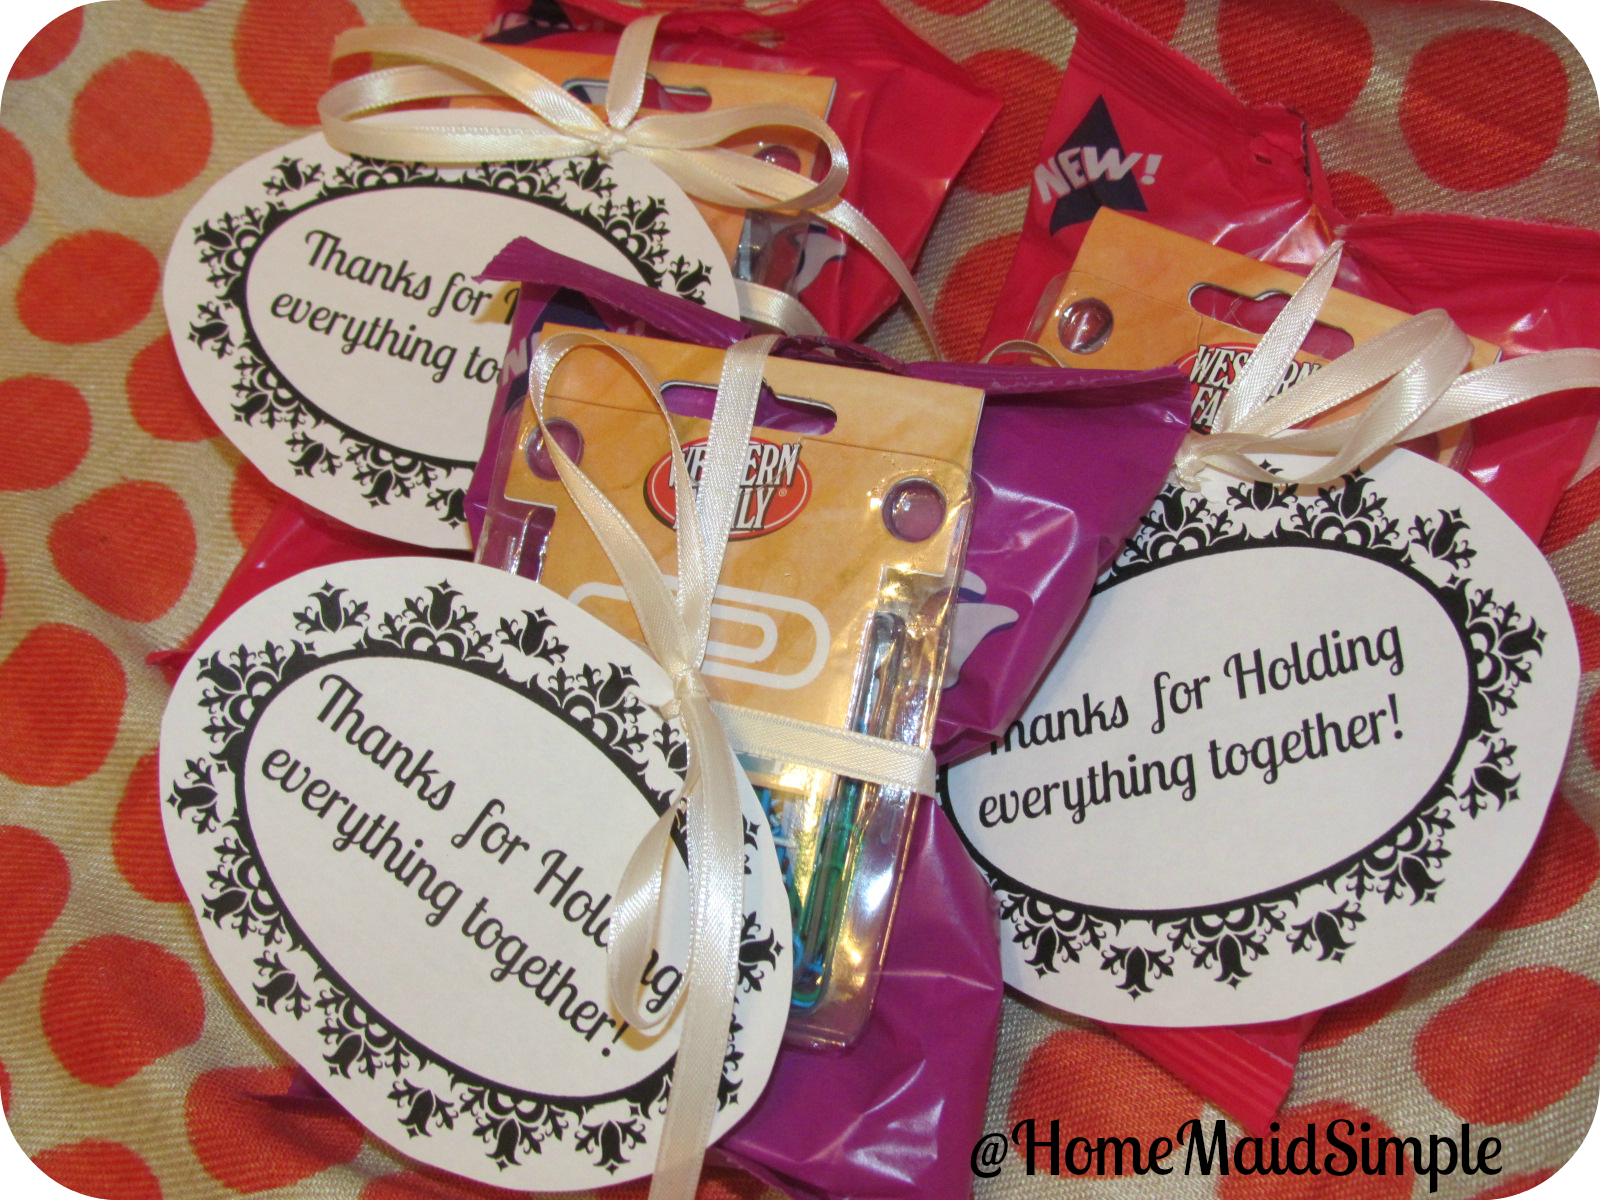
    The idea was cute, but I wanted to make it a little extra special. So I mustered up my courage and made the easiest printable for this.  Nothing says You’re Awesome like paperclips right? OK, maybe add a treat that your teacher can enjoy just for themselves to take it up a notch.

    Paper clips not the thing for your teacher? Well, that’s A-OK because I’ve gone around and gathered together some of the most creative teacher gifts I could find on the web! Now all you have to do is put the gift together and say Thank You.

    15+ Creative Teacher Gift Ideas

    Expo Marker Teacher Gift Idea

    Super Hero Candy Bar Teacher Appreciation Gift

    A Fortune Cookie Teachers Gift

    Stylish Teacher Gift Ideas Teachers Really Want to Receive

    Mod Podge Teacher Gift

    Refreshing Teacher Gift Idea

    M&M Teacher Gift Printable

    Sunshine Sugar Scrub

    Sharpie Teachers Gift Printable

    EOS Lip Balm Teacher Gift Idea

    Teacher Survival Kit

    Teachers Tote Gift

    24 Ways to Encourage Teachers

    Popcorn Teacher Gift In A Jar

    Pilot G2 Teacher Gift Idea with Free Printable

    Commit-Mint Teacher Gift


  • Stop Moldy Toilets

    Stop Moldy Toilets

    *Stop moldy toilets contains affiliate links. When you click through and purchase I receive a small compensation at no extra cost to you.*
     
    Suffering with moldy toilets? Suffer no longer, because I just found the best product to use, and I’m sharing my knowledge with you.
      Stop Moldy Toilets
     
    About a week after moving into our rental, I noticed mold was starting to grow inside the toilet bowl. I grabbed the scrub brush and tried to clean it out. For the next couple days, I found myself scrubbing that toilet bowl. It was so gross! It didn’t matter how often I scrubbed it, the mold was growing faster than I could keep up with.
     
    YUCK!
     
    One morning, I woke up and told Mark I was going to get that toilet cleaned by the end of the day no matter what it took. Turns out, he had the same thought (yes I have an awesome husband).
     
    Mark’s solution was a bit more educational than mine. He deduced that there must be something like calcium deposits in our toilet. So he grabbed Lime-A-Way and poured it into the toilet tank.  That way, every time we flushed, we’d get a coating of Lime-A-Way in the bowl. 

    Ok I thought, that might work, however, I still needed to scrub the new layer of mold off. I took my trusty Comet, and scrub brush, and headed to the bathroom. The Lime-A-Way had already been at work! One coating of Comet and the mold came right off.

    I kept my eye on the toilet the next couple days, waiting for the mold to come back, but it never did!! 
     

    Thank you Lime-A-Way!! 

    Two weeks later, a small patch of mold was returning, so I added a couple more squirts of Lime-A-Way to the tank, scrubbed the inside of the bowl, and our toilet was clean again.
     

    Stop Moldy Toilets

    If you are having a mold problem as bad as mine, I suggest calling a plumber as well as using the Lime-A-Way and Comet. There is very possibly something else going on to cause such a large mold build up. Since we were renting, we chose to stick with cleaning it ourselves until the landlord chose to hire a professional.


    Looking for MORE Bathroom Cleaning Tips? Check out this Bathroom Cleaning Station

    Bathroom Cleaning Station

  • How to Upcycle Receiving Blankets into a Quilt

    How to Upcycle Receiving Blankets into a Quilt

    Don’t throw those old receiving blankets out just yet. So your kid outgrew these special blankets, but now you can turn them into an heirloom to grow with your kid. Upcycle receiving blanket into a quilt that your child will love to snuggle with. This post contains affiliate links and I will be compensated when you click on and purchase through them. 
    Upcycle receiving blankets into a quilt. It becomes an heirloom your child will love forever. After having 3 girls, I started accumulating pink receiving blankets. My kids grew out of them very quickly, and with Rosalina we mainly used them as burp rags instead.  For quite some time now they’ve been sitting in a closet, taking up precious space. 
     
    I was thrilled when I saw Heather from Handmade Haven had turned her receiving blankets into a baby quilt! A novel idea, I thought, and then they still sat around my house, just no longer in a closet. I finally decided the receiving blankets had to be taken care of before they were all lost.  It was time to do a little upcycling!
     

    Upcycle Receiving Blankets into a Toddler’s Quilt

    To start out, cut up your receiving blankets.  This can be done easily by folding them in half, and then cutting 2-inch strips.

    Online Quilting Class

    Next, cut through the fold so each 2-inch strip is now 2, 2-inch strips. 
     
    Now you have fun designing your quilt! Don’t worry if some pieces are longer than others you can either trim them down now or after they are sewn together. 
    If you desired you could cut your strips down further to make separate blocks, but let’s face it, I’ve got 3 kids running around, I could only keep those scissors out safely for so long.
     
    Once you’ve got your quilt designed, it’s time to start sewing! Make sure you have plenty of bobbin thread and spool thread.  Using a 1/2 inch seam start at one side of the quilt and begin sewing the strips together.
     
    Once you have it sewn, trim any edges, and dangling thread.  Iron out the seams so they lay flat going the same direction.
     
    Cut out the quilt backing – make it about 3 inches larger than your finished top.
     
    Roll out the quilt batting, and then take your new quilt top and lay it on top.  Cut the batting so it is the same size as the quilt.
     
    Lay out your quilt back, wrong side up. Lay the quilt top and batting on top with the quilt side facing up.  A simple cotton fabric works best for the backing since this is all sewn on the machine.
     
    Fold the backing over so it touches the edge of your quilt top, and then again a second time over the quilt top’s edge. Iron the edge down, then pin all three layers.
     
    Using a coordinating thread color, sew around the edge to finish your quilt. If you use fleece, remember it’s bulky, and it will “shed” into your machine. Take the time between edges to clean out your bobbin case.
     
    TIP: Most machines come with a cleaning brush, but if yours is missing like mine, a soft paint brush does the trick as well.
     
    You can make your quilt any size, I chose toddler bed size, but if you have more receiving blankets than me, you could make it bigger! 


  • Strawberries – Wordless Wednesday

    Strawberries – Wordless Wednesday

    I looked out my kitchen window yesterday morning to see a little touch of red. Strawberries!


    I started with 3 strawberry plants, but only one survived our crazy weather, and then the  birds started pecking at them, so I didn’t think we’d get any berries. One day, if we have enough land, I want to grow a large field of strawberries. I’d share of course, if you’re really nice. I can do so much with strawberries!
     

    Do you have a Strawberry patch? Try one of these recipes to use your strawberries! 

    Strawberry-Mango-Popsicles Strawberry-Cheesecak-Shortcake Strawberry-ice-cream Strawberry-preserves


  • Tuesday Tip – Cleaning Microfiber Couches

    Tuesday Tip – Cleaning Microfiber Couches

    How to clean a Microfiber couch, or other microfiber furniture

    Yes I know, it’s Wednesday. I haven’t lost complete track of days yet (or have I? calendars are brilliant inventions!).  I spent Monday and Tuesday morning testing out different cleaners on our Microfiber couch, so I could bring you this post. It took longer than I expected, but I got it done, and I’m here to let you in on some awesome tips!

    If your kids are like normal kids, then your furniture probably starts to look something like this before you can even blink

    Pen on Microfiber furniture? No more worries!


    Pen on Microfiber couch? No more worries!
     

    I can’t even believe looking at these pictures that I actually let it get this bad, and that I would actually have company over sitting on these! ahhh, bad housekeeper over here. Well I finally saw past my kids, and realized what had become of my sitting area. So off to work I went. I started with some cleaners I had in my cupboard.

    EcoFresh Deodorizing Cleaner. It didn’t seem to be doing much. So I pulled out my – 1 time purchase from a door to door salesmanOriginal Lavender Advanage The Wonder Cleaner Super Concentrated.  The claim was that it gets grease stains out like magic!  Too bad it doesn’t take pen stains out of microfiber, because that would be a wonder.  Admittedly, it did lighten the pen, it just didn’t come all the way out.
    My next method of attack was removing the covers from the seat cushions. I threw the covers in the wash on Heavy soiled, high spin, warm water.  YES! Ok, again the pen didn’t come out completely, but everything else did, and they look so much better!

    Here is my #1 tip for Microfiber furniture – Buy pieces that have a zipper cover.  I wish the back cushions were removable for the same reason, but I guess I’ll just have to spot clean them.

    After going through the wash here is what my couch now looks like
     
    Isn’t she a beauty? No more dark marks all over it. Absolutely wonderful to sit on! And really the cushion with the pen isn’t nearly as noticeable.
     
    So off to the arm and back cushions I went. I headed to pinterest for ideas.  The one “solution” I saw over and over again was Rubbing Alcohol. You take a white sponge (to avoid discoloration of your couch) and scrub the couch with rubbing alcohol. Again, the alcohol helped lighten the pen marks, but didn’t take them completely away. The rest of the arm looks nicer now though.
     
    #2 Tip when cleaning Microfiber – if you can’t remove the cushions, do not spot treat. You will need to wet the whole cushion to avoid leaving water marks.  It’s more work, but it will be for nothing if you end up with large water marks all over your couch.
     
     
    Good luck and Happy Cleaning!
     
    Have any spring cleaning tips or ideas? I would love to test them out. Please contact me at familyroom2@gmail.com
  • Tuesday Tip – Crayon on Walls

    Tuesday Tip – Crayon on Walls

    Have you ever stopped and looked around your house, specifically at your walls, and went “WHOA!, what happened there?”  You suddenly find that just about every wall from 2 feet down is covered in crayon.
    Yeah, that happened to me this week. I couldn’t believe I let it go that long. I’m sure I could blame it on the dining room remodel, being pregnant, trying to get kids to actually sleep at night, etc. But in reality, 5 minutes with each wall and I could’ve had them cleaned ages ago. We’ve all got 5 minutes!  Granted, if you’ve let yours go as long as mine, to get it all clean, may take your whole day. That’s the price of procrastination.
    I recently read that WD-40 will remove crayon from walls. I had a can in the cleaning cupboard, so I figured I’d give it a try. The worst possible outcome would be that it did nothing.  To my joy, it actually worked. Sadly, it only takes off crayon; no pen, pencil, marker, or little dirty handprints.

    Nice right! It even wiped off pretty easy. 
     
    This here’s my favorite though
    See if you look right near the top center to the left of the face, you’ll see CTR. CTR stands for Choose The Right. I’m so glad my kids thought to write CTR on the wall, they must be learning something, right?
    As you can see, the crayon came off, the pencil stayed. I also learned that if the crayon is under something else, say like lotion smeared on the wall, the WD-40 will do nothing. Sigh.
     
    If you know of any way to remove pencil, pen and marker, I’d sure love to hear it!

    Leave me a comment with your best wall cleaning tips!

  • DIY Drum Light

    DIY Drum Light

    DIY Drum Light


    We felt our dining room needed different lighting. The dome light just didn’t give adequate light. In fact, I kept it off more often than on, because it made so little difference, and I saved the money. Since we were remodeling already, I figure a new light was in order as well. 
    While browsing Pinterest, I came across this DIY Drum light tutorial over at From Gardners 2 Bergers.  Although I really liked how she made her drum light, she also linked over to another tutorial at The Keylor Family.  I felt my talent for craftiness was best suited with The Keylor Family’s tutorial. 
    With the dining room remodel accomplished I decided to add my finishing touch with a drum light, in pure hopes we’d get much more light in the room than the current fixture gave.  A trip to the thrift store for a hanging chandelier, then to Hobby Lobby for the biggest Embroidery Hoops (23 inches)available, plexiglass, and some muslin and I was ready to begin.


    DIY Drum Light

    The materials:
    2 Large Embroidery hoops
    Plexi Glass – long enough to fit around the hoops. I used 3 sheets
    Fabric
    Chandelier
     
    Lay your plexi glass down and tape together. Carefully wrap the glass in between the hoops inner and outer hoops. Tighten the hoop, and flip it over. Attach the glass hoop to the 2nd embroidery hoop. 
    Lay out your fabric, and carefully glue it over the edges to the inside of the embroidery hoop. Having 2 hands helps to hold the fabric tight and straight. 
     
    The real hard part came next. Figuring out how to hang the light inside.  Through a collaborative effort with Mark, we got this.
    A piece of wood sandwiched between a section of the light, and resting under the embroidery hoops. Our first attempt was wire hangers, but they weren’t sturdy enough.
    And finally the light was hung! In my personal opinion, it’s pretty awesome!  Mark thinks it’s a little too big, and in truth it could be smaller, but hey it gives us a lot more light now!
     
    I don’t want to leave you just hanging there so here’s a grand look at our finished dining room, complete with a DIY drum light!
     
  • Mock Raspberry Jam and Other Ways to Use Green Tomatoes

    Mock Raspberry Jam and Other Ways to Use Green Tomatoes

    The growing season is ending, but you find yourself with an abundance of green tomatoes still! What do you do with them? Make this mock Raspberry Jam of course. This post contains affiliate links and I will be compensated when you click on and make a purchase through them.

    One of my first years gardening as a self-sufficient adult left me with an abundance of green tomatoes. I planted late in the season, and in a corner of the yard that did not receive enough sunlight to ripen the tomatoes.  Not one to waste anything, I was determined to find a way to use these fruits, despite their immature growth. 


    You may find yourself with green tomatoes at the end of the season, not because of any mistake on your part, but rather because you had a plant that continued to produce right up to the first frost. So whatever reason you find yourself with green tomatoes, I’m pleased to tell you that this recipe for Mock Raspberry Jam is a winner – as long as you can mentally get past the tomatoes. 
     
    I first heard this recipe for Mock Raspberry Jam on a Saturday morning garden radio show. Joy at KNRS made this jam sound so much better than fried green tomatoes – my only other option at the time – so I whipped up a batch. 
    Mock Raspberry Jam
    Yields 9
    Write a review
    Print
    Ingredients
    1. 5 cups green tomatoes
    2. 5 cups sugar
    3. 6oz package raspberry jello
    Instructions
    1. Grind Tomatoes in a blender.
    2. Pour tomatoes into a large sauce pan, and add 5 cups sugar.
    3. Boil until sugar is dissolved.
    4. Turn heat to low and cook for 25 minutes, stirring periodically.
    5. Add 6 oz Raspberry jello, and cook for 1 minute.
    6. Pour into sanitized pint jars.
    7. Wipe rims, and place lids and rings on.
    8. Process in a water bath for 30 minutes.
    Adapted from KNRS Garden Show
    Adapted from KNRS Garden Show
    Home Maid Simple https://www.homemaidsimple.com/


    They are so delicious! It tastes just like raspberry jam, and the tomato seeds give the same texture as real raspberry jam. Now to get over my mental block of knowing it was made from tomatoes. 

    More Green Tomato Recipes

    Green Tomato Bread from Instructables

    Green Tomato Relish from Homegrown In the Valley

    Oven Fried Green Tomato Caprese Stacks from Southern Plate

    Fried Green Tomato Pickles from The Country Chic Cottage

    How to Ripen Green Tomatoes from Happy Mothering

    How do you use Green Tomatoes?


  • First Aid Kit

    First Aid Kit

    One thing every home needs is a first aid kit. How many times have you gone to grab a bandaid, only to find you used the last one, or you’re out of antibiotic creams?  I know it’s happened to me quite a bit. I suggest going through your first aid kit about once a month, and adding any items running low, or missing, to your shopping list. You don’t want to be stuck in an emergency situation and find yourself unprepared. 

    Home First Aid Kit

    Now where do you start when putting together a first aid kit? To get you started here is what I keep in ours:

    • – bandaids, different sizes
    • – gauze
    • – gauze tape
    • -antibiotic cream
    • – vaseline
    • – anti-itch cream
    • thermometer
    • – tweezers (I still need to buy some new ones)
    • – small scissors
    • – cotton balls or swabs
    • – hand sanitizer
    • any medications your family takes 

    The last one is where your First Aid kit will differ from others. We don’t have any regular meds to take, but I do like to keep ibuprofen and infants and children’s Pain Reliever in ours.

    Once you have all the items for your kit, you’ll want something to put it all in. I love my carrying case. It’s pretty similar to one my mom kept in our cupboard growing up – but until I found one for our family, I didn’t realize it’s meant to be a makeup box. That explains the mirror. Everything fits so nicely in it though!
     
     
    What’s in YOUR First Aid Kit? Leave me a comment letting me know what I might be missing!
  • Budget Wall Art: Love Is Spoken Here

    Budget Wall Art: Love Is Spoken Here

    When budgets are tight, but you need some inspiration or beauty added to your life, a little bit of DIY Wall Art is all you need. 

    Budget wall art you can love looking at.

    Related Content:

    1. Frame Your Own Canvas
    2. How to Hang Art Like the Pros
    3. Star Map Art

    I pretty much spent my day yesterday looking at the wall in our front room. We had this large bare spot that needed something, but a framed picture would’ve looked too cluttered.  We got to thinking about vinyl lettering and decided we’d go that route.  Then Mark came up with the brilliant idea to just paint it.  It would be a lot cheaper, and could actually fit into our budget.

    The first step was designing what we wanted.  I knew it would say “Love is Spoken Here”, but I still needed a good font.  After playing around for a bit with the fonts, Mark sat down, and in 5 minutes had the whole design done on photoshop.

    Make some budget wall art for the home.
     
    To humor Mark, and because not many people will make the connection, the font and star are taken from his favorite band – Smashing Pumpkins. The next step was finding someone to print our 2-foot by 3-foot design.  We went with AlphaGraphics for just under $4! Now that’s a deal.
     
    After picking up the poster, I taped it up on the wall and marked the corners where I wanted the final image to be. 
    Wall art on a budget
    Once I had it where I wanted it, I removed it from the wall to cut out the letters, creating a stencil. Anywhere the white wasn’t attached (middle of R), I laid some tape on to keep it in place.  Then it was back on the wall.
    make budget wall art with your own stencil
    At this point, I then used a pencil to trace the whole design right on to the wall. Finally the fun part! Painting. We used some black acrylic paint that we already had on hand. Mark helped for a little bit until Rosalina woke up from her nap. At that point I got Venice and Chloe to help take some pictures. 
    Making wall art on a budget is simple.
    After we took the stencil off, I went back around a few of the edges with a fine brush. This helped fix where some of the paint dripped or seeped through the paper.
     
    It only took about 5-hours from start to finish but was worth every minute and the neck ache. Did you notice my yard sale find? I picked that candle holder up knowing that this was exactly where it would be going!